
3 hours later…I marked the lengths of the sao fingerboard curve as described in “Shamisen of Japan” to use as a sanding guide for my strokes and pressure, frequently checking with a straight edge and a ruler. Once my measurements hit the average measurement indicated, I glued on the rosewood fingerboard. It is now ready to be shaped!
While that is drying I’m going to let it sit over night. Meanwhile I prepared the templates for the dou curvature. I’m not ready to wield the angle grinder just yet but with these cut I’m one step closer. I might use the angle grinder for the saruo as well.

1 Like
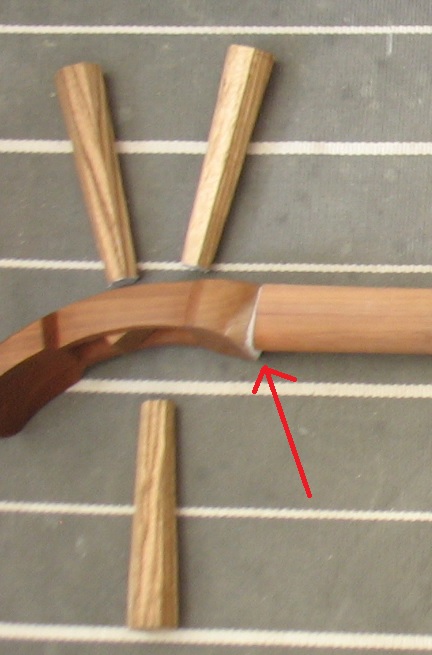
So after gluing panels on a 41mm wide sao…I found this.
Kyle Abbott
"Ah, good question! It is just as you wrote it. On average, the very top of the sao is about 3cm and the width of the sauro is about 3.5cm.
Keep in mind, it doesn’t have to be exactly 3cm/3.5cm wide. It really all depends on the maker’s tastes. Some makers make the sao 28mm wide, sometimes it’s 33mm wide. Likewise, sometimes the saruo is wider than 3.5cm, sometimes it’s narrower. Shape it however it feels best for you. "
For sake of a more consistant wood grain I guess I’ll cut them off.
Oh, interesting. Where did you find that?
I understood the measurements to be for the top part of the sao at the saruo, like so:
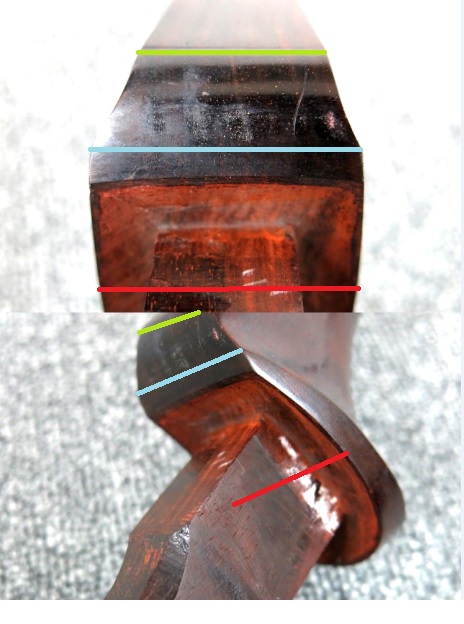
The green line being from 28mm-30-35mm wide, the red line being 50mm (I ended up with 44mm or less, I don´t remember) and the blue line being something in between green and red measurements. Yes, the saruo was the part I was most ticked about :))) But I guess that the main point in the build is, as long as it holds, carve the shape into whatever you like 
Just another example on the Akatsuki shamisen. (I don´t own it, just borrowed the picture  )
)
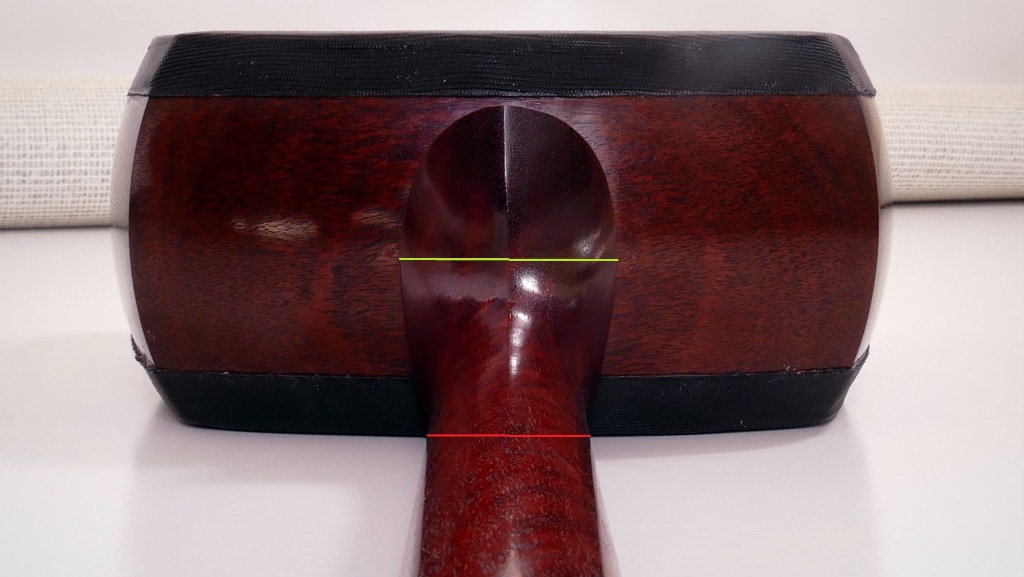
Hope this helps!
2 Likes
Thanks for the examples.That does help a lot.There’s been a lack of detail on this part. In some cases it appears the saruo is no wider then the widest point of the sao, yet in others the flare out at the base of the saruo is obviously wider the the rest of the sao. With a 30mm fingerboard, 33mm sao, and a 40mm saruo I think it will be alright.
<2 hours later…I cut the panels off the saruo and cut down the width of the sao with a bandsaw and saw rasp. And tapered it off with a belt sander toward the saruo. It’s starting to look more like it should. The sao is currently 36mm W x 37mm D, so I still have some padding.
2 more hours later… I started shaping the nakago joint and saruo and I realized I had a “happy accident” and “decided” I would streamline the saruo for more ergonomic access to the higher notes. At least that’s what I’m telling myself. I’m going to try and let what’s there, distract from whats missing. I’ve already gone for a more modern tenjin and plan to ridge the back of the sao so why not.
2 Likes
That’s the spirit. As someone who is fond of drawing, I frequently like to draw in pen without a pencil sketch underneath. This forces me to live with each mark, even unintended ones or lines that ended up differently than I had intended. This forces me to work with what I’ve got and has caused me to try different things or take drawings in totally different directions than I ever would have gone if I could have just erased everything I thought of as a mistake.
I also do this because I have a tendency toward being a perfectionist and if I can endlessly correct or “fix” things, I will. This is exacerbated when I draw digitally, because erasing/tweaking is super easy. Drawing in ink on paper removes that ability and forces me to actually complete things and to be more creative. Just have to keep pretending whiteout doesn’t exist…
3 Likes
I agree Mean Owl…I’ve used the drawing in ink analogy myself. Normally I do lots of material and tool tests but in this case with so much work ahead it seems best to ease my way into to each step as to just get into it without getting in over my head too quickly.
2 hours later…I shaped the back length of the sao. It took a chisel and saw rasp and a some sanding. My hands are sore today.
I still have to smooth out the sao to saruo transition but so far I’m very happy with it. Once I do that I can round the edge of the fingerboard, cut the tenon, and finish the nakago joint. I look forward to showing the sao but it’s not quite ready…Maybe sometime over the weekend.
One of the things that I noticed and did differently then in Shamisen of Japan was shaping the saruo first and then the sao. This gave me more to clamp to for chiseling the stubborn end grain.
2 Likes
Ah, the chiseling of the end grain… I could not believe that wood could get so hard. I thought it an impossible thing. This build helped me to focus on one thing at a time and get it done otherwise I would not get anywhere. Totally not my style!
2 Likes
If anyone is wondering, I haven’t thrown my sao in the wood chipper. The tenon is taking much longer to dial in then I anticipated and the shop has been very cold this week. The tenon is very close to done, and then I can sculpt the tenjin to the back of the sao.
I’m looking forward to the dou. I think the shaping will go quickly (or at least less stress) an then back to fitting joints…not so fun. Once I get that all together I’ll surely be clamping thin wood over the dou and playing it till I build the skin stretcher. hehe
My neighbour just got back from Okinawa and I can’t wait to show her!
2 Likes
Glad to see your Sao didn’t share the fate of Steve Buscemi in Fargo!
Can’t wait to see how it’s coming along, especially once the dou is added. Should look very pretty with all the different woods.
1 Like
I wonder how tight the mortise/tenon needs to be. The mortise and tenon itself is quite tight otherwise the closest I’m getting is 1mm gap all around. Or just enough to let light through. I’m thinking if the epoxy doesn’t fill it then use some saw dust to fill what is left. I 'm having trouble reducing the gap on the back even.
2 Likes
To fit the tenon took me super long  and the shavings I took towards the end were minuscule… My problem was mostly in getting the tenon to sit in the mortise and then few “bumps” in the rouded part of the tenjin and the “holowed” sao.
I used chalk to see if the tenjin sat around the tenon (don´t know how to describe it ) The parts that got marked were shaved off either from the tenon or the mortise until all was white. Truth be told, my joint is far from perfect
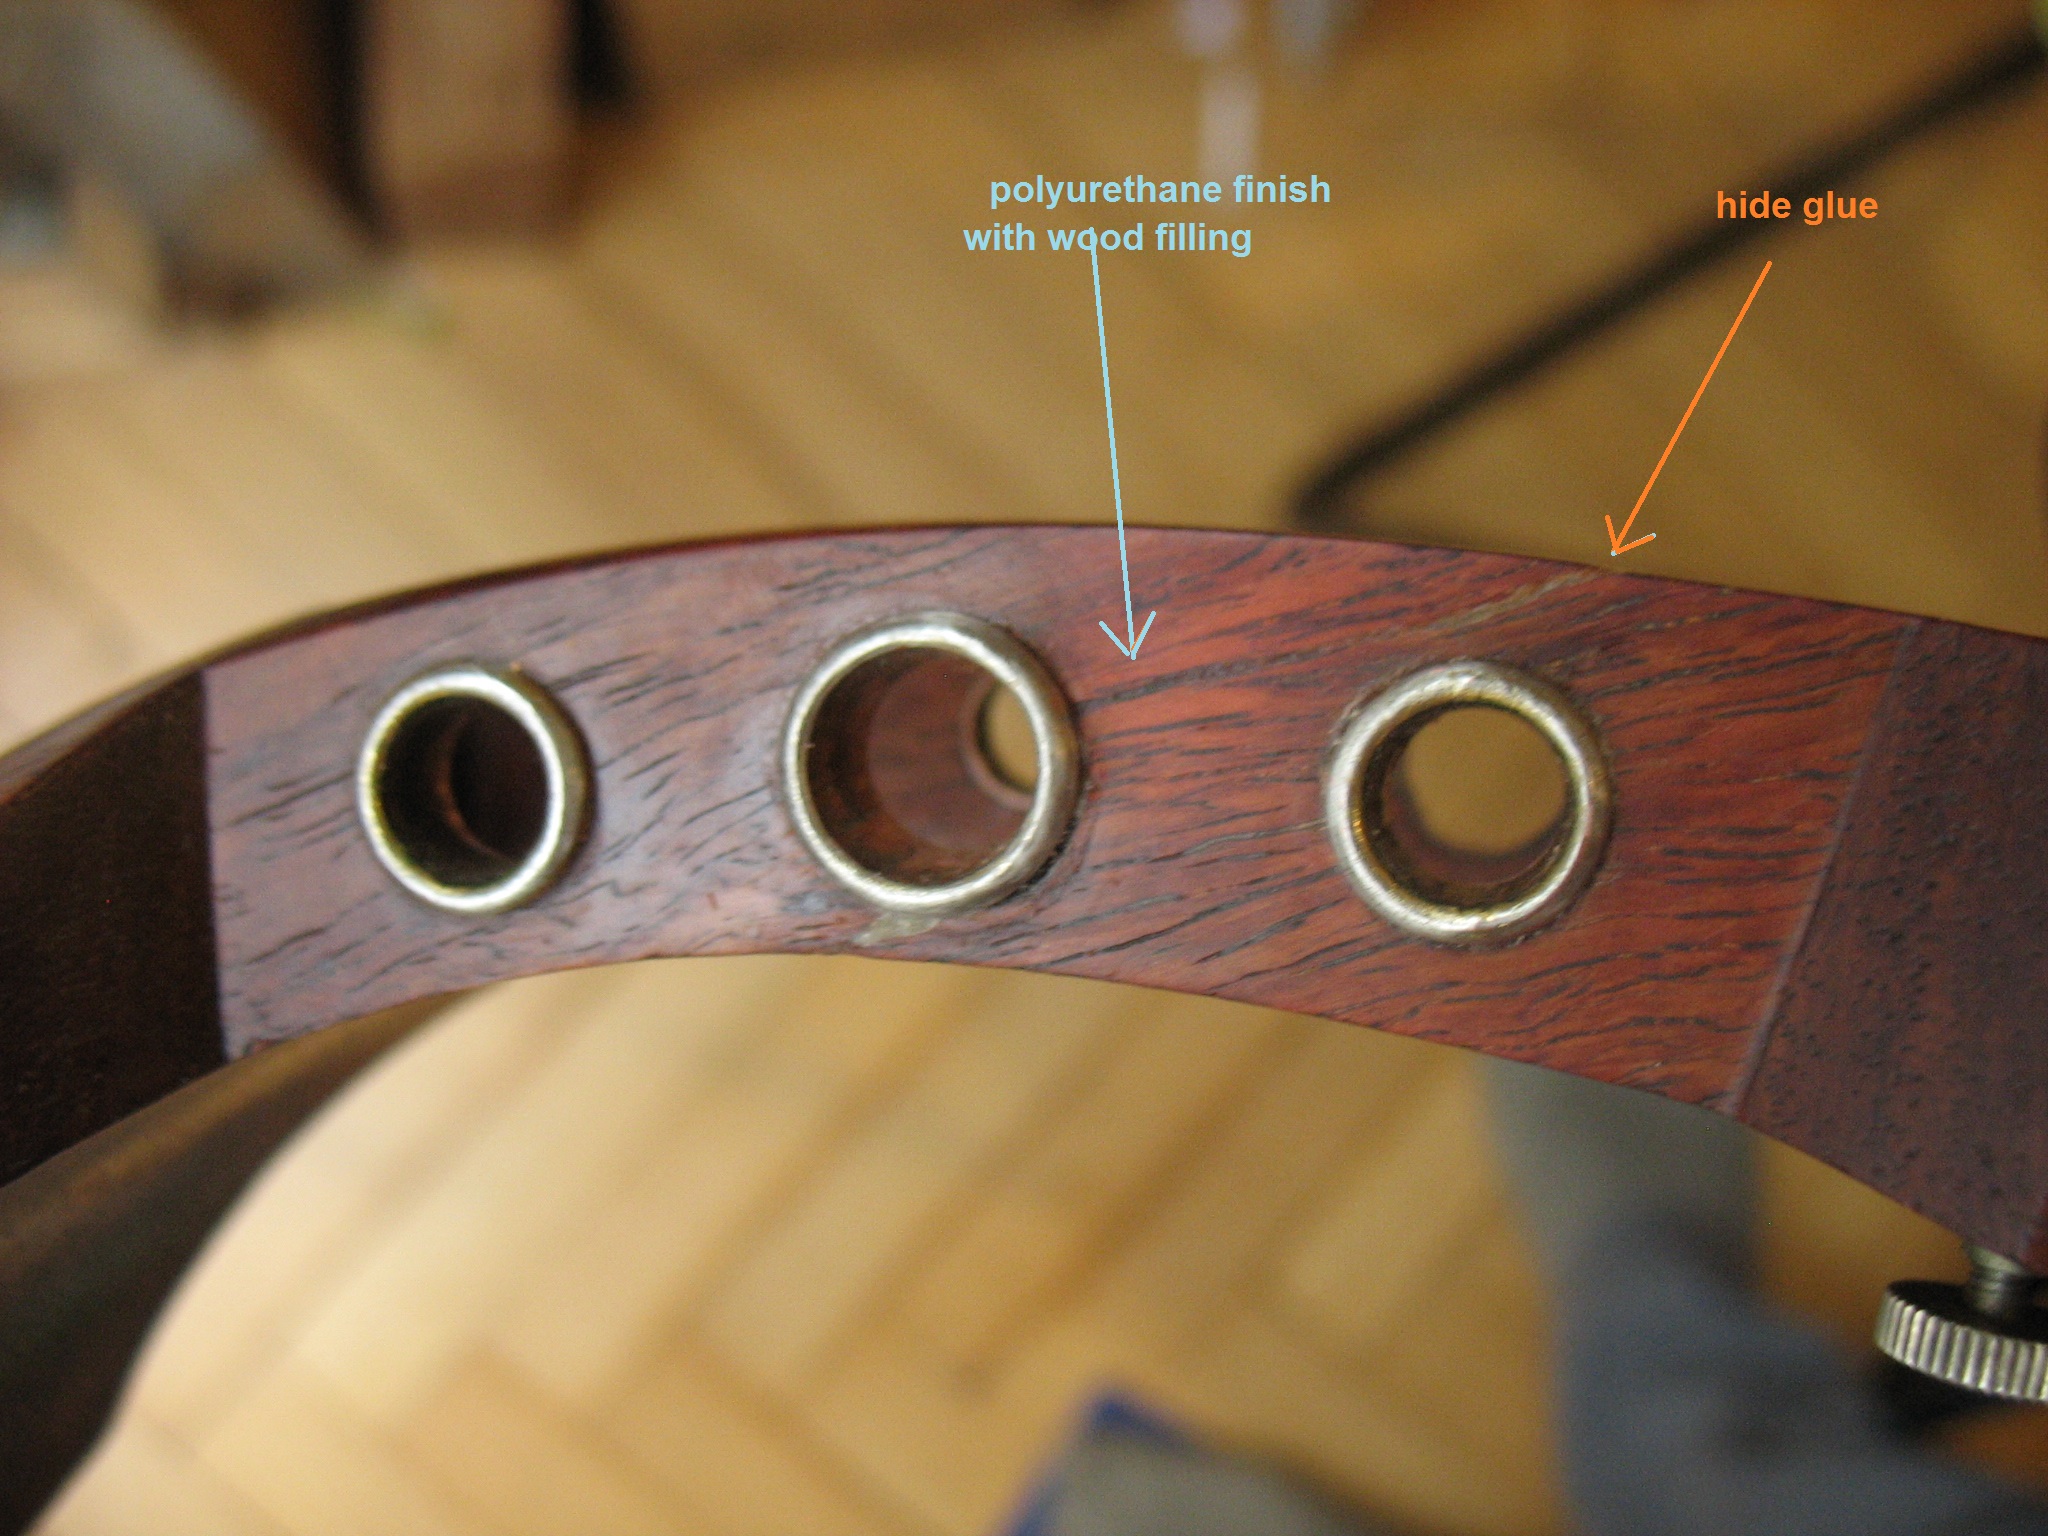
Also, polyurethane finish used instead of water in wet sanding works wonders in filling up gaps. I had the opportunity to try it out while repairing a cracked tenjin.
3 Likes
I considered using chalk, that’s a great suggestion, but only have colored chalk right now. I should test it on scraps and see how it cleans up.
I know I can get the joint tight eventually but possibly at the cost of shortening the sao, which might make finding the notes harder. Right now it’s close I supposed since the measurements in the book don’t go from kamigoma to koma. Also I’m worried about exposing the carbon rod which might be too hard to file. I think I left room but I’m not sure how much. I accidentally narrowed the widest part of the tenon trying to make it longer so I had to file a flat spot and glue on more wood which won’t be visible but makes the whole process drag on…I’m sure I’ll overcome it as I usually do.
Ah, you´re right, colored chalk on light wood can be tricky  and I forgot about the carbon rod… I won´t be of much help today.
Just don´t give up, maybe take a little break and have something nice to cheer you up and then continue 


2 Likes
Yeah I tested the blue chalk we have and it stains. Flour might as well be sugar. I did find that paper works wonders as a feeler gauge. I had to glue in a third piece of extra wood to get it tight without making it much shorter. It might be 5mm shorter then ideal but it’s tight and looks good. It is soooo close now that I’m into high grit sand paper and leveling largest surface areas till they meet. I can’t wait to finish this and move on. Impatience = break time. Haha
2 Likes
The impatience, I can feel that! 
I bet. Yours is sitting there just waiting to be skinned.
Not only have I never played a shamisen, I’ve never even seen one in person. I have everything I need to finish this except the sawari. I might buy one later.
Light is barely getting through the one tenjin joint, and the others are tight. I found a crack in the saruo and filled it with epoxy resin. Once it’s cured, I can wrestle with the sao some more and I’ll get back to tighting the gap.
1 Like