Masamune Shamisen Build - Pushing the Boundaries of Shamisen Design

Hello Bachido Community!

My name is Michael, and I have been a member of Bachido and following along the community for a number of years, though have never posted until now. I would just like to start sharing the details of a very personal and special shamisen build I have been working on for a number of years now, which I have named Masamune.

As a brief background, I originally got interested in shamisen over a decade ago, way back in high school. I had always been fascinated in instrument building, particularly Japanese instruments like the shakuhachi. Around that time I stumbled across tsugaru shamisen, and was immediately drawn to this incredible instrument. Having dabbled a bit with instrument building, and with very little money at the time, I was determined to make my own and learn to play. I eventually found that it was actually possible to build your own shamisen through some of Kyle’s very first videos. I subsequently reached out to him when he was right in the middle of writing Shamisen of Japan. I didn’t want to wait until the book was finished, so I decided to go it on my own. Looking at pictures and available videos online, I came up with a rough design for the instrument.

My first shamisen was very crude, made from red oak from Home Depot and skinned with calfskin, with little tools and experience, paid for through a part-time job at McDonald’s. Despite this, the shamisen has had an incredible impact on my life, and is largely in part where I am today. It has helped me make some incredible friends, gotten me through some tough times, and is even how I met my amazing wife. Shamisen has always been my favorite instrument, and because of it’s profound impact on me and my life, I always wanted to make a new, high end custom one for myself.

About 6 years ago, I began the plans for a new shamisen. I wanted something very unique and different from current shamisen out there, and something that reflects my own aesthetic. I had access to a local makerspace, equipped with a full suite of woodworking tools, where I spent many, many hours slowly bringing it to life.

The project has been going on and off since then, and I have shared details of the build with Kyle directly over the years, as well as friends and family, but haven’t shared it much beyond that. Now that I am fully committed to finally finishing this instrument, and am finally close, I have decided to start sharing the details more publicly and with the shamisen community.

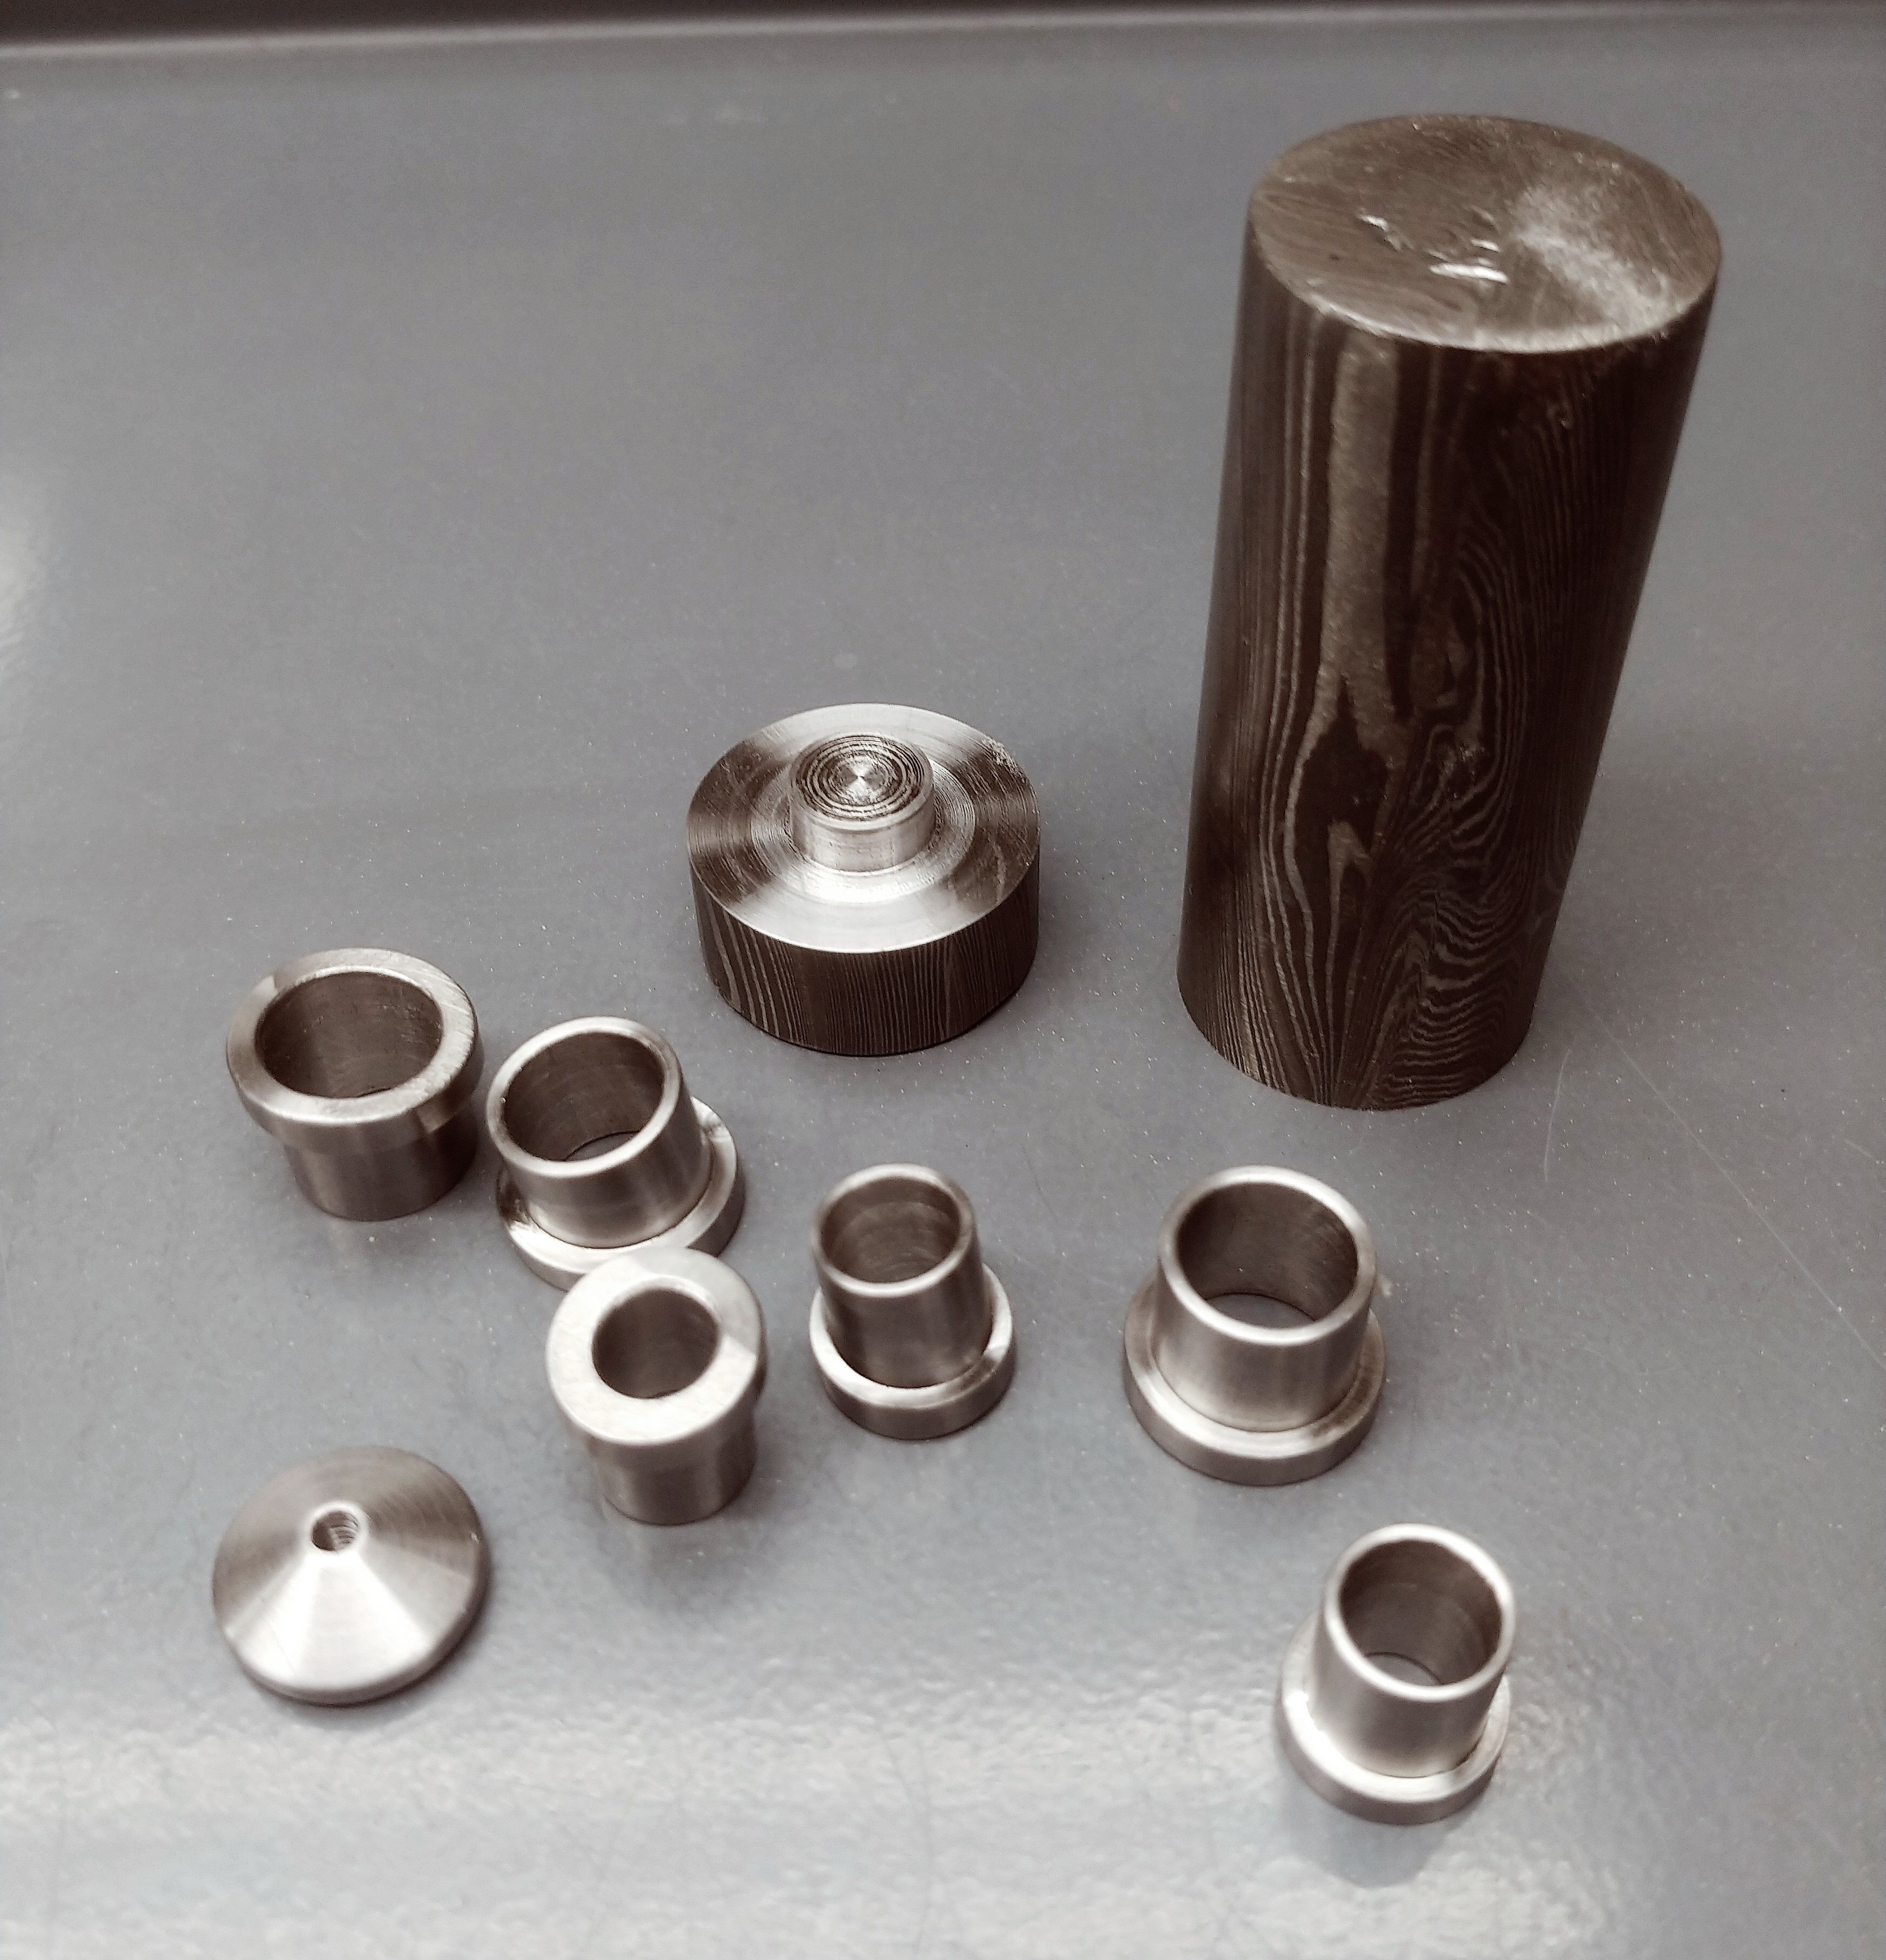
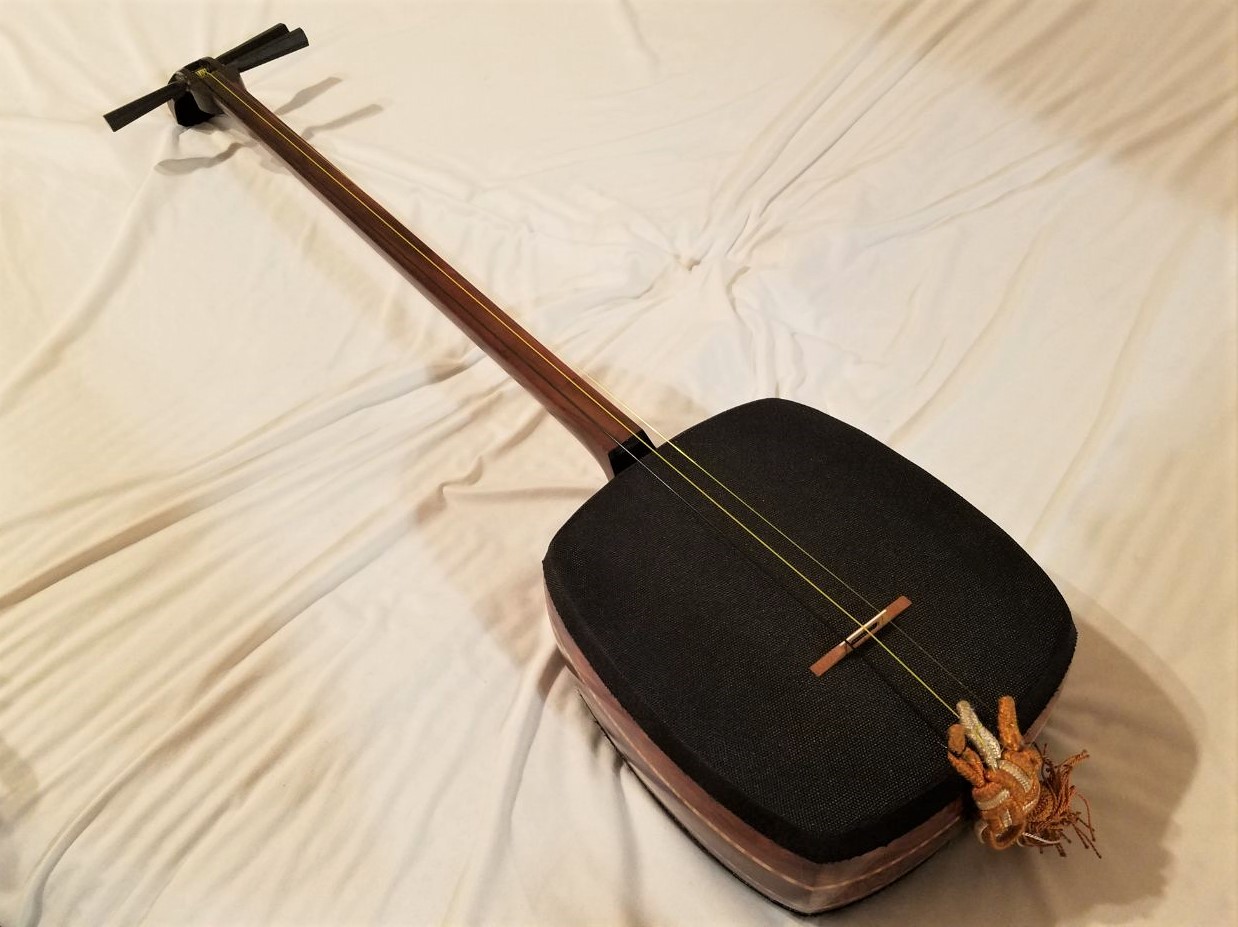
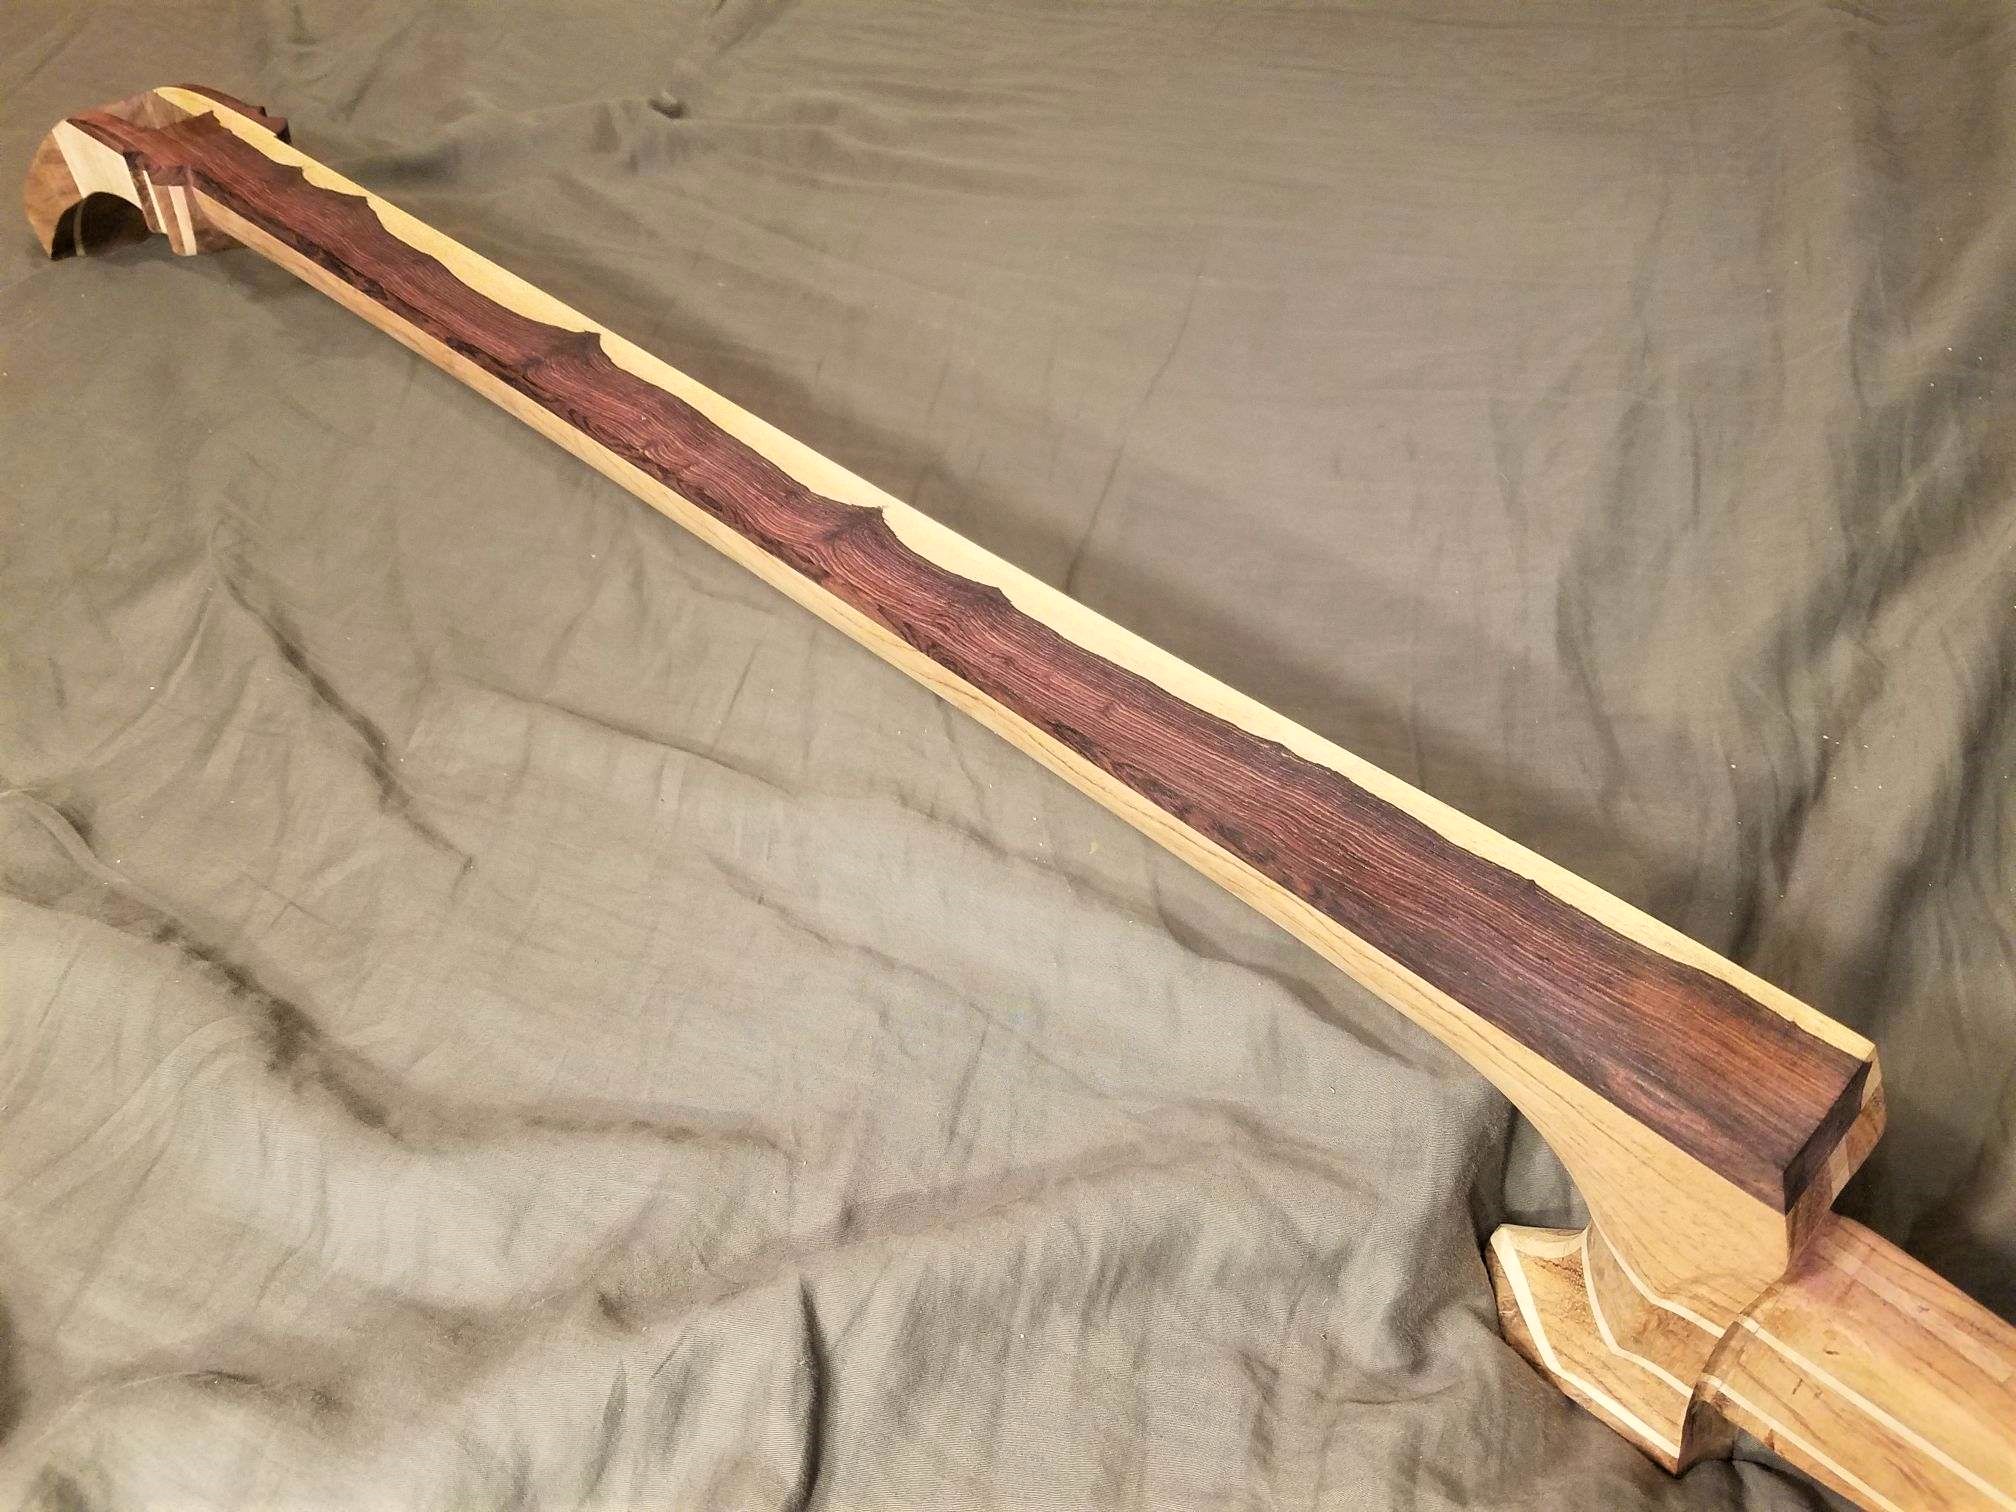
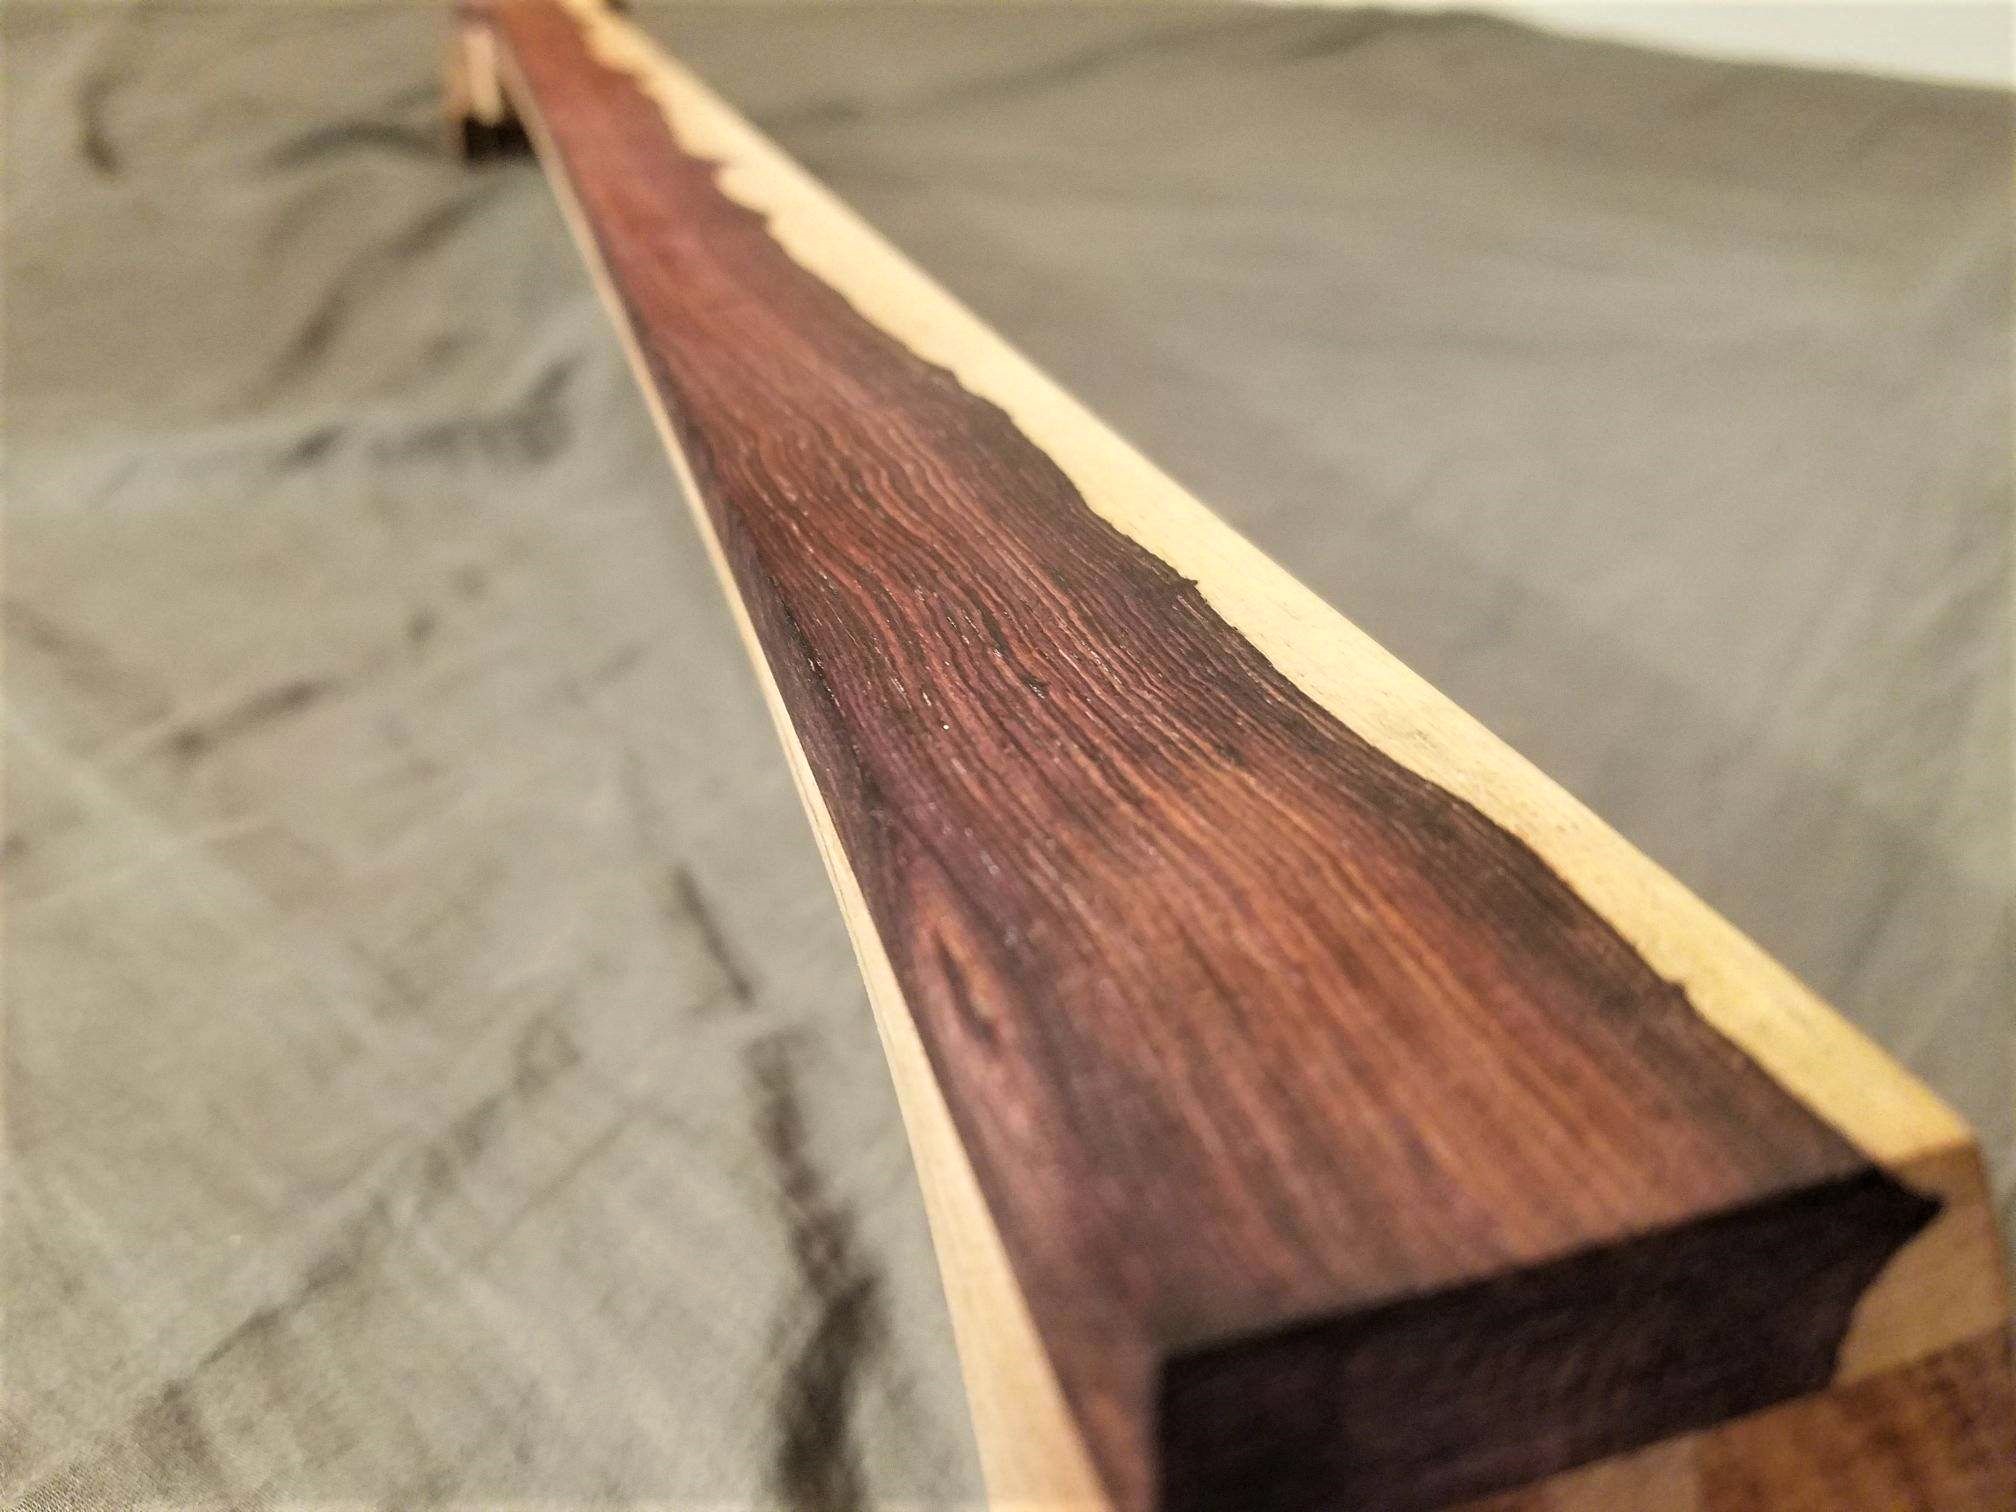
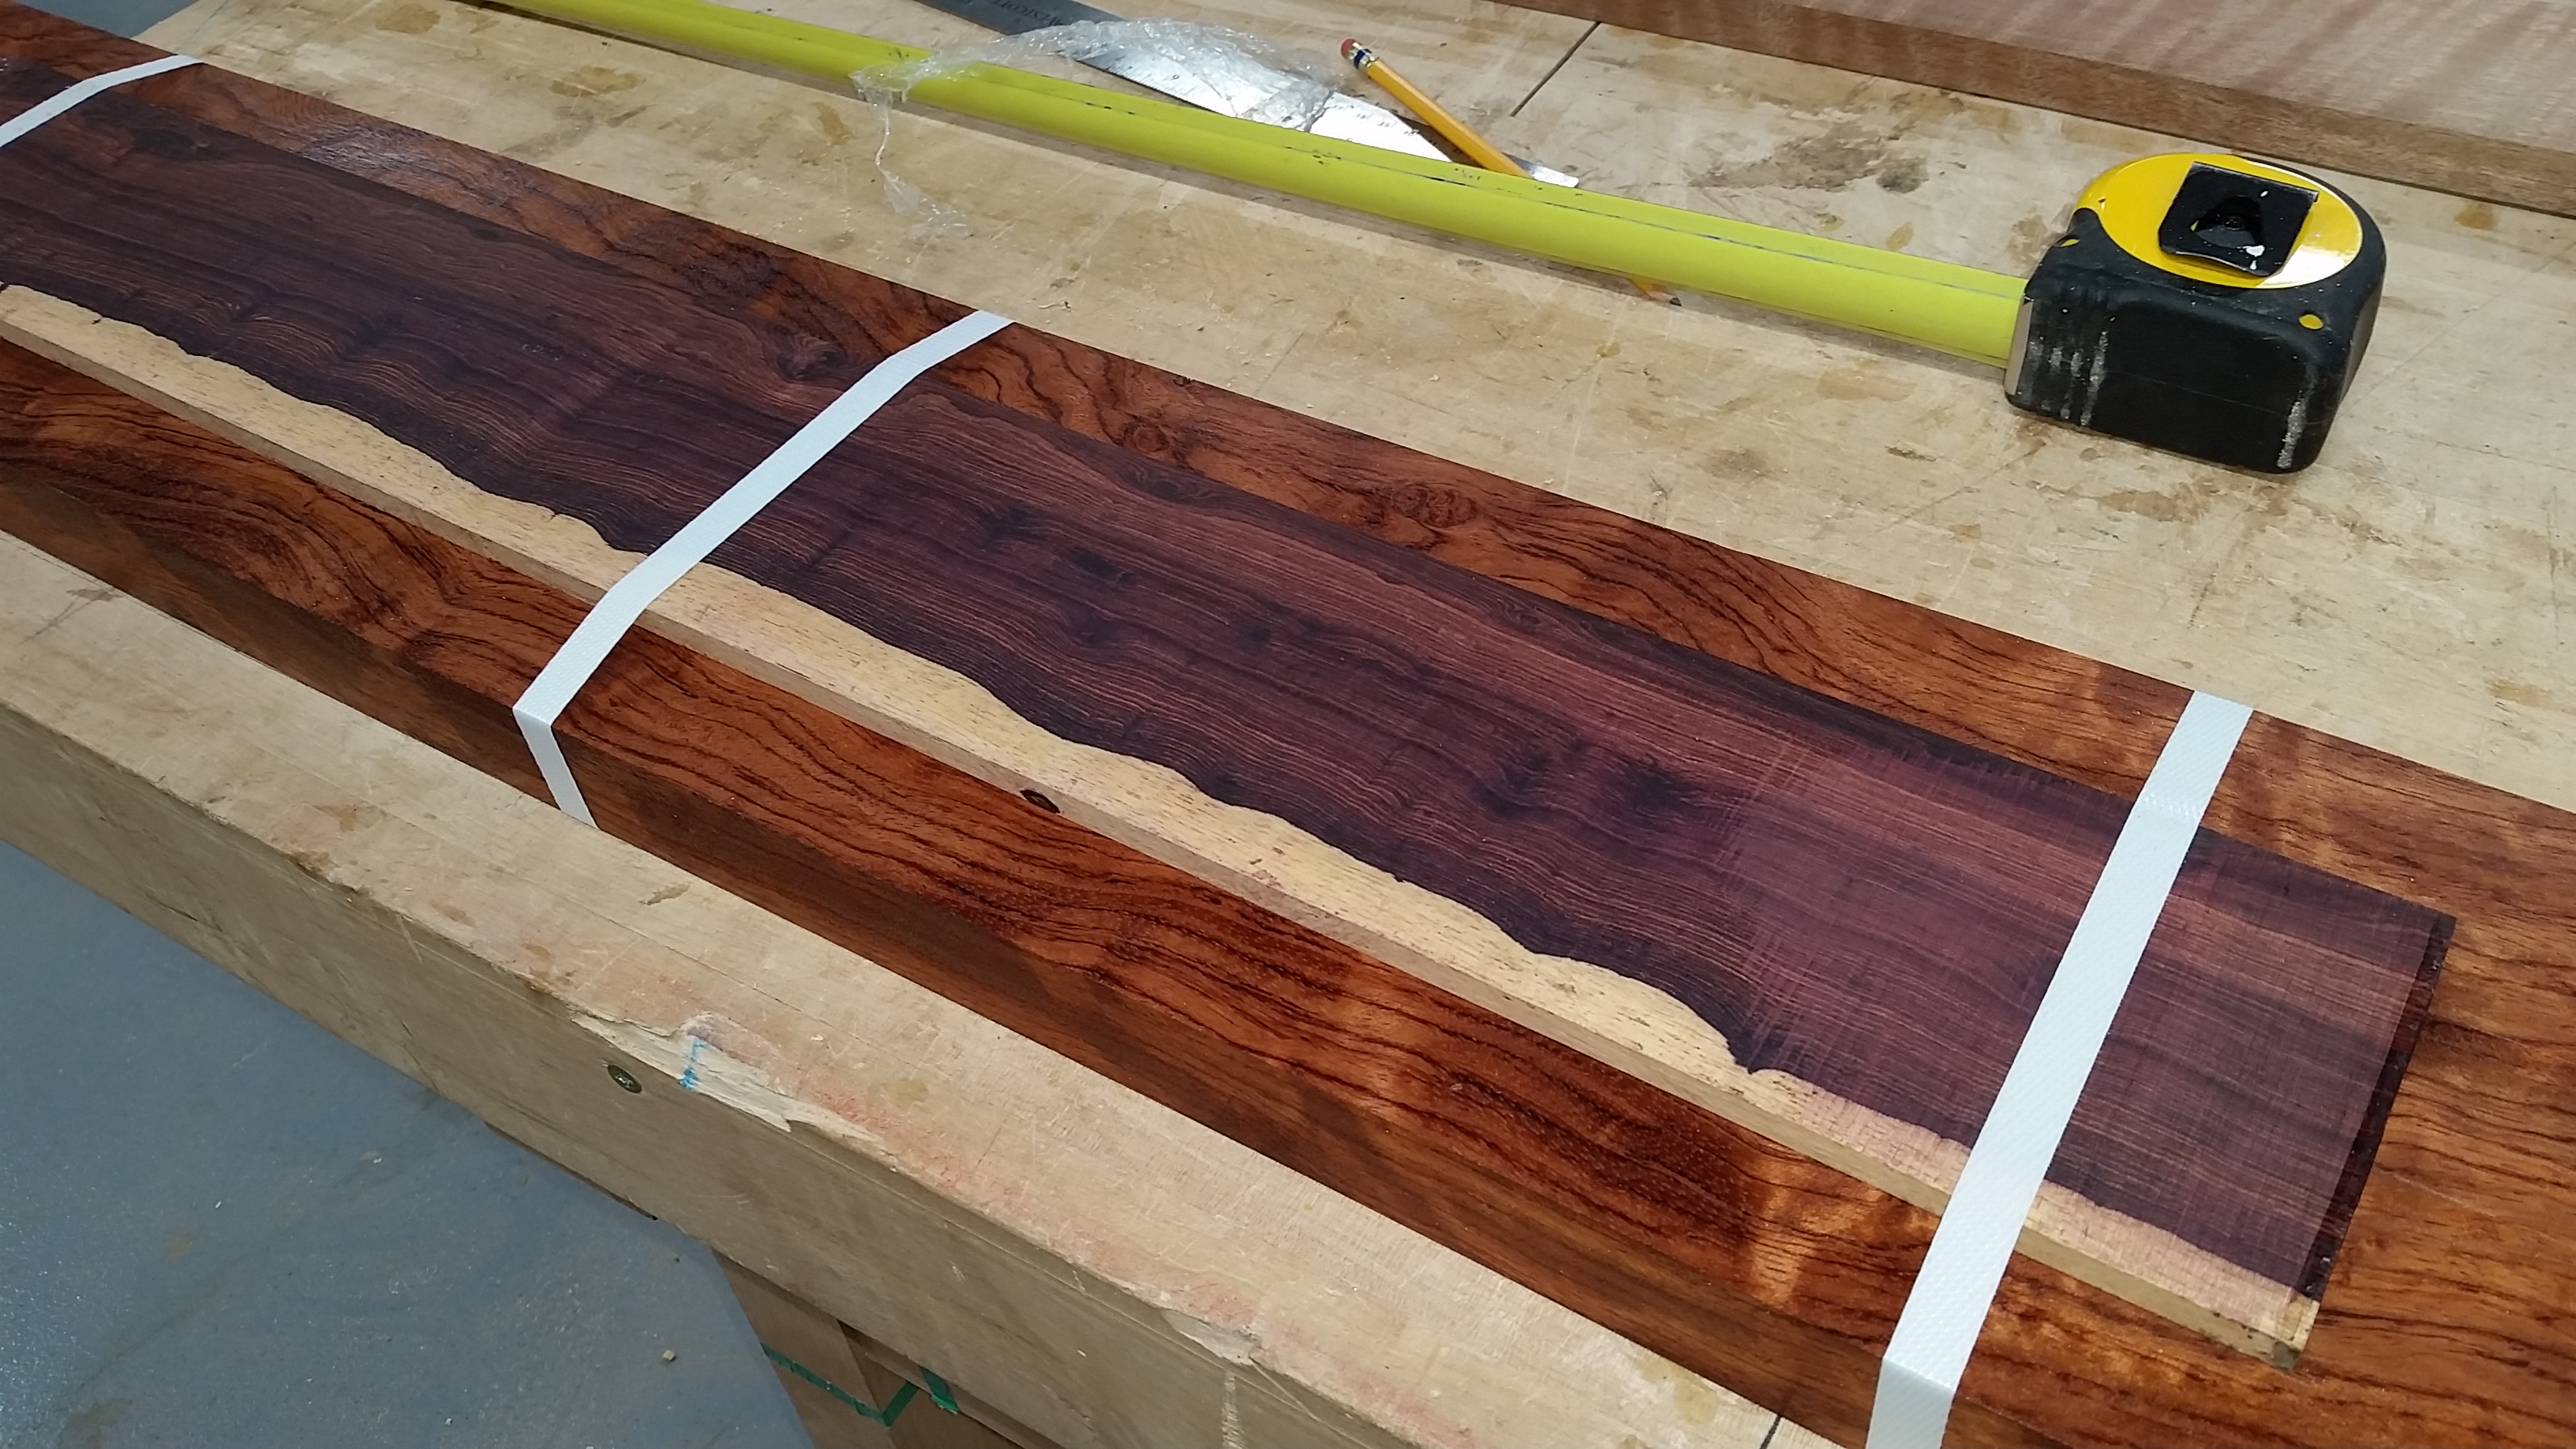
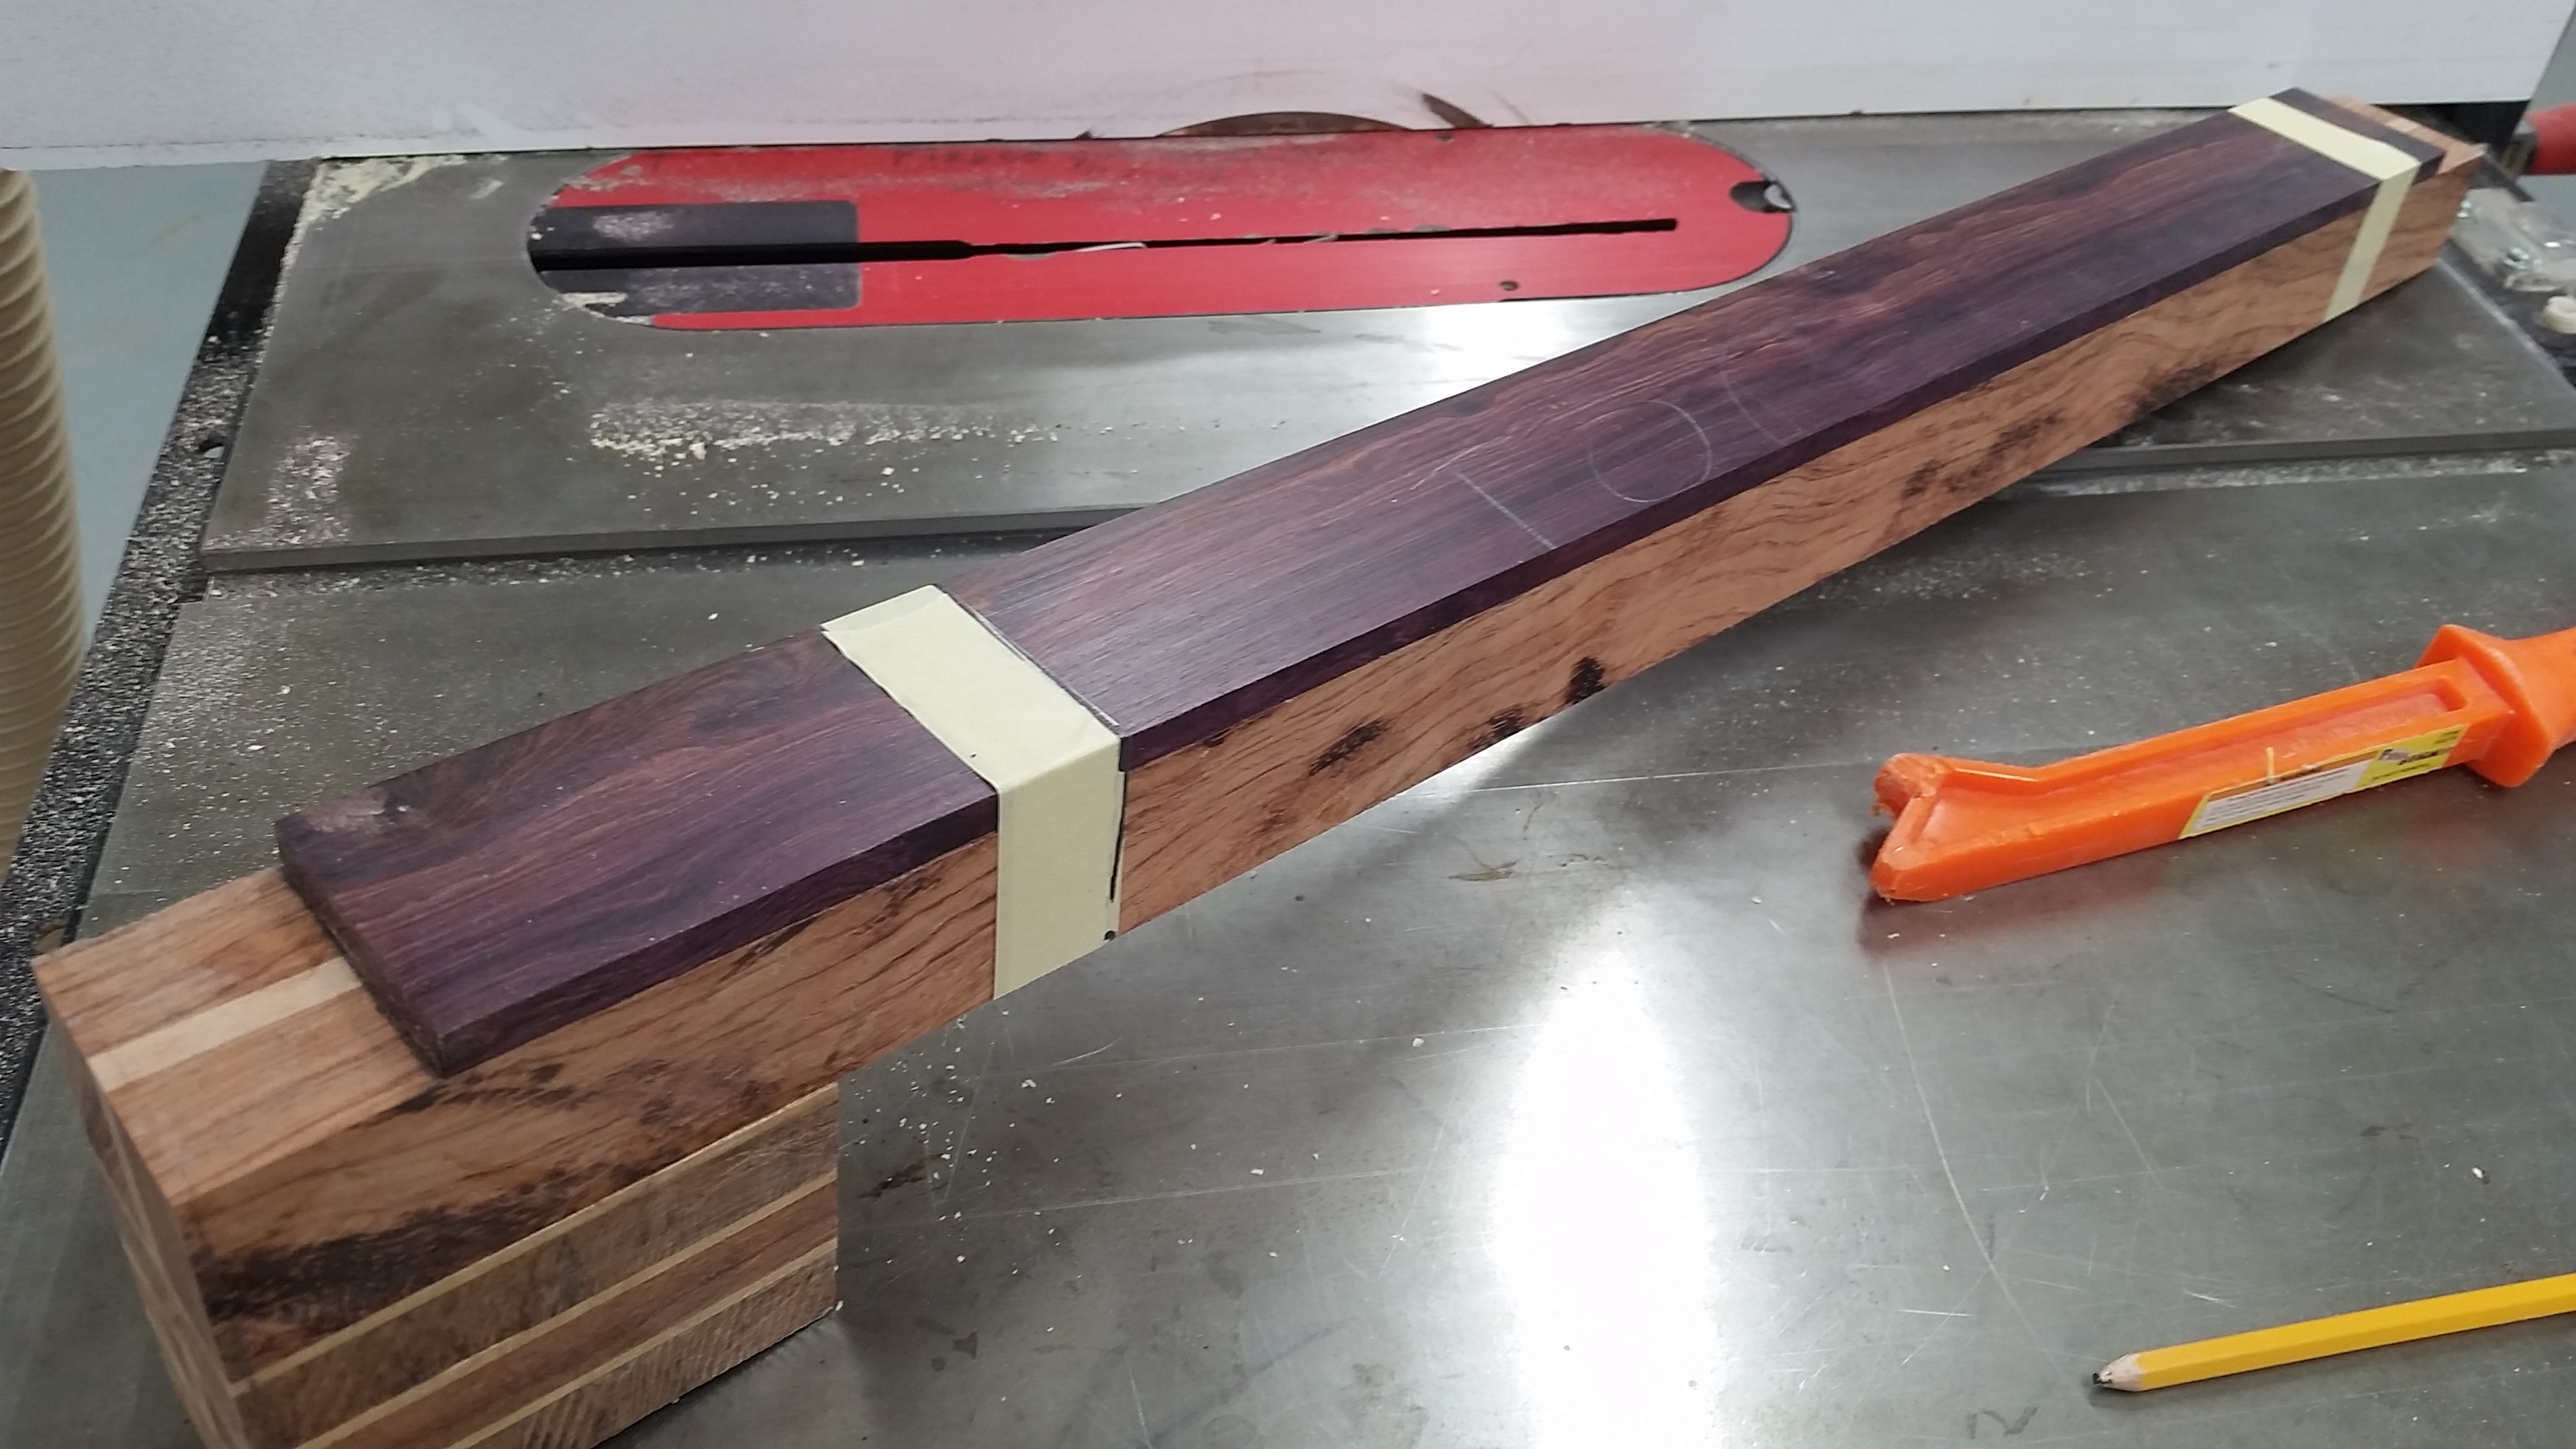
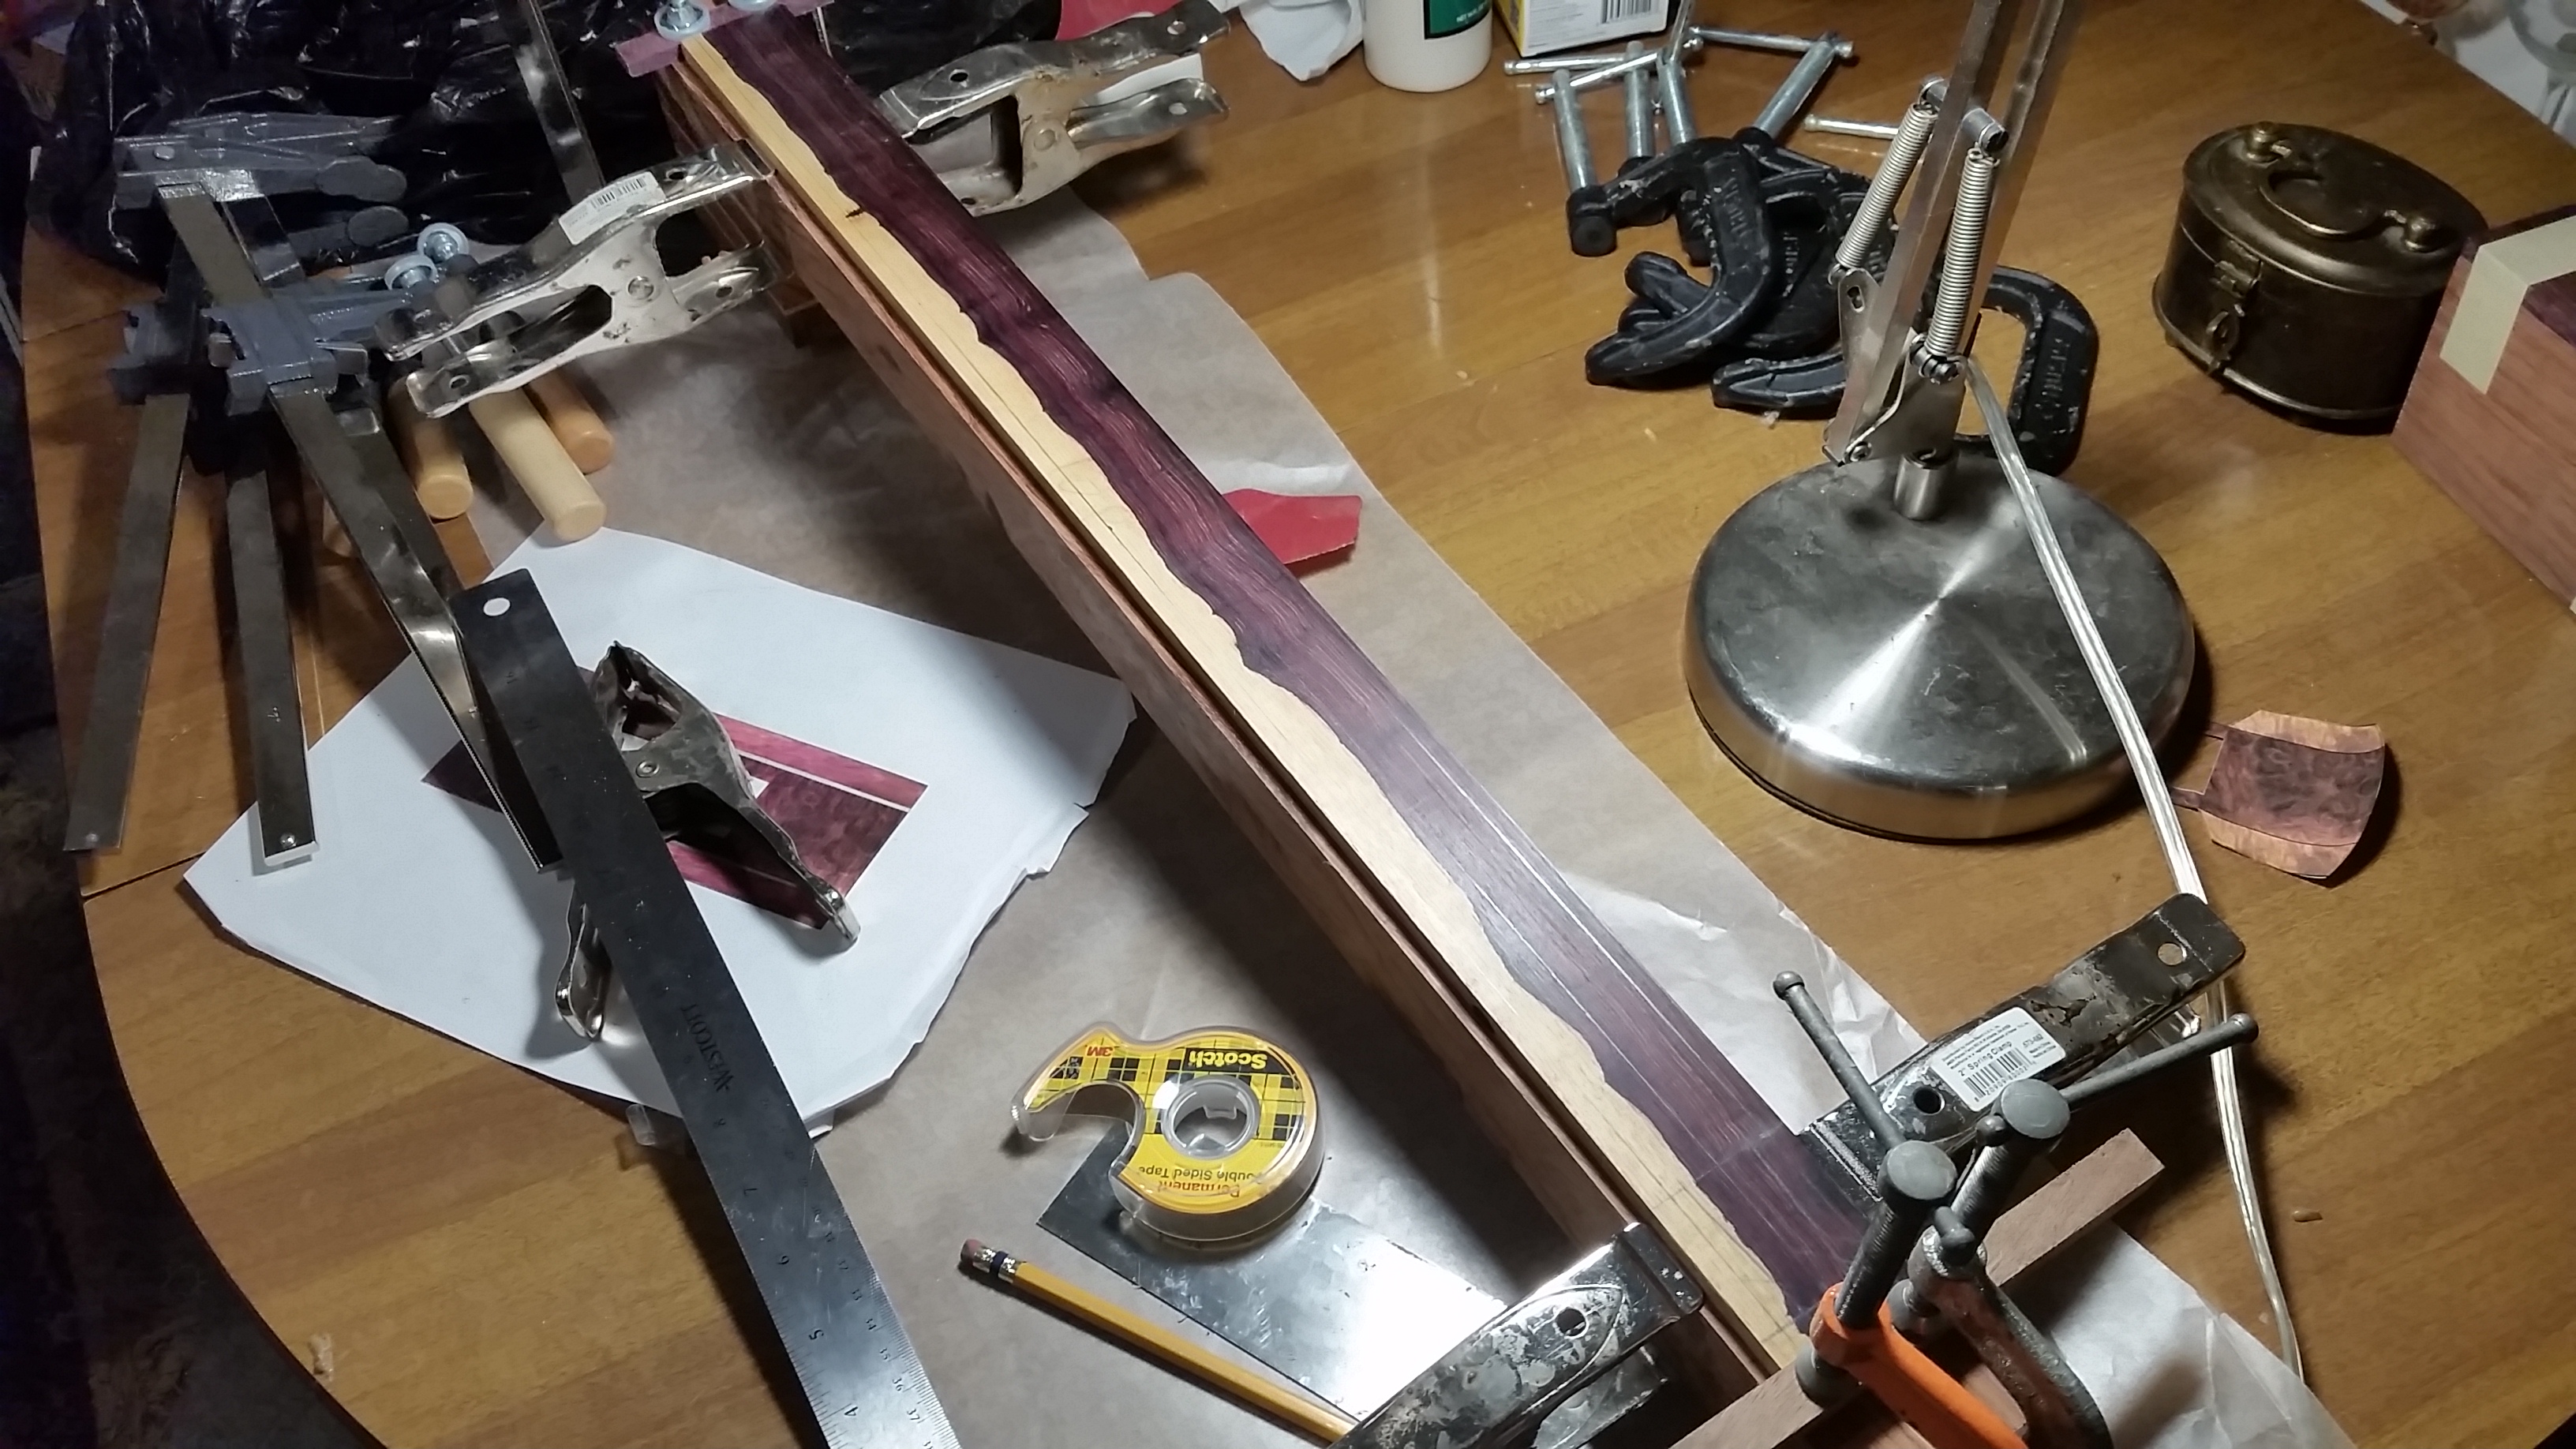
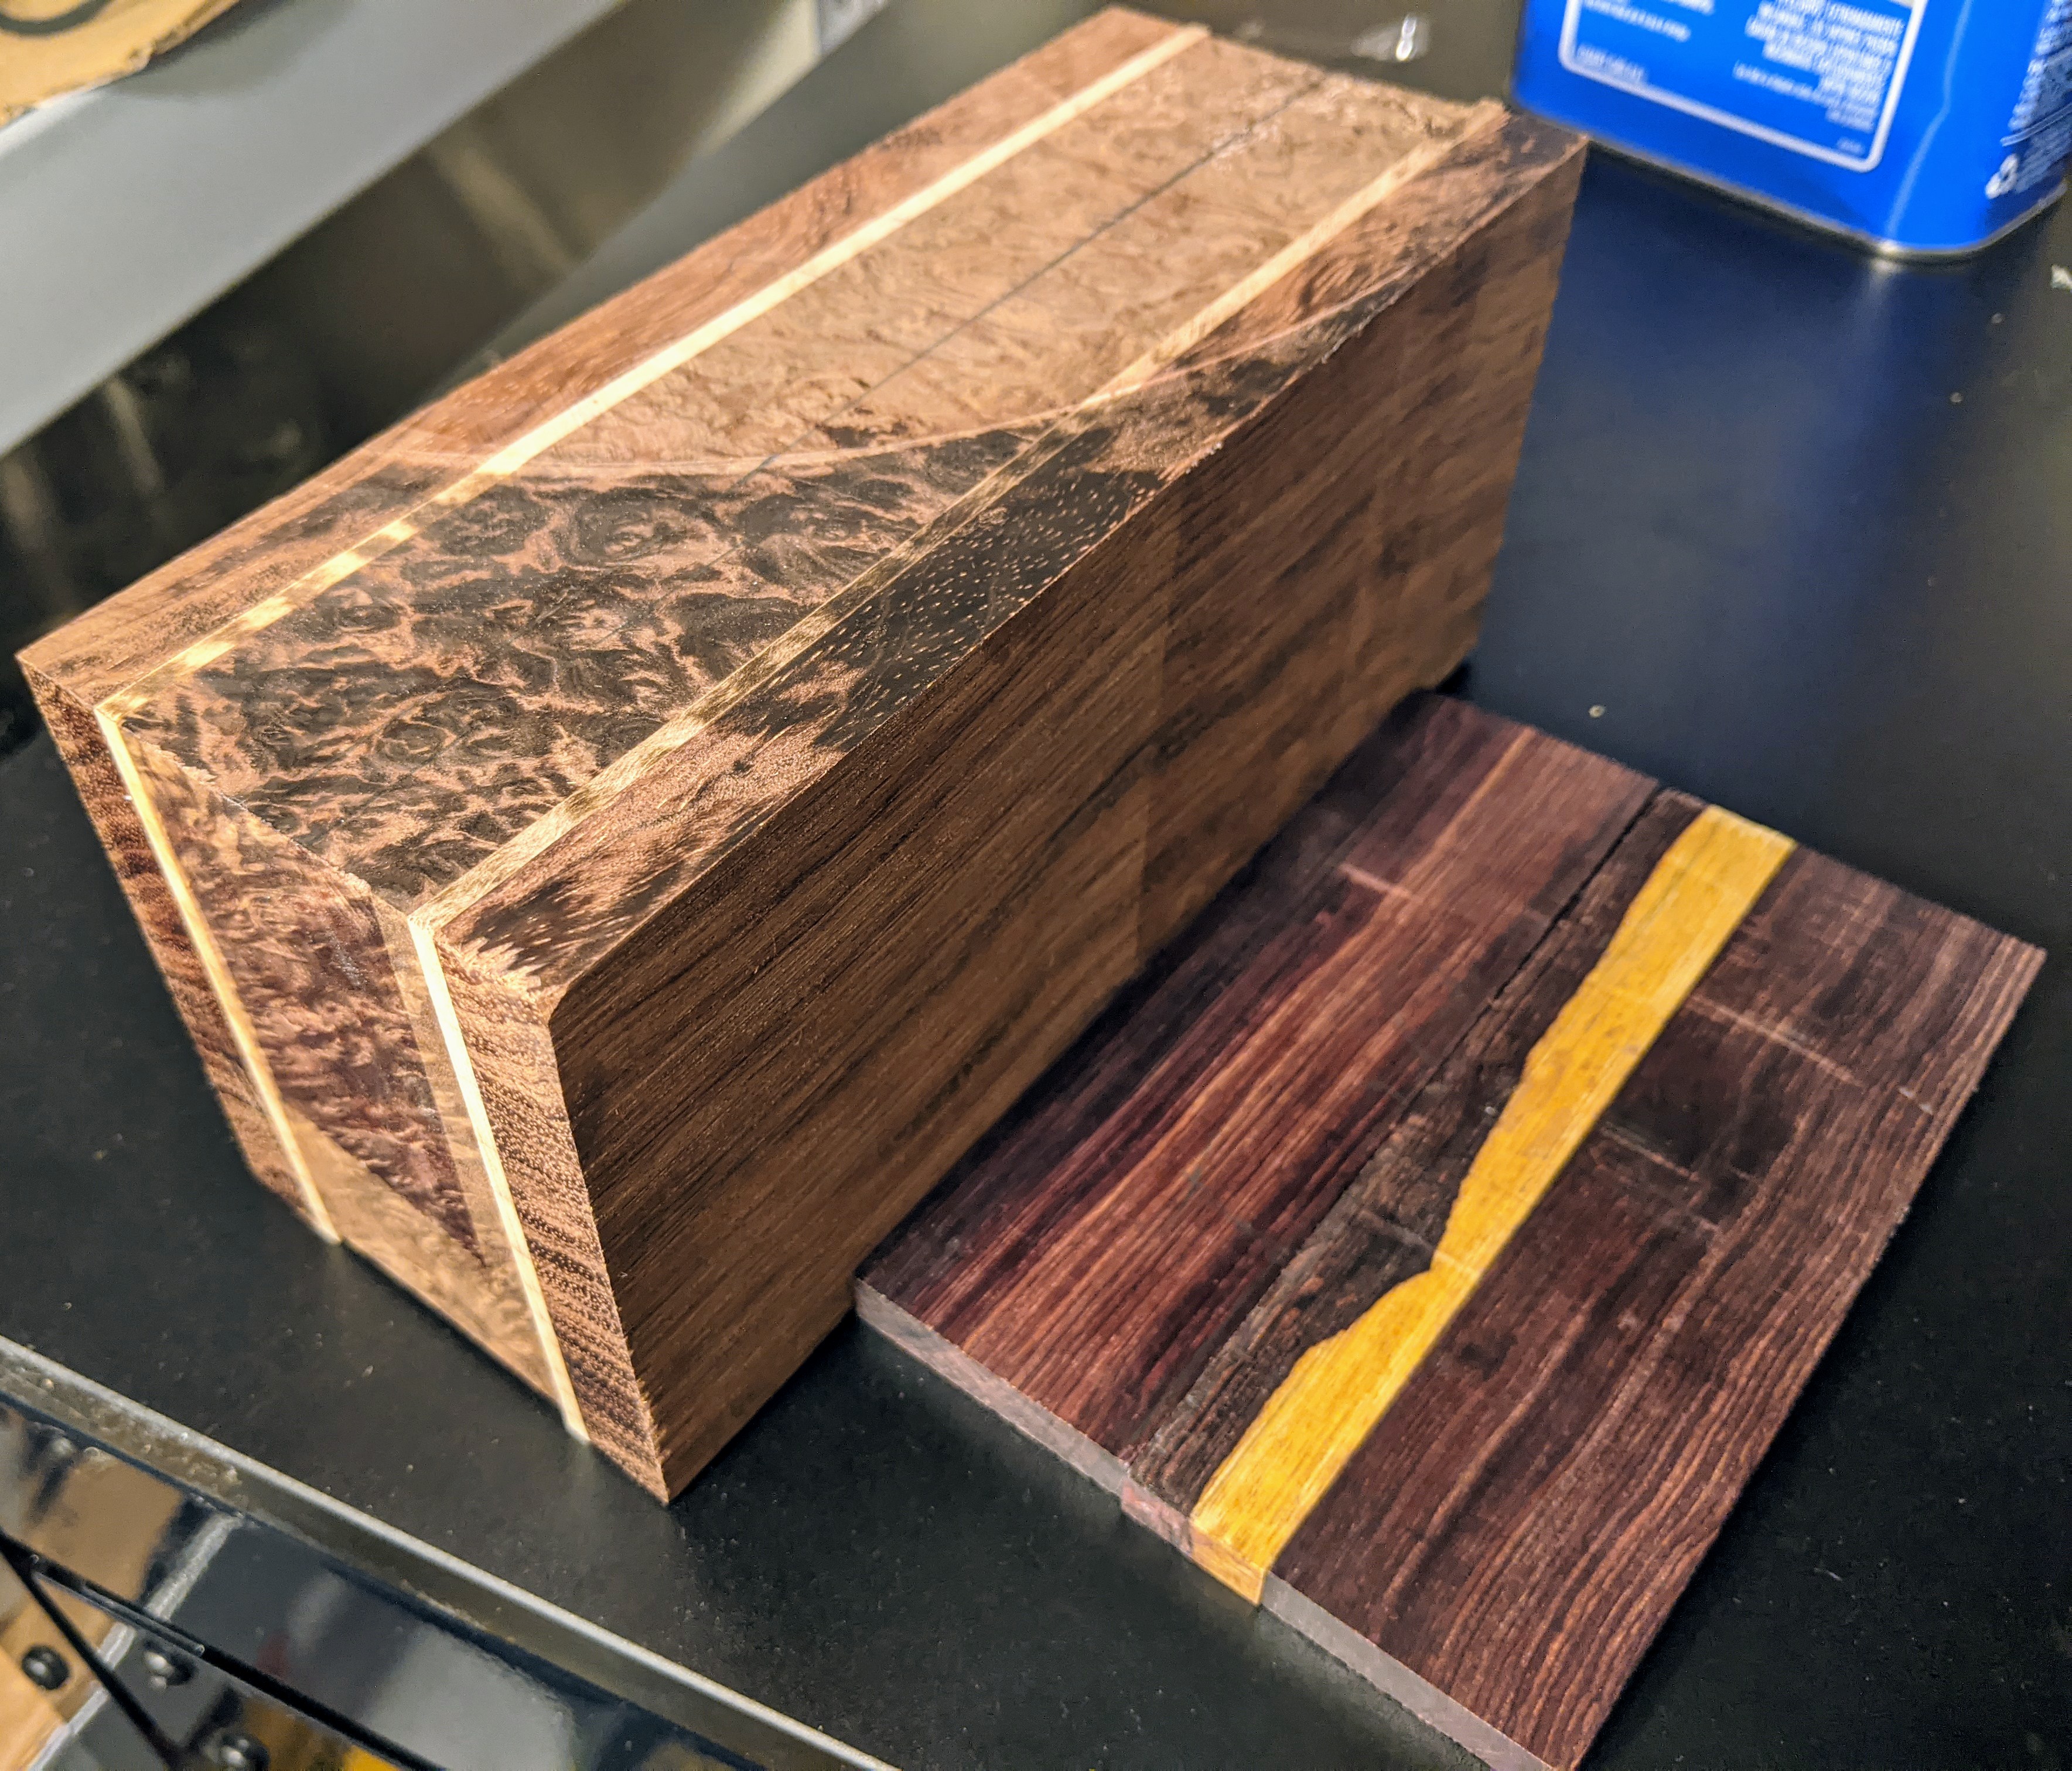
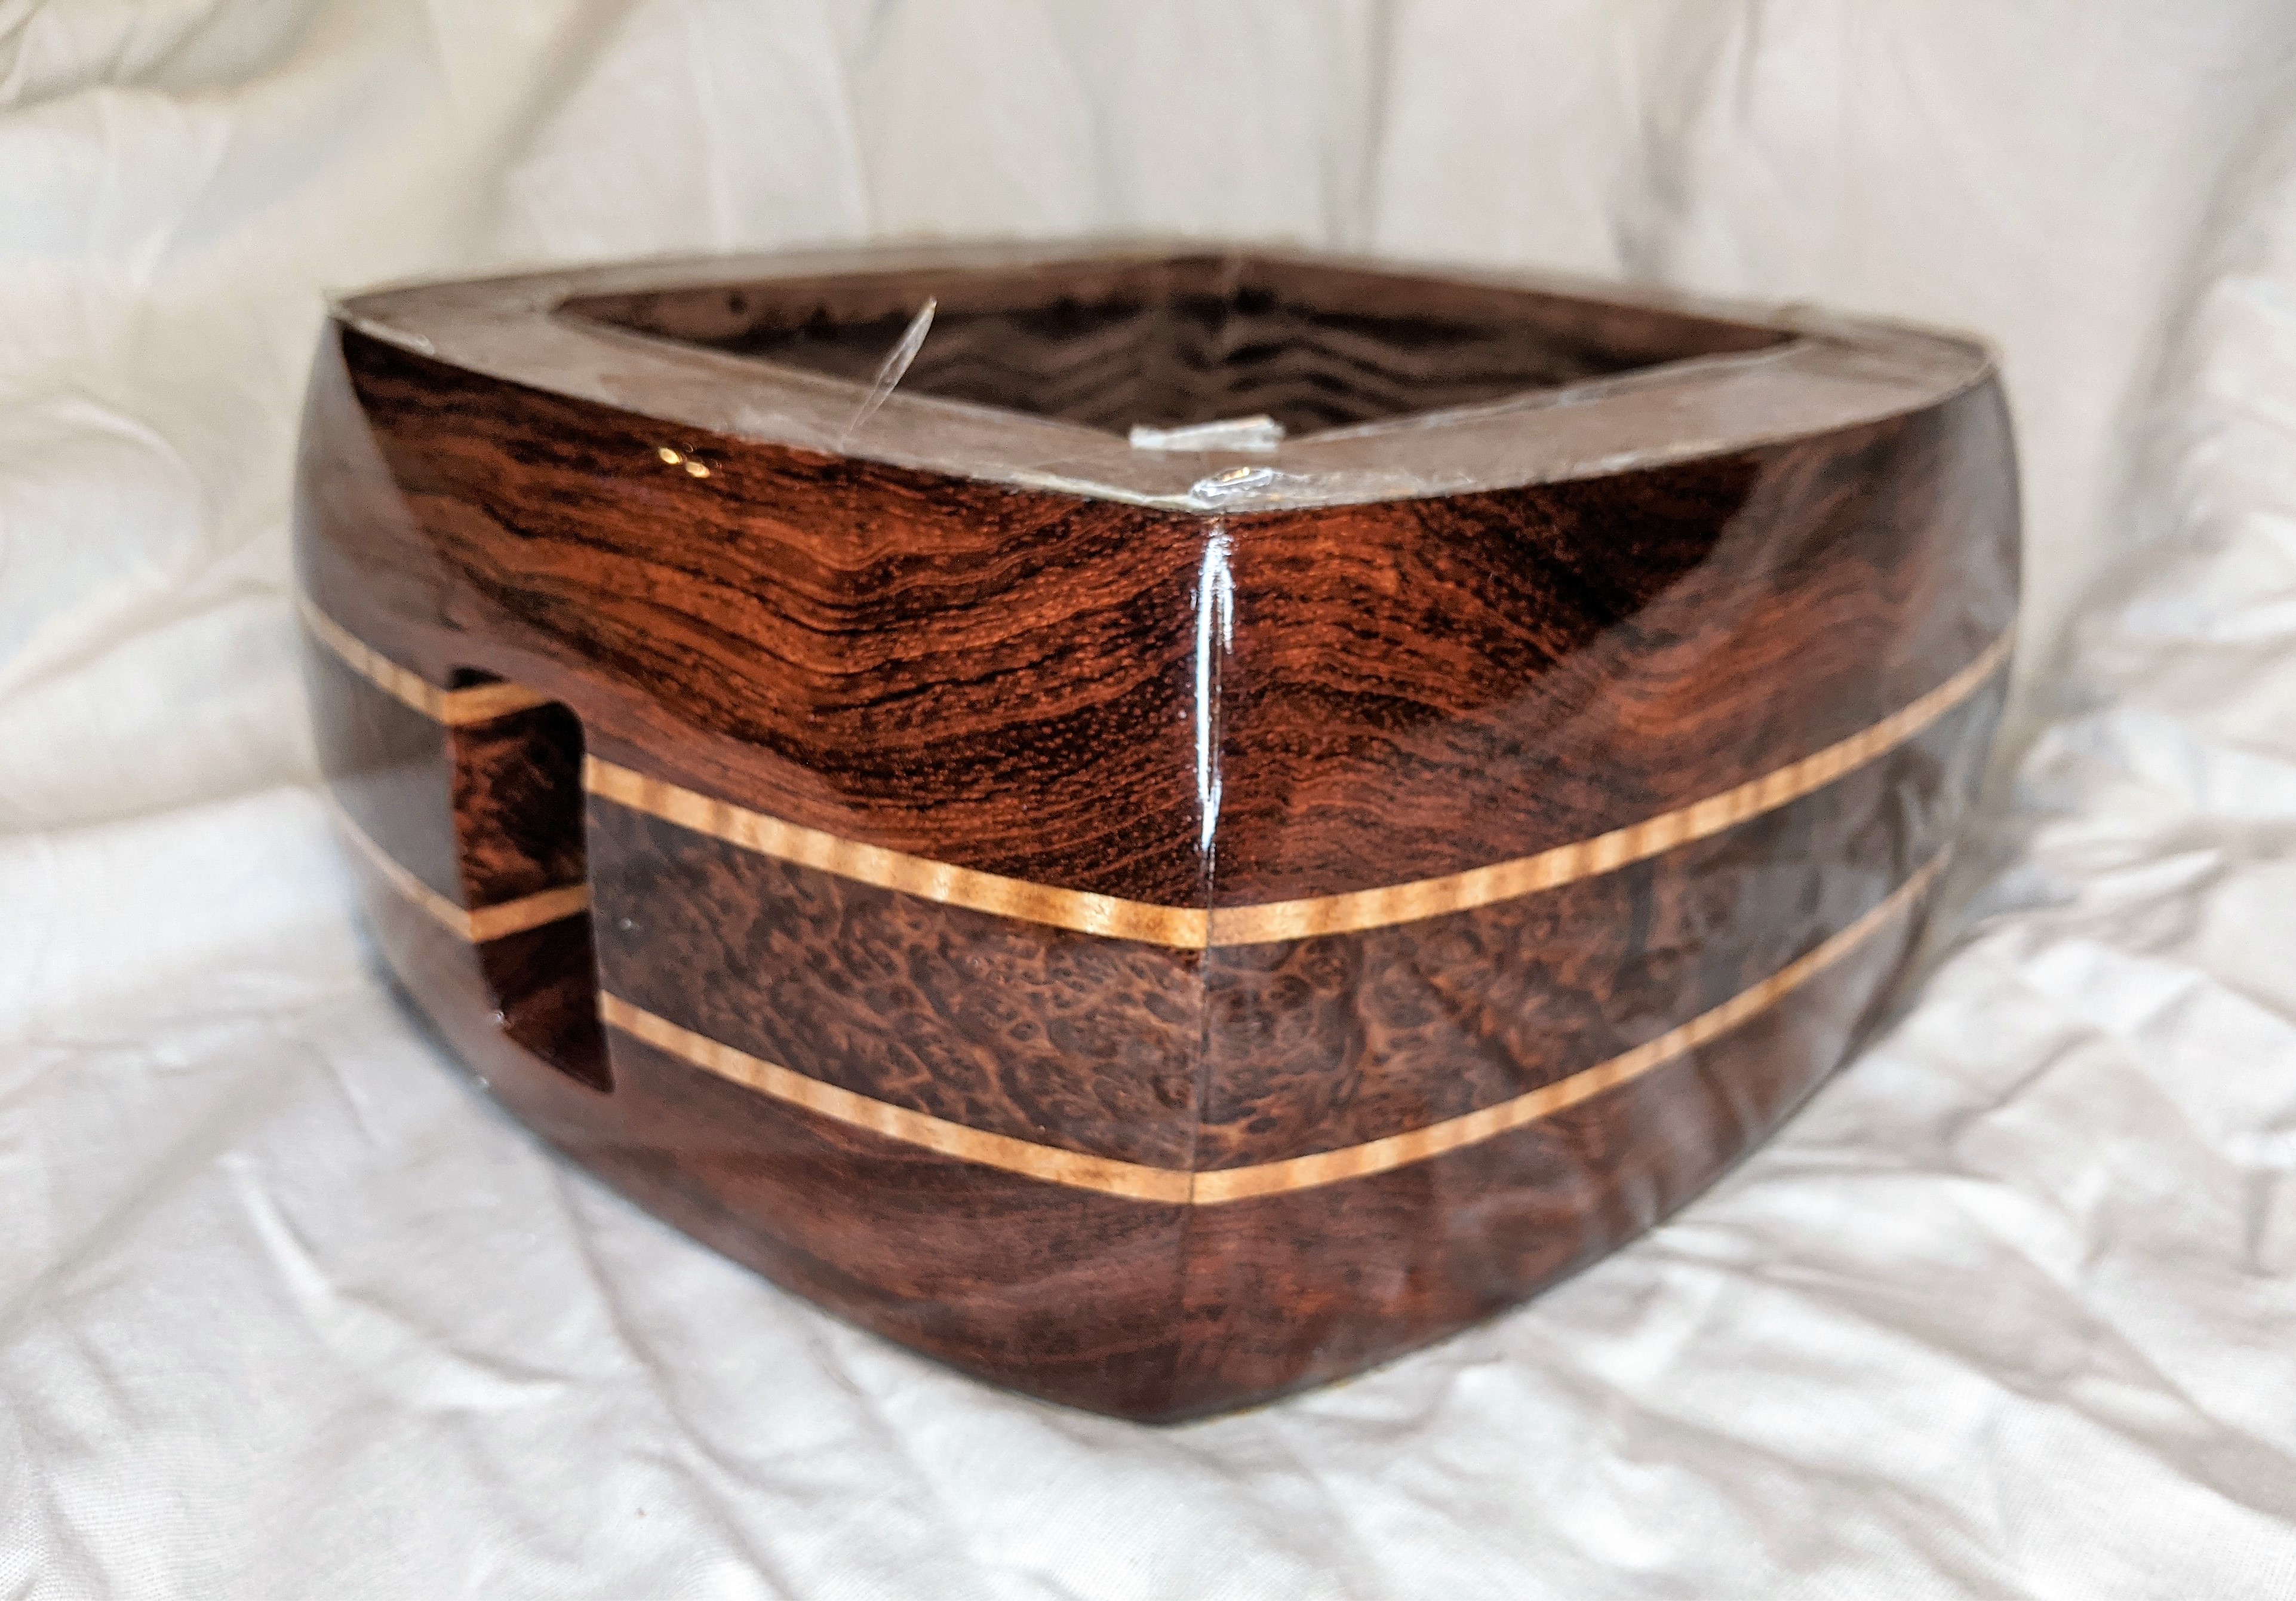
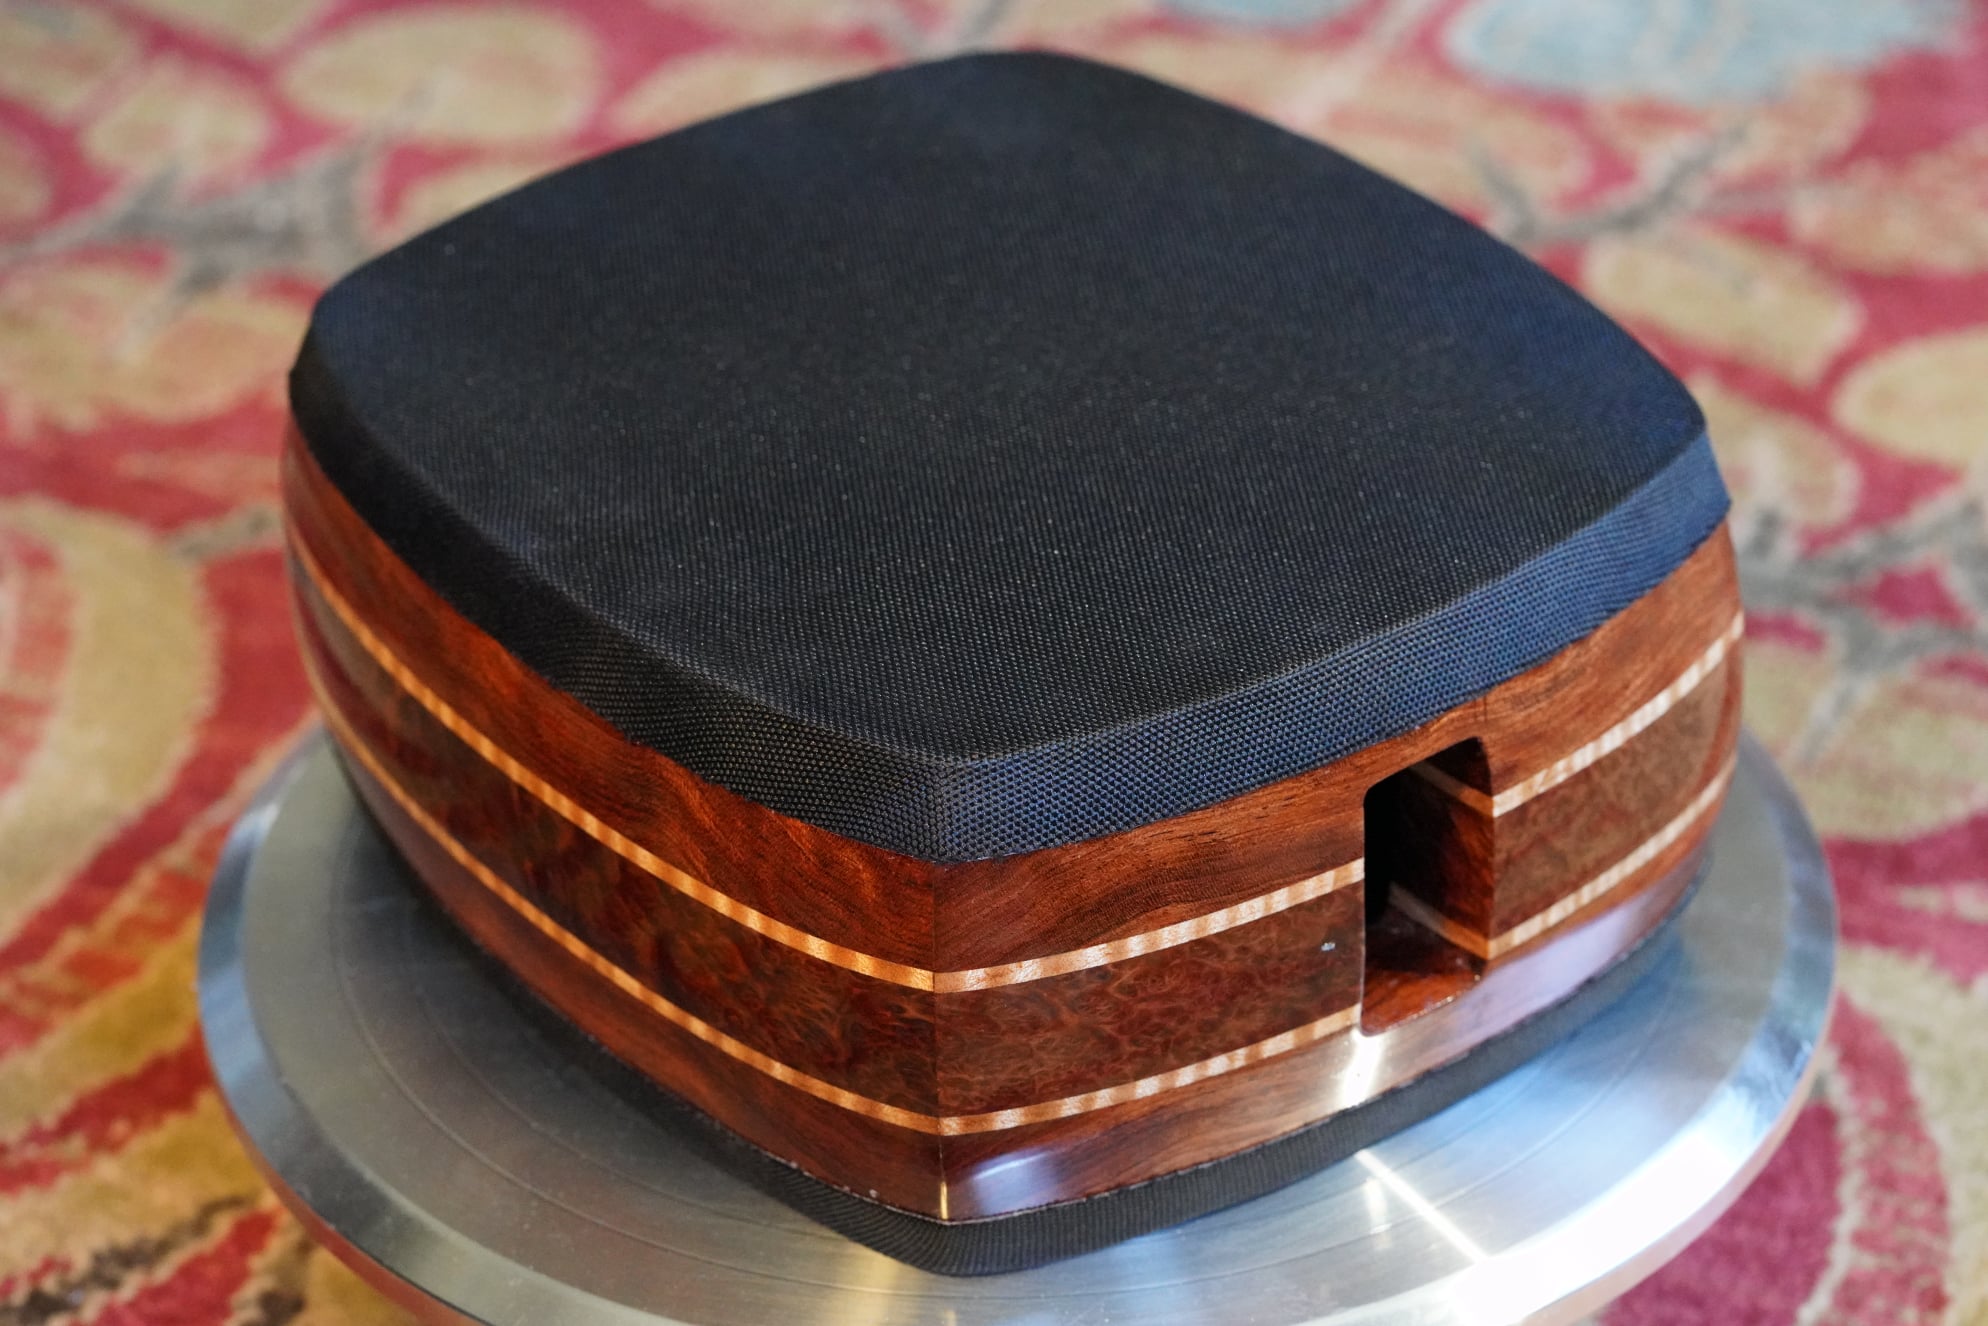
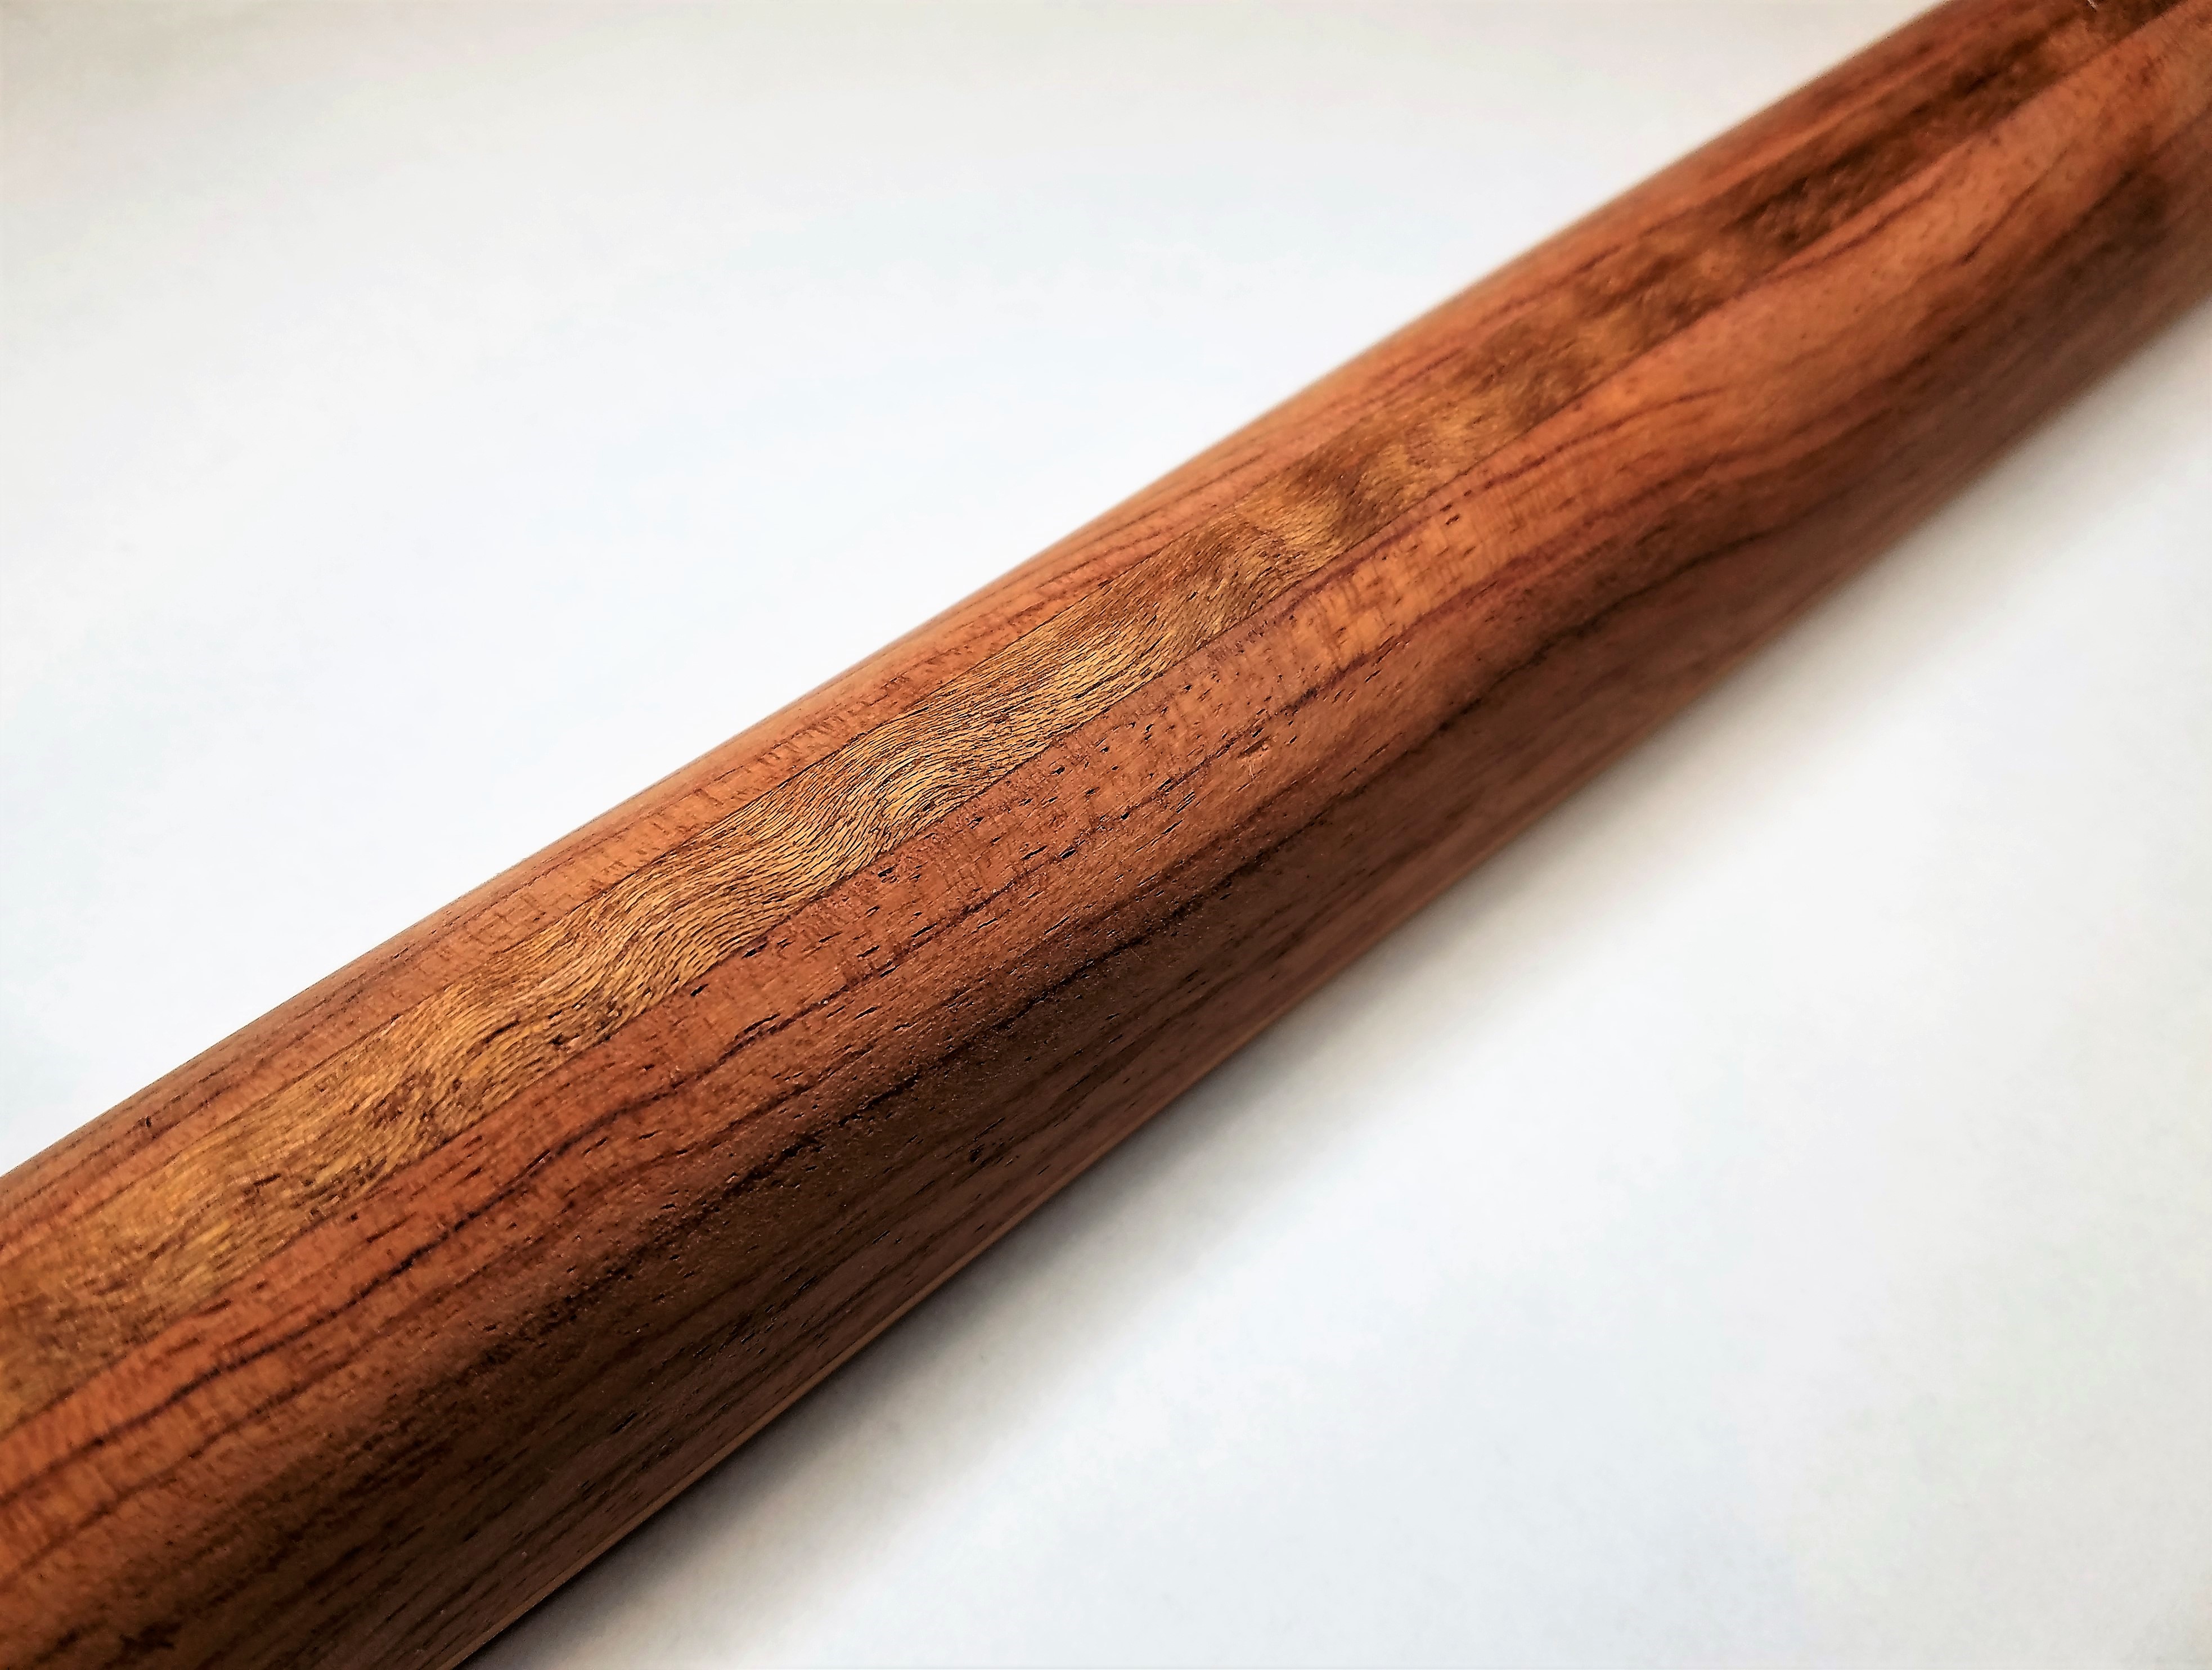
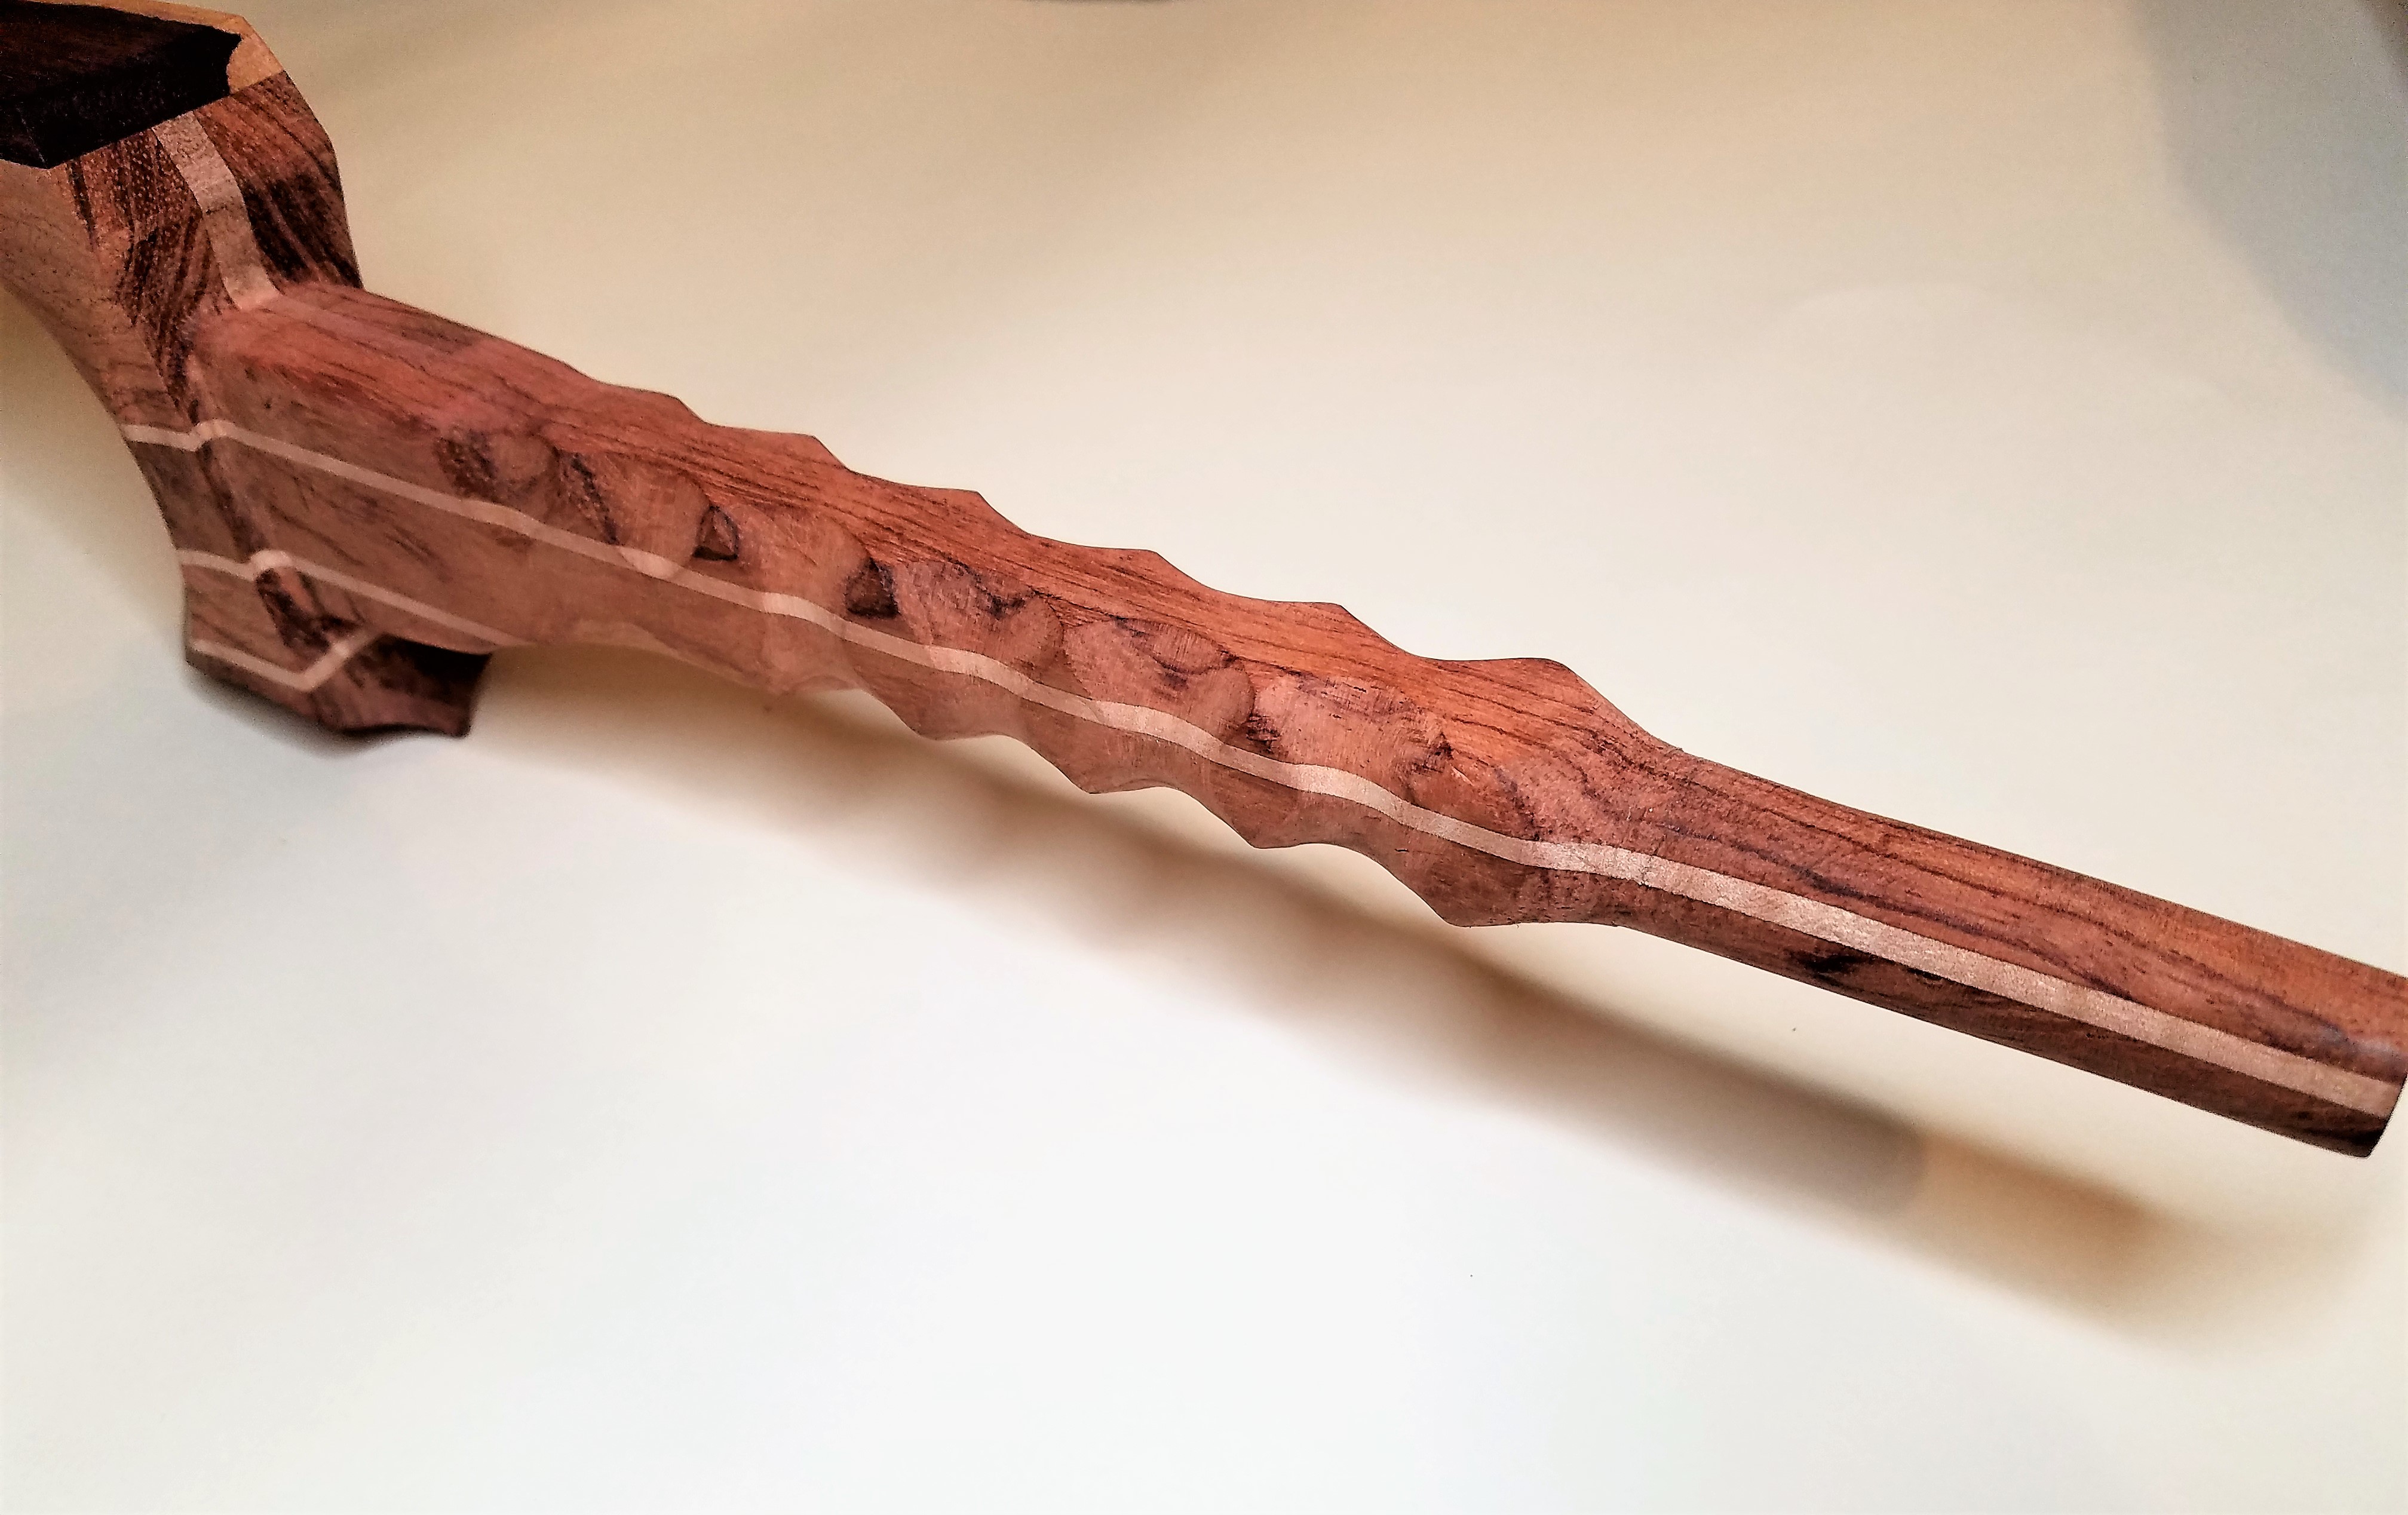
The name Masamune was inspired by the wood that I found and selected for the fingerboard, which is further complimented by the custom zagane and rindou I am having made from damascus-style pattern welded steel (which I absolutely love the aesthetic of, and even my wedding ring is made from.) For now however, I will reveal the dou, which I have just recently finished polishing, and am in the process of shipping out to Kyle to get skinned with black Hibiki.

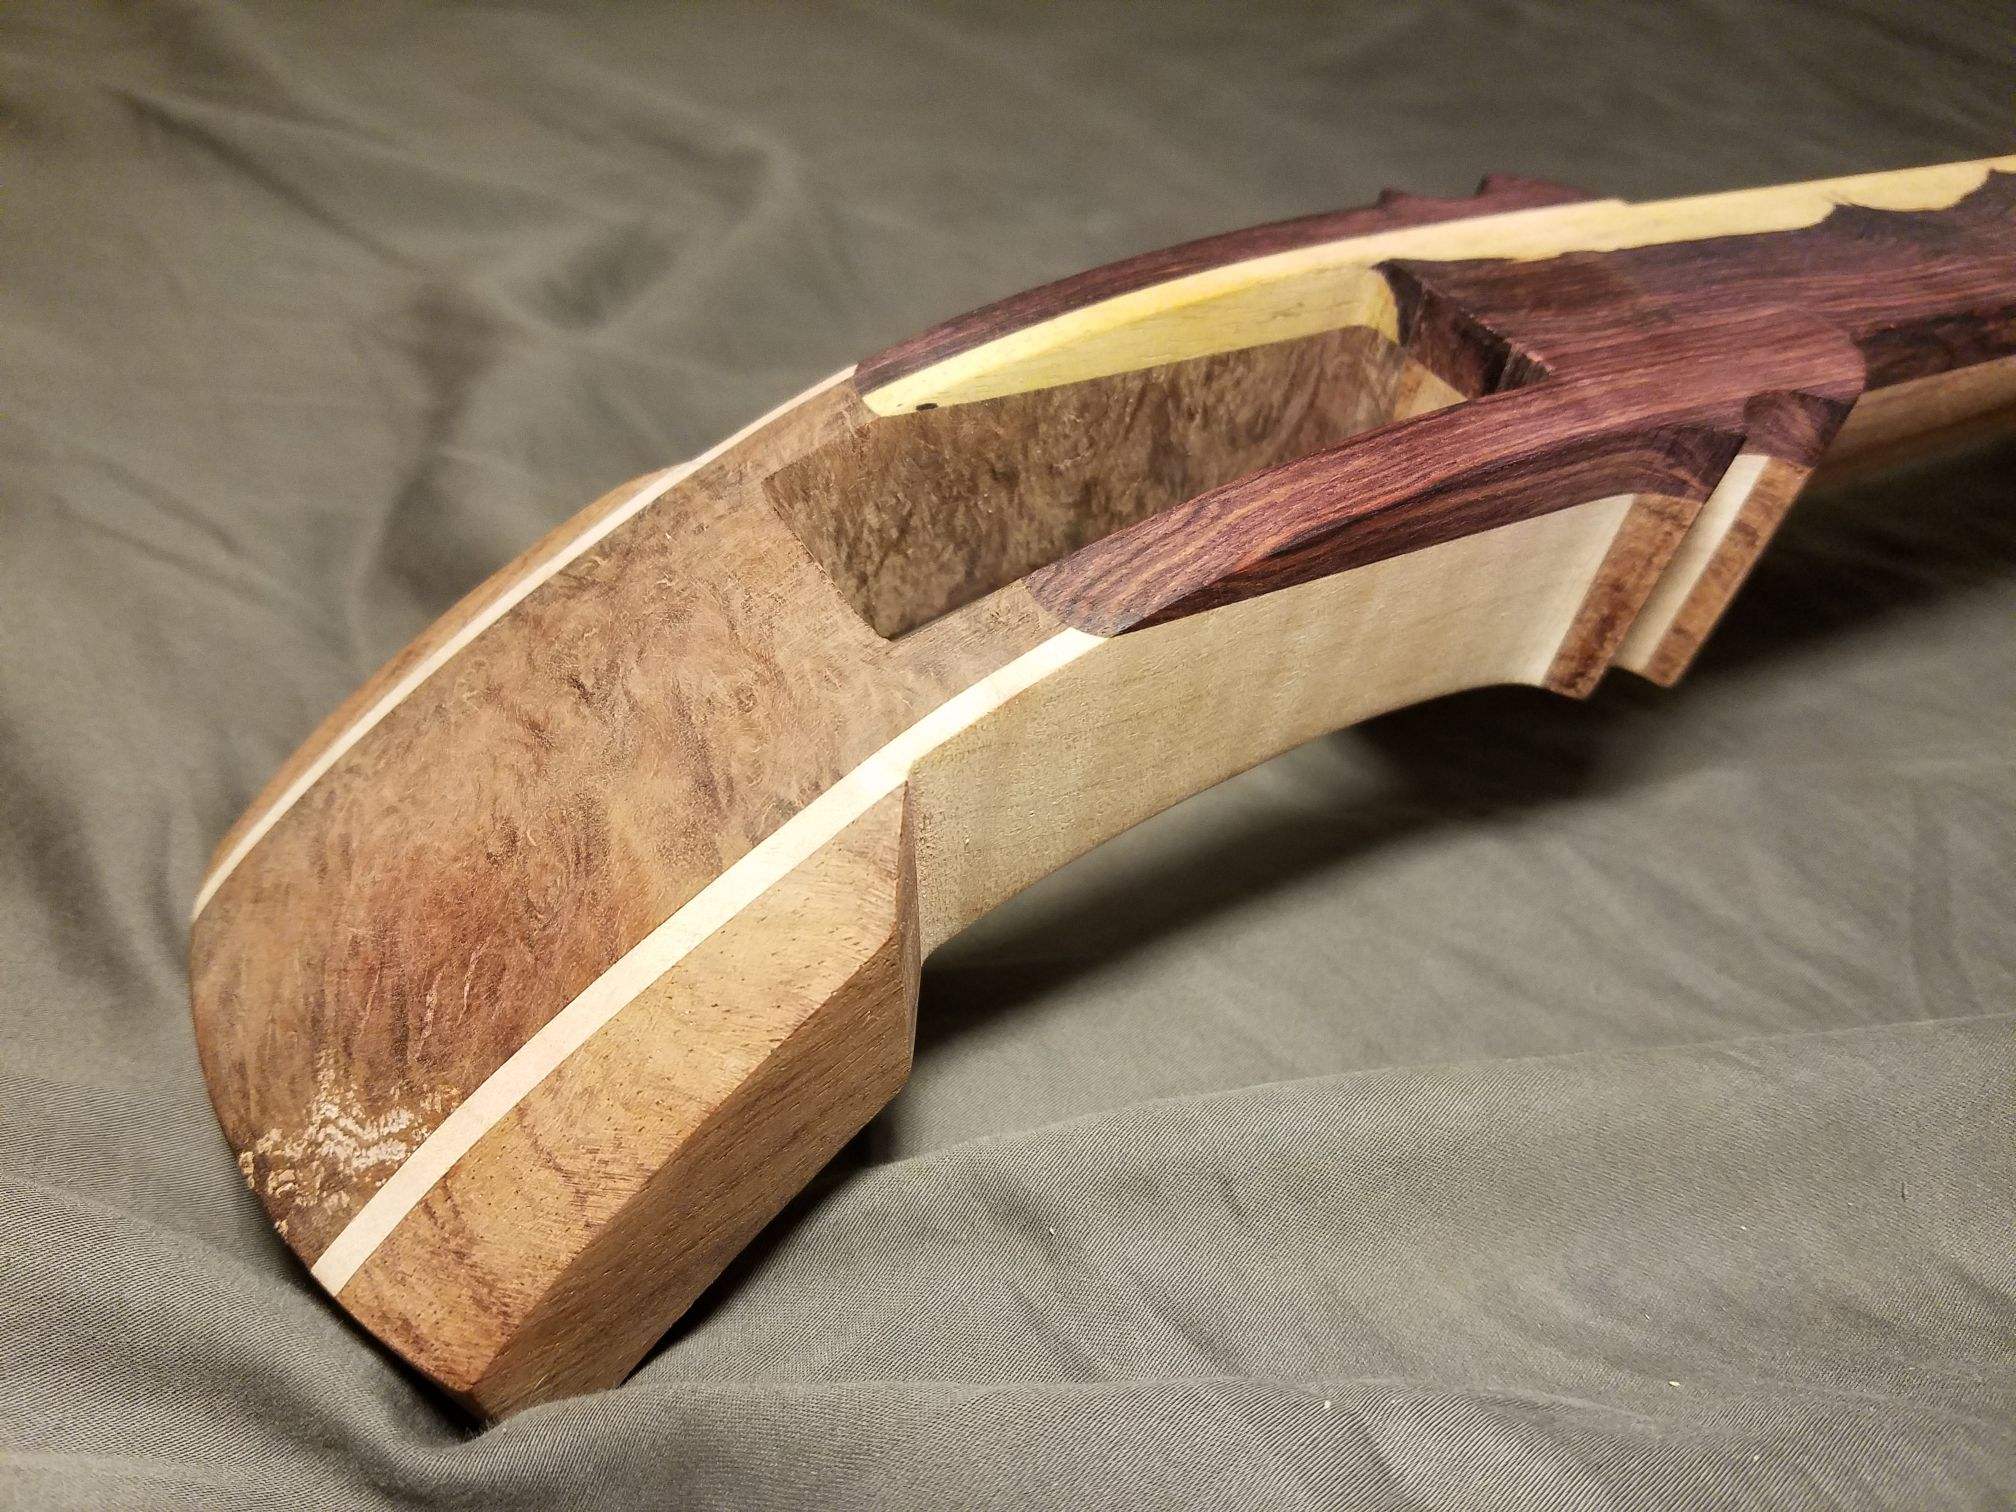
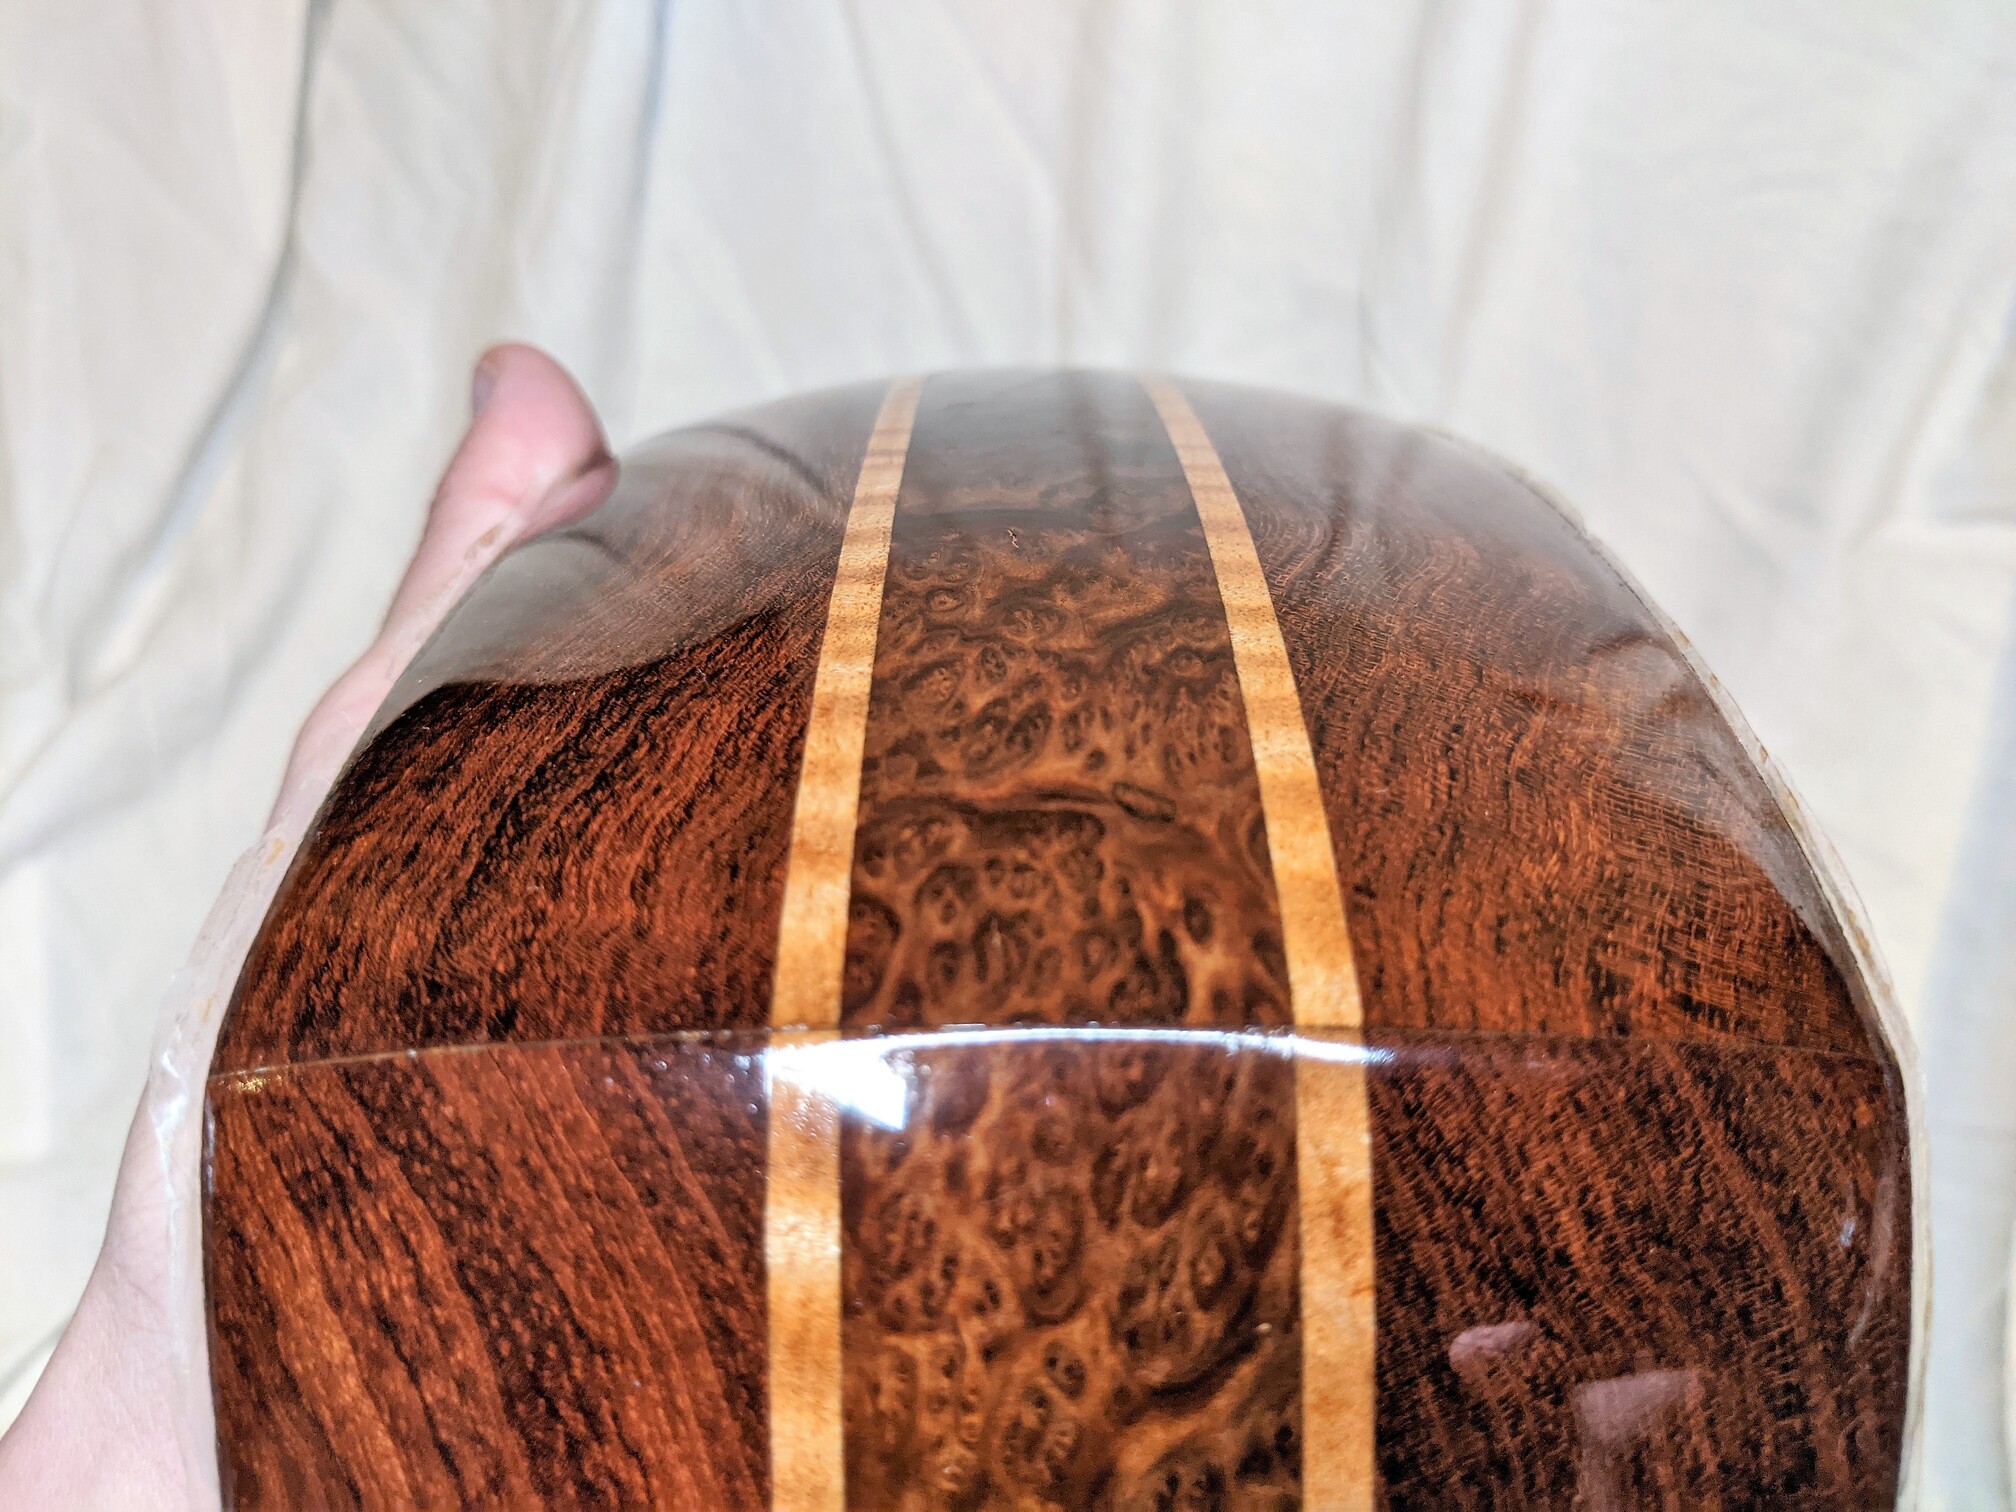
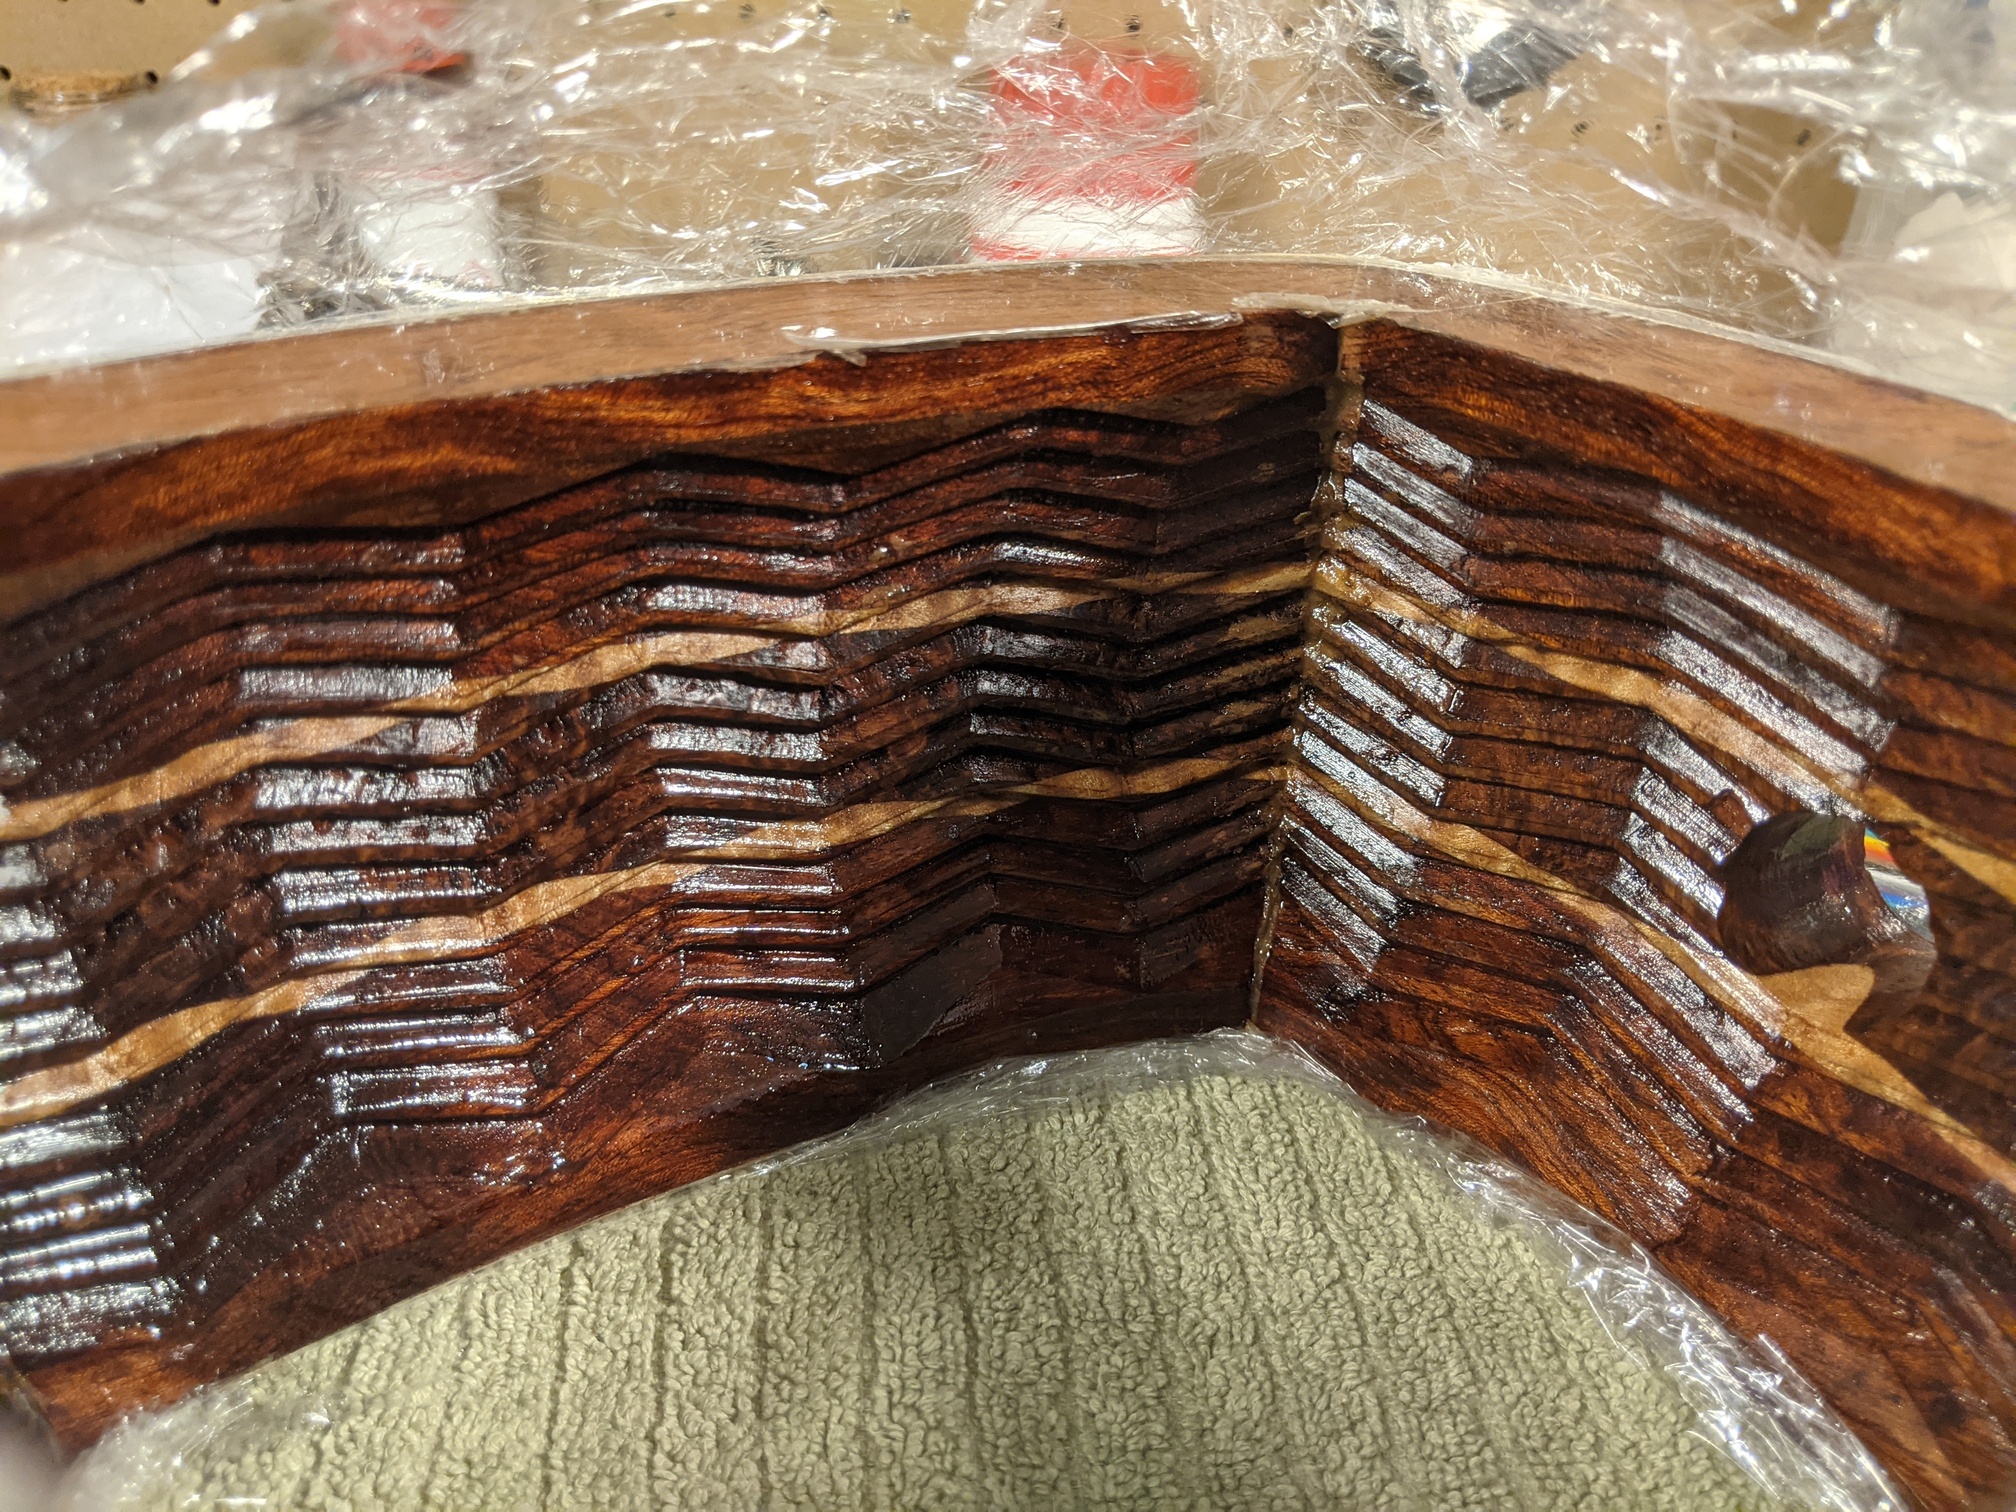
The dou is very unique, made with many layers of laminated wood. Each side of the dou is made from 5 individual pieces. The top and bottom use a very dense and high-grade figured bubinga I obtained, followed by thin strips of curly maple, and a strip of Australian red mallee burl running around the center. The outside is hand finished with Tru Oil, and hand polished to a high gloss using Meguiars Ultimate polish (a quite common combination in the guitar world.) The inside of the dou uses a much larger and deeper cut ayasugi-bori than traditional, coated with a couple layers of Tru Oil varnish.

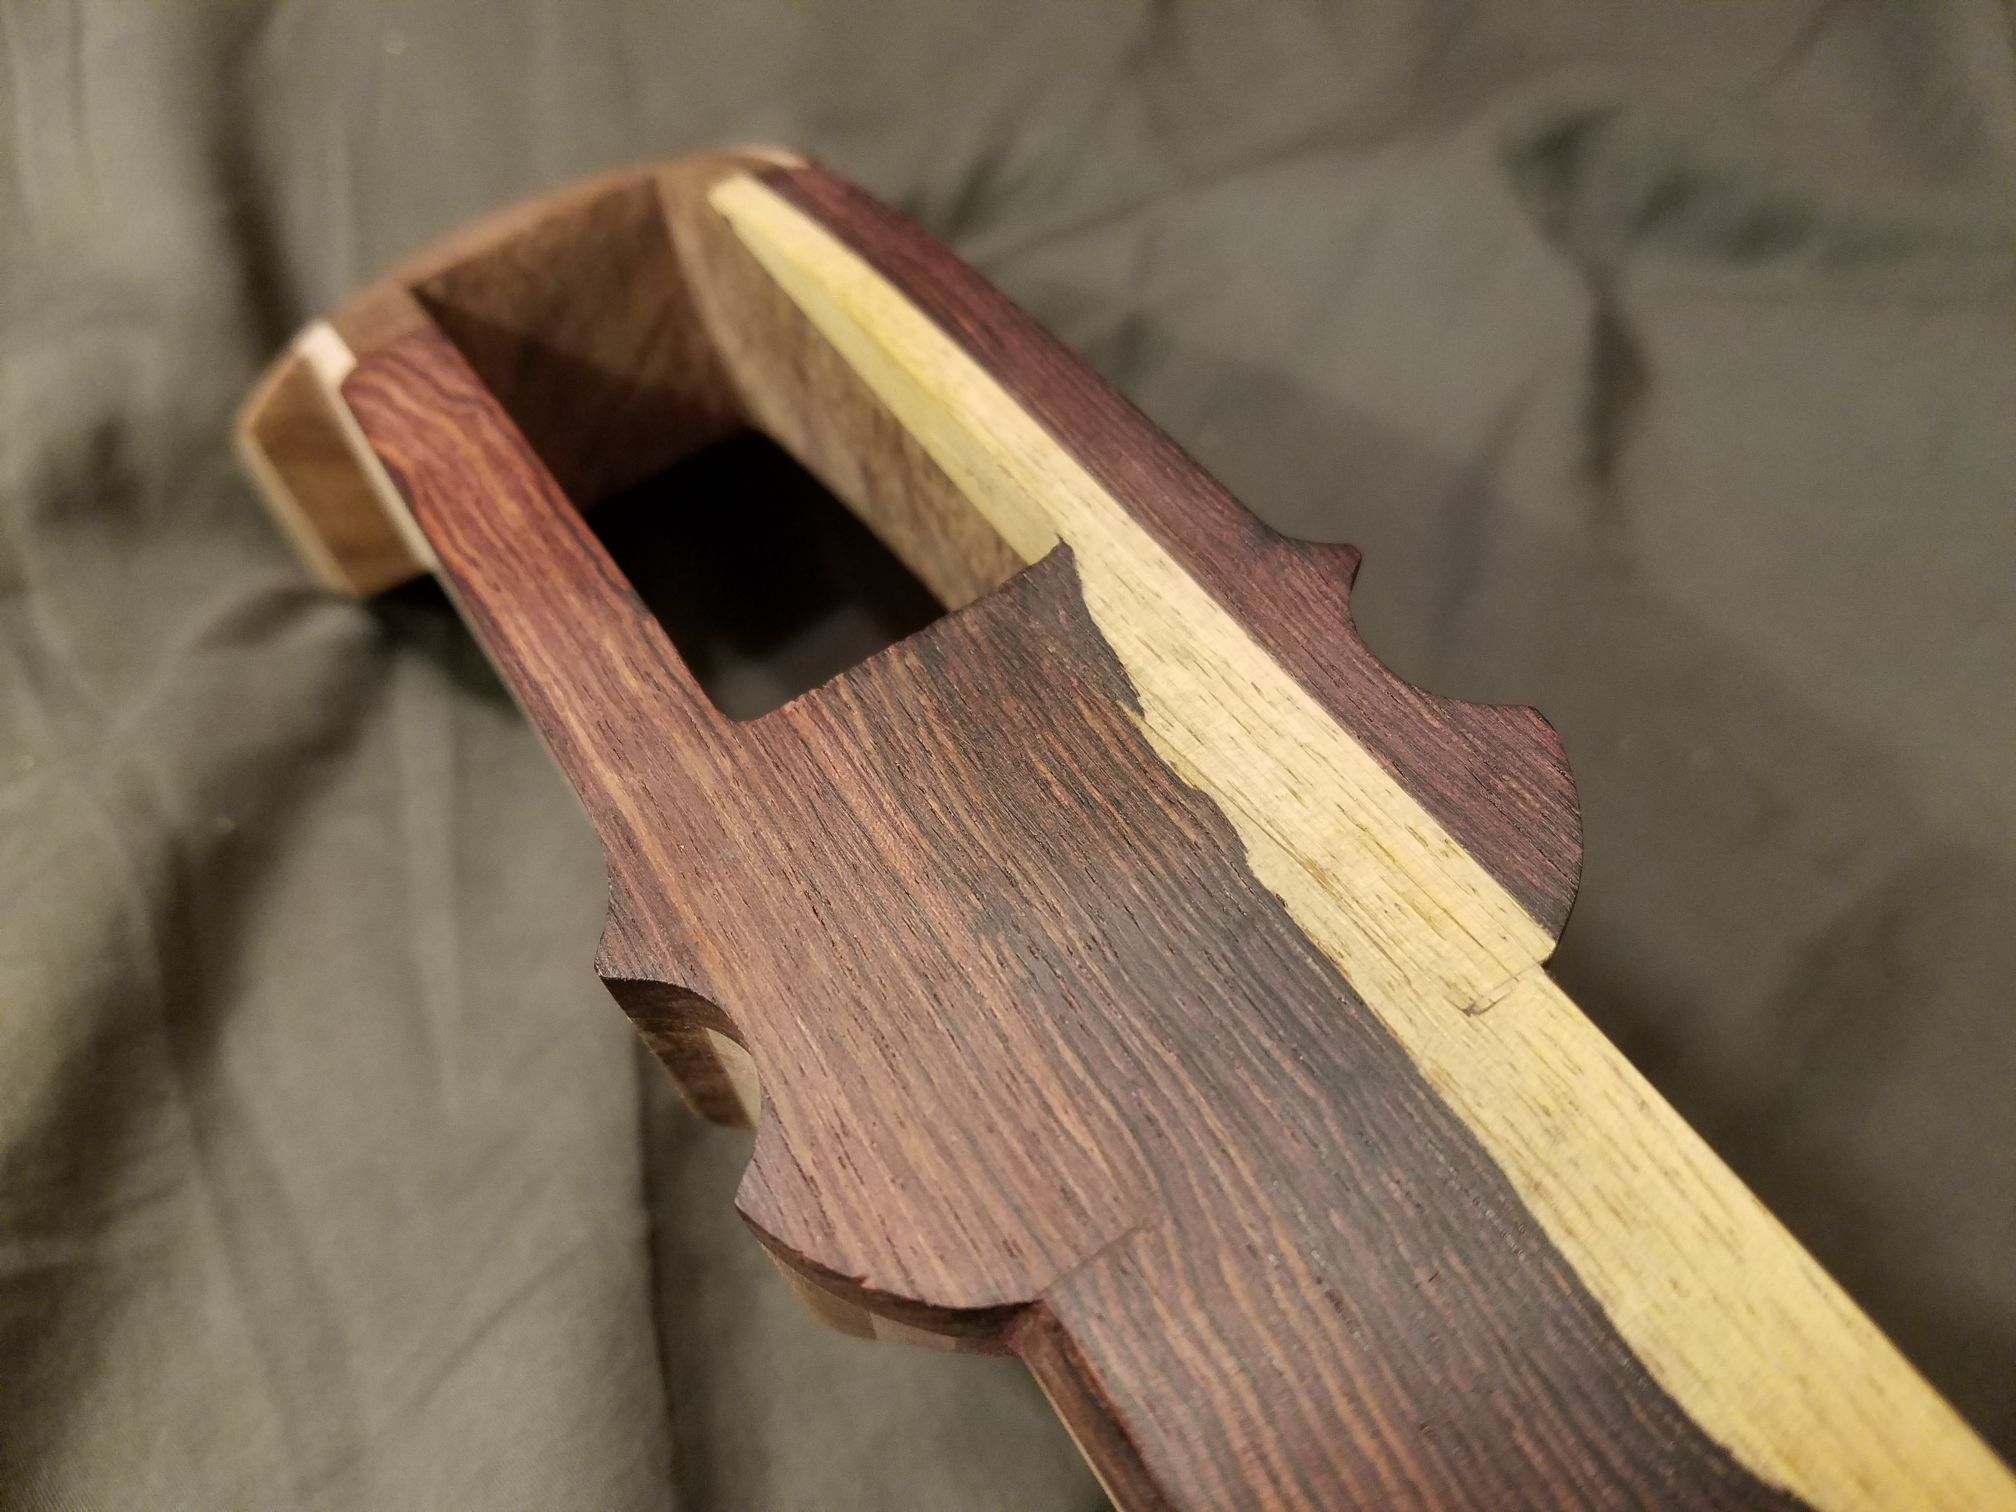
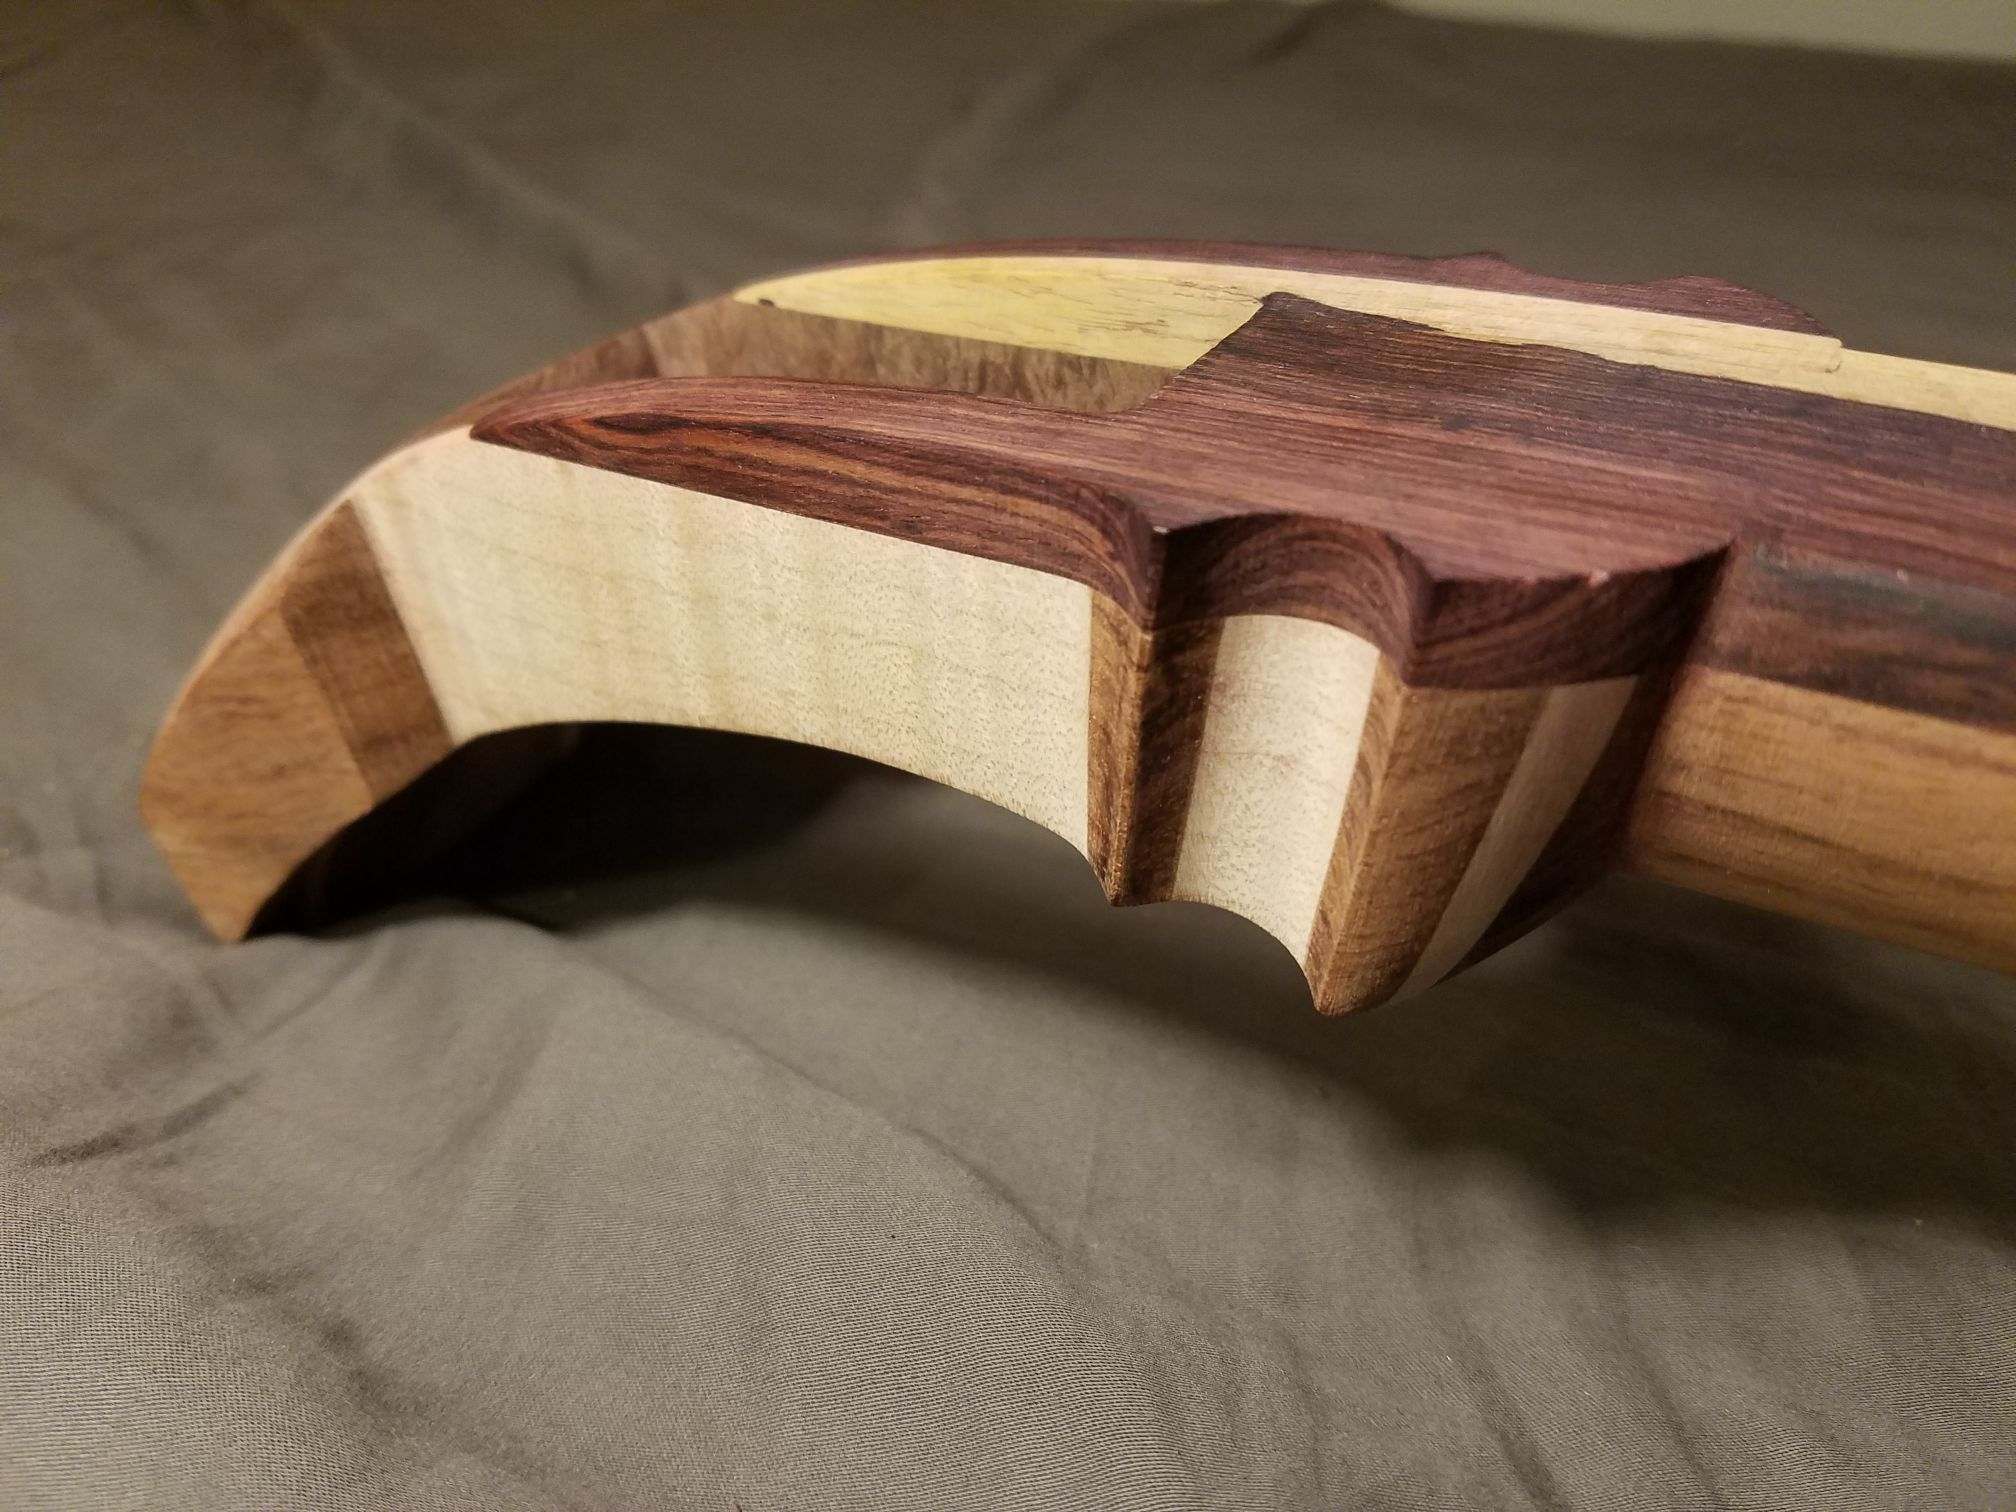
The tenjin follows a very similar laminated wood pattern reflecting the same woods as the dou, and the sao also features a heavily laminated design. I am currently finalizing the fit of the tenjin to the sao, and will share more details as I progress. After this, I just have to clean up final details, fit the hardware, and polish the sao and tenjin up.

I have not yet seen a shamisen that uses a heavily layered design like Masamune, which is quite common with many other instruments. I wanted to push the boundaries of high-end shamisen design with this project, incorporating lots of unique and custom features, and I hope this design helps further inspire new builds and ideas in the shamisen community. I am by no means a professional woodworker, and there are still flaws here and there, but I am very happy with how it has come out, and look forward to finally starting to play shamisen again with Masamune.

6 Likes

Here is another shot of the dou, showing the detail of the wood grain as well as the polish:

3 Likes

Finally, a look at the ayasugi-bori on the inside. Once I am ready and get some good shots in, I will share pictures of the tenjin and sao. Along with the wood selection, the design has a few other unique features to it, as well as the custom hardware I am having made for it.

2 Likes

It’s very handsome. Curious to hear the finished product

2 Likes

Wow, I’ve never seen a shamisen like that before. The contrast of the different woods is quite striking. Great work! I’d love to see the sao at some point.

1 Like

:open_mouth: Whoa! Can´t wait to see the whole instrument! Keep up!

1 Like

Thanks everyone for your comments, I really appreciate the support! Got a couple of major updates regarding the build. As of yesterday, the dou safely made it across the country and is with Kyle now for skinning. Kyle will probably post some pictures of the before and after, and I am super excited now to see it with the black Hibiki skin. With the skinning of the dou, it really feels like this build is finally and truly close to being completed.

Also just last night I finally glued up the tenjin to the sao, so I can work on the final touches and rough sanding to prep for fitting the hardware and finishing. I don’t have pictures of it glued up yet, but will probably get around to it once I clean it up a bit more. The joint isn’t completely flawless, but at this point I figured that if I tried to fiddle with it too much I would end up messing it up. A lot of delays of this project have been a result of a bit too much perfectionism, and I’ve learned to scale back my ambitions to some more realistic levels.

For now, here is a look at another piece of the build, and one that is very important to the theme. This is the custom rindou I had designed for Masamune, machined out of pattern welded steel. I put it through a couple of acid baths to etch out the pattern and bring out the detail. This particular piece actually delayed this project for almost two years, and was a combination of factors (figuring out design, material I wanted, machining, etc.) The dou and sao have already been fitted with it last year though, and is ready to go.

For the rindou, I decided to make it so that it protrudes out of the end of the dou further than traditional, giving more of a noticeable spike feature. I figure since so much has gone into this particular piece of hardware I might as well show off as much of the detail as possible!

I also just about finished the design for the custom zagane, which will use the same pattern welded steel to match the theme. Hopefully I can get those machined in the coming weeks and fitted to the tenjin. Like the rindou, the zagane will be larger than traditional to show off the figure of the etched metal more. As a result, the tenjin was designed to also be a bit bigger to accommodate the larger zagane.

I am also finalizing the sawari mechanism for Masamune, which is of my own design that combines features from both the en sawari and azuma sawari styles. The mechanism itself is the same, but some of the physical features are different than traditionally seen.

There are still a few more unique design elements I am adding to Masamune, and will post additional updates as they come!

4 Likes

As a metal nerd I love the pattern on that zagane. Very pretty.

1 Like

Another round of updates! Kyle just finished skinning Masamune with black Hibiki, and I couldn’t be more excited! Massive thanks to Kyle for the incredible skinning job and for making this all possible. Honestly this whole project was only possible thanks to all of the resources he has provided, between Shamisen of Japan and sharing his amazing shamisen builds. Seeing the dou finally skinned, it’s still hard to believe that it’s actually done. Can’t wait to see it when it comes back!

For the rest of this build, besides working on the lengthwise curve in the sao and cleaning up the rough edges on the tenjin and sao, I also spent this entire week contacting over a dozen machine shops in both NY and MA to try and get the final custom hardware made. Out of all the places I reached out to, only one place located about a 1.5 hours drive from me would machine the zagane for me. Fortunately, it sounds like it shouldn’t be a problem to get done, and I also threw in a decorative screw cap design for the sawari made from the same dasmacus pattern welded steel to top things off. I will be dropping off the steel stock to the machinist on Monday, which should be done in about two weeks for final fitting to the tenjin.

In the meantime, I will be starting my sawari build while the other parts are being made. I will see if I can post some pictures of the current progress of the tenjin and sao soon, though the real magic will happen after the finish is applied and reveals the chatoyance and figure of the woods.

5 Likes

A bit of background on the sao. This was actually the second sao that I made. The first one ended up in a bit of a tragedy. For the original sao, I had decided to use the same bubinga from the dou, which is not only a much deeper colored bubinga, but is literally the hardest and most dense bubinga I have ever worked with (I have used bubinga before, but this stuff was just weirdly hard and heavy). I also decided upon a curly maple stripe running down the center, to match the curly maple theme. However, I did not account for the grain direction of the laminated pieces, nor for the fact that the wood entire lamination was overly stiff. During gluing, the neck actually warped so severely that it was unusable after removing the clamps, and I had to start over. While a rather painful lesson, taking this all into consideration, I decided to make a new one. Here you can see a shot of a section of the resulting sao.

The sao is a three-piece laminated neck with figured bubinga sides and a thin strip of curly mahogany running down the center. The bubinga for the neck is considerably lighter and softer than the bubinga used on the dou, with a deeper orange color and a nice random chatoyance in the grain. The center mahogany has a very deep curly striping, and is softer than the hard maple strip originally used. Mahogany is also inherently more dimensionally stable than maple as well. This time, I made sure to align the grain properly, with the outer bubinga pieces mirrored with the grain in an “A” pattern, and the mahogany grain running parallel. Gluing this up, there was no warping! The neck has actually been glued up for years now, and still has not warped.

Unfortunately, with it just sanded like this for now it’s hard to see the figure all that well, but once polished with the varnish the orange of the bubinga will pop, and the mahogany will have a really nice golden tone with very deep chatoyancy in the grain.

2 Likes

Moving on to some more details of the build, here is a shot of the saruo. I decided to go with a very non-traditional design as well as continuing the use of heavy lamination. The saruo is made up of 8 different pieces, alternating between the red mallee burl, curly maple, and continuing the neck pattern with the bubinga and curly mahogany layering. The layering from the saruo is also extended through the nakago, which is also laminated with bubinga and curly maple and glued to match the lines and layer thicknesses on the saruo at the nakago joint. The nakago joint is larger than normal (I made the nakago and tenjin joints thicker for extra rigidity and strength in anticipation of supporting an overall heavier build).

In terms of shape, the saruo is more like the heel of a guitar, however it curves out with a larger flair at the back, as well as a bit of triple-ridge feature underneath. The entire curve on the dou side extends down very deep, following the curve of the dou and ending right at the bottom edge of the dou with the bottom ridge. The inside curve on the saruo also follows kind of an exaggerated “s” shape, starting with a taper at the top and flaring out to the bottom.

Here we can see another shot looking more that the bottom features of the saruo flare. The shape evolved on its own over time as I played around with carving it. I knew I wanted kind of a sharp center ridge, and after a bit of shaping, added the curving side ridges which were inspired by some of the design elements found in the jiaoye, or “banana leaf” style Chinese guqin (which I actually incorporated into my own unique guqin build I completed prior to this shamisen build.)

Finally, here is a shot of the nakago. The layering can be better seen here, and this features more of a sharp wavy pattern, also inspired by some design elements I personally like and have incorporated in other builds as well (5 string Finnish kantele and Chinese guqin.)

4 Likes

:astonished: 
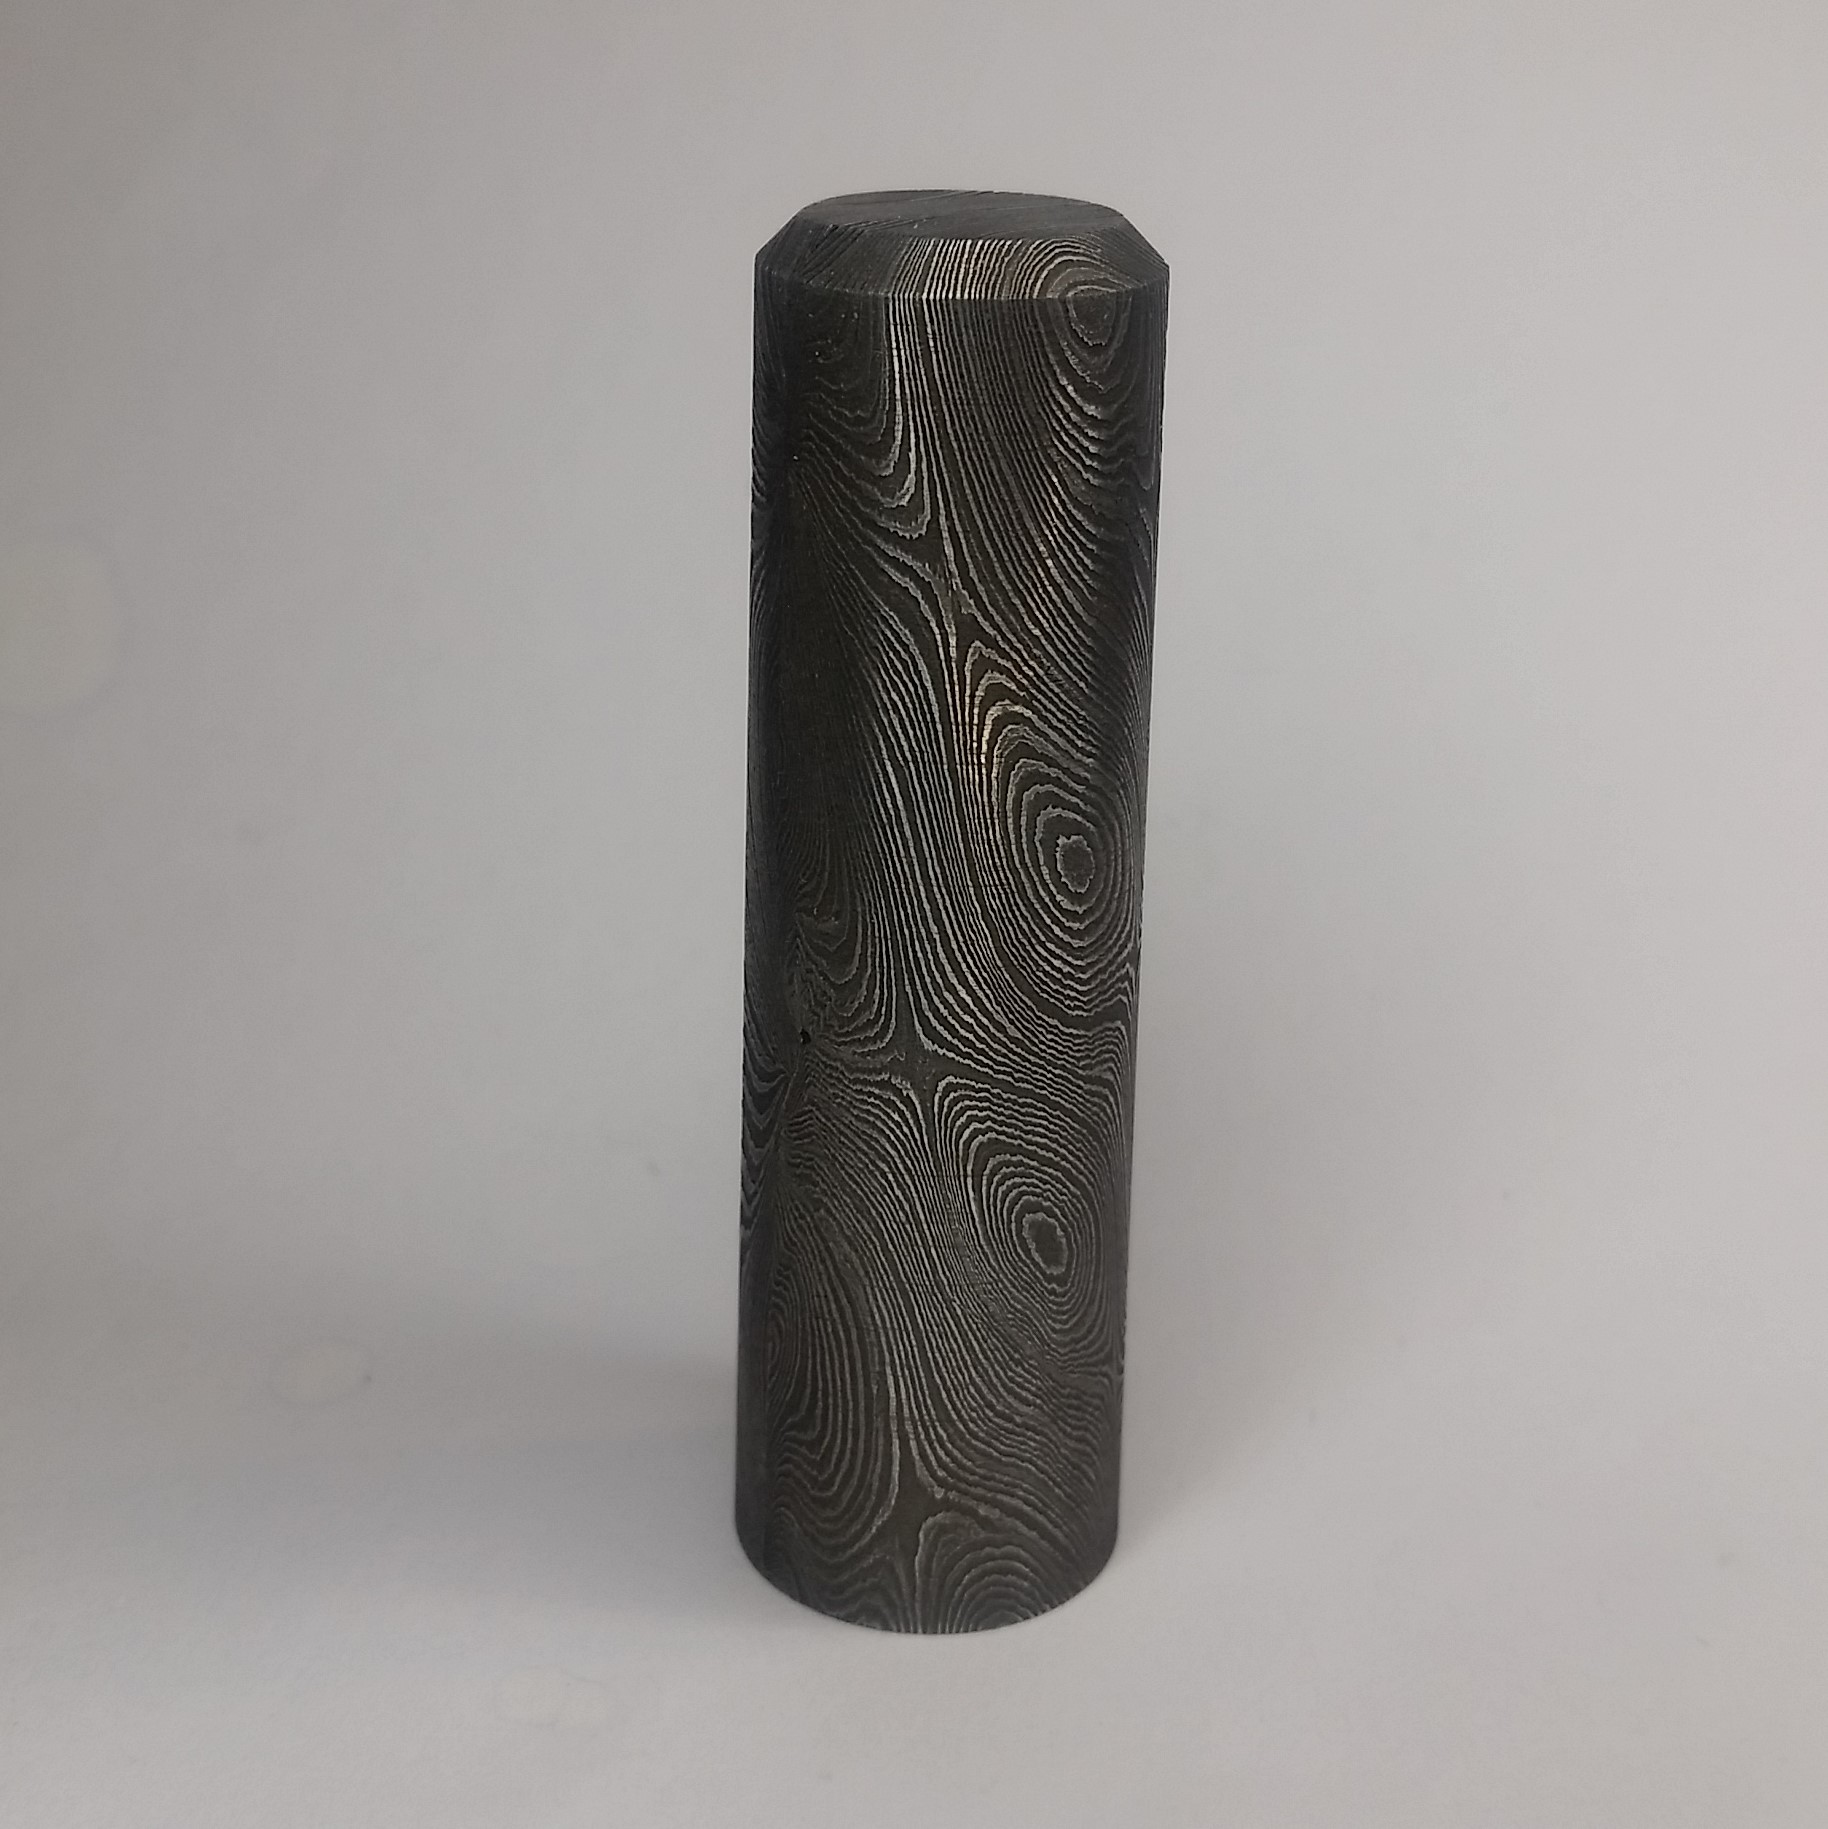
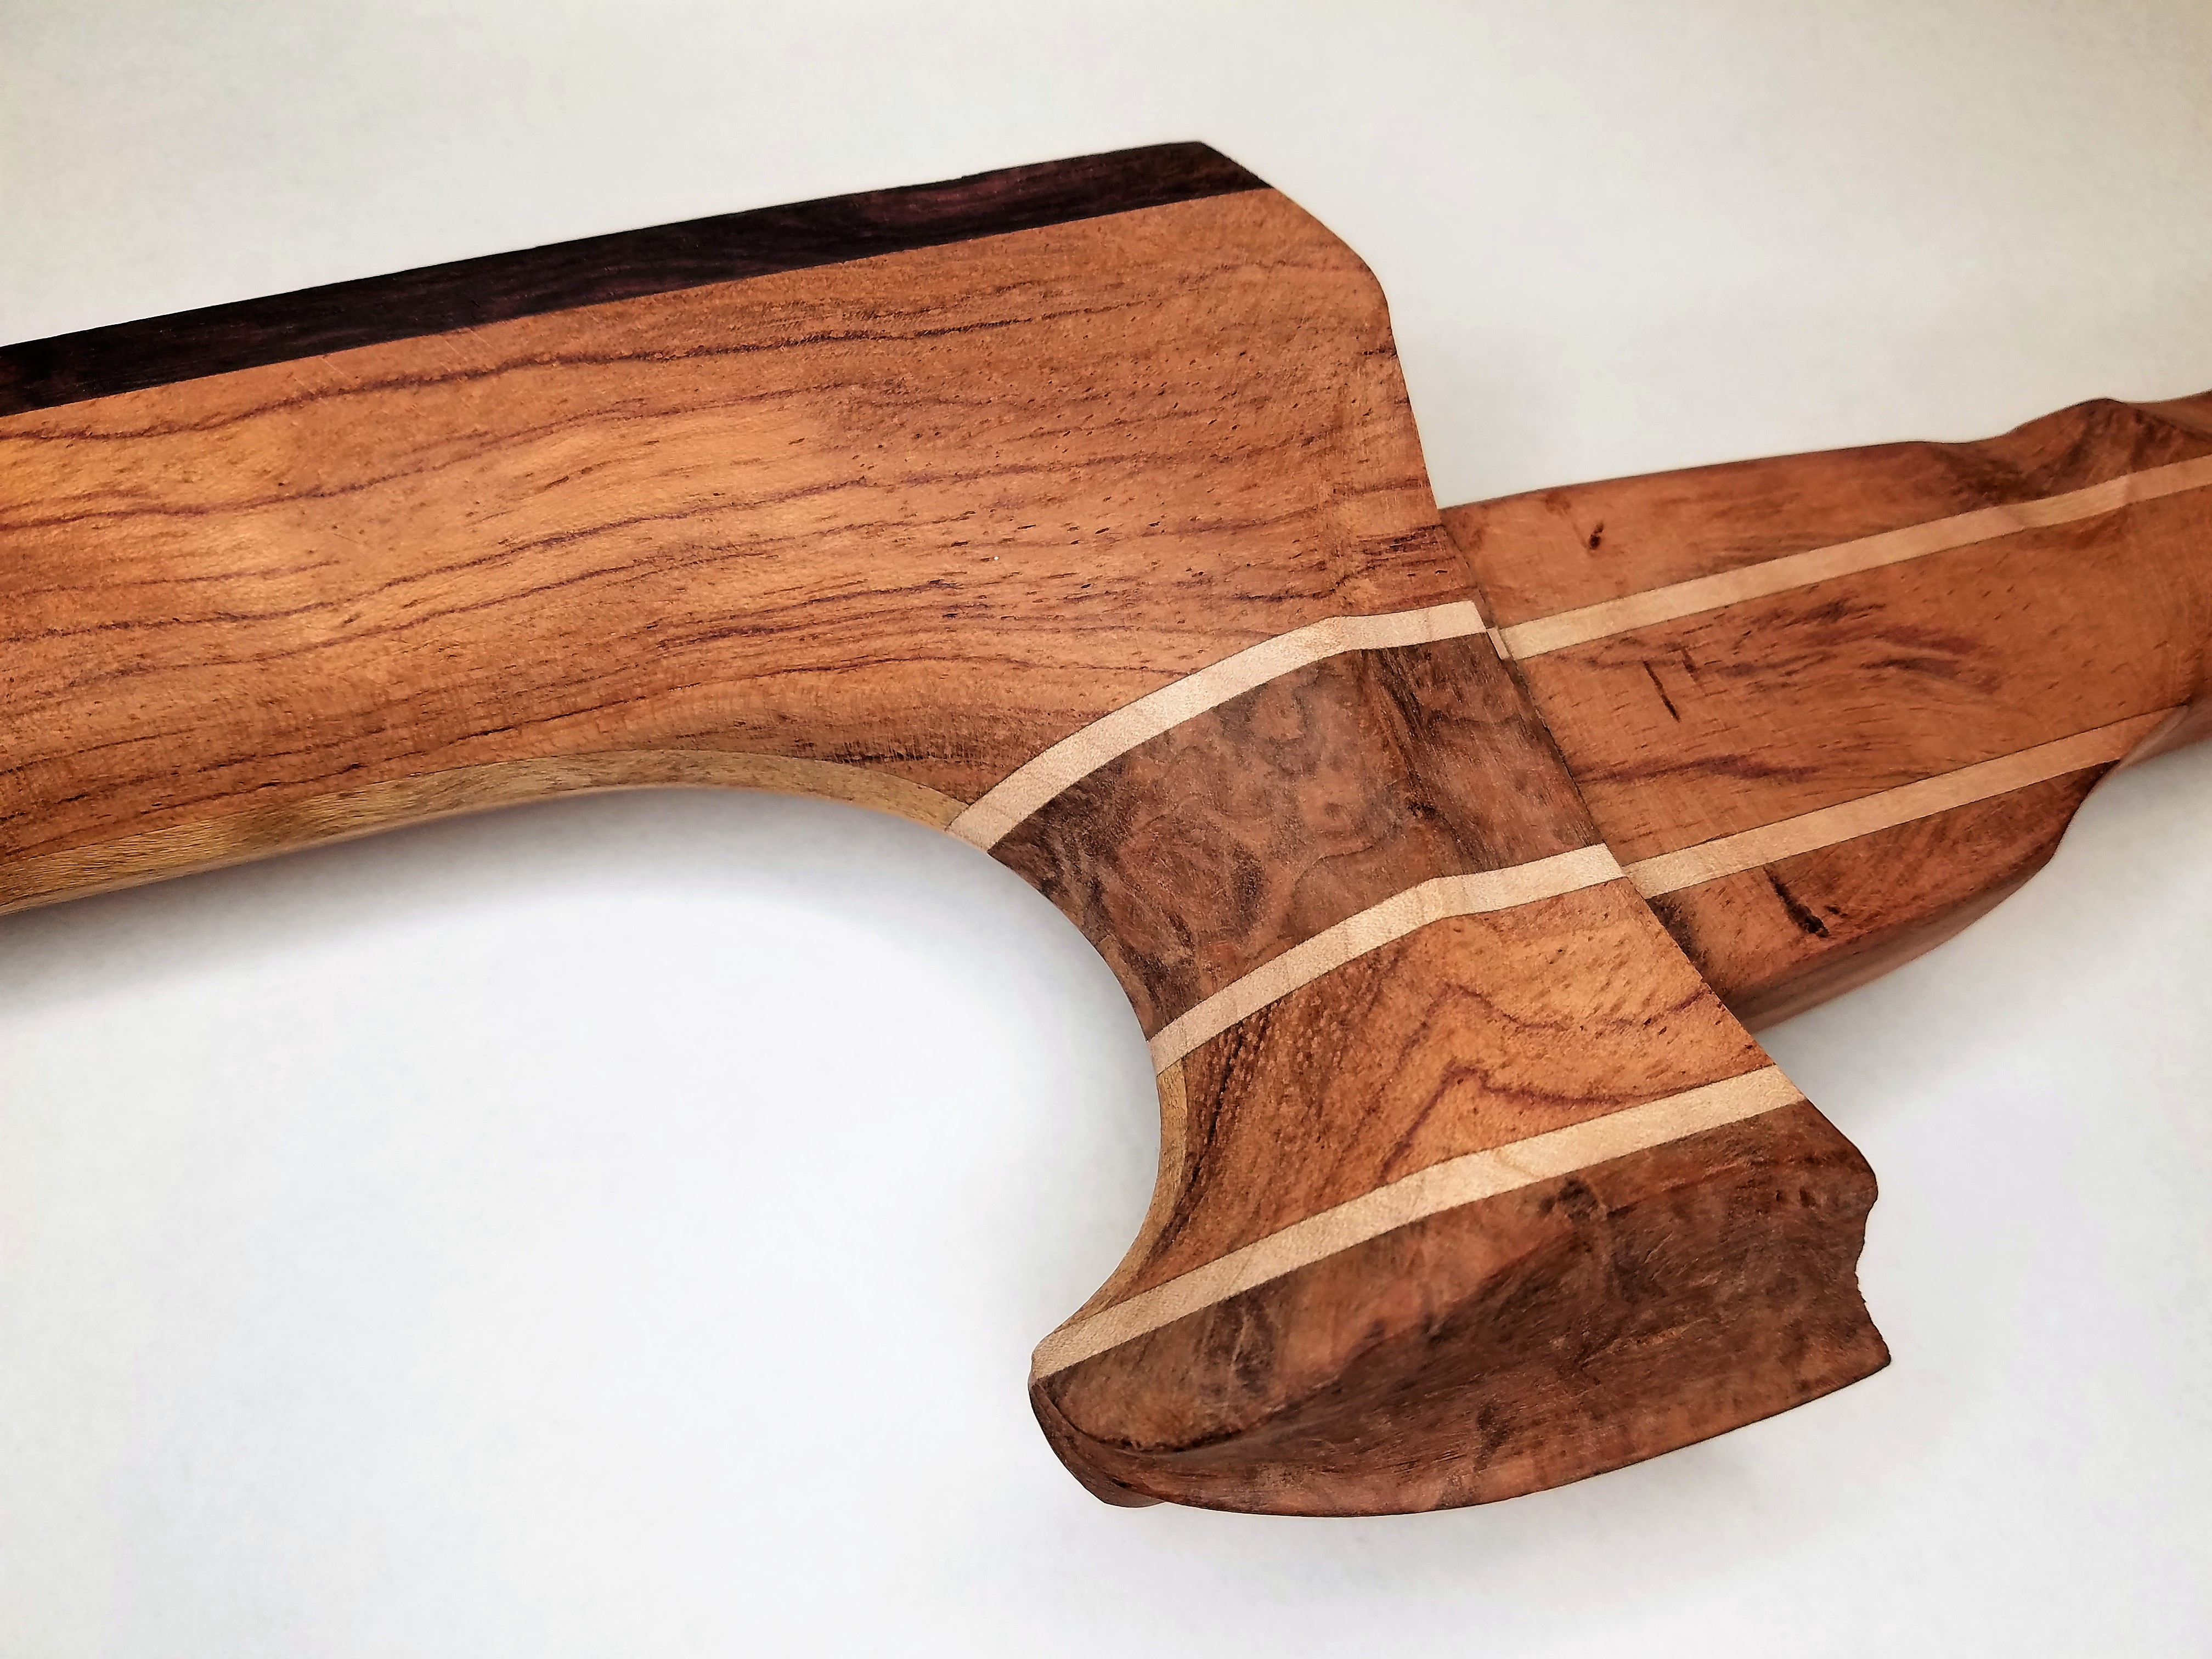
I am speechless… and is that an ebony fingerboard? I can see it has a white edge, I like that! Sorry for getting ahead. :slight_smile:

1 Like

Stephanie, great guess! The fingerboard is not quite ebony, but rather a lesser used member of the rosewood family (though actually even harder than the ebonies!) You are definitely right that there is in fact a lighter cream-colored sapwood edge on one side, where the heartwood is a quite unique color itself, which I will reveal a bit more of the story once I get some more pictures up!

Well, the steel stock was delivered to the machinist today, so I am looking at about a 2 week lead-time until I get them back and can start working on fitting them to the tenjin. Still plenty to do in the meantime though!

A bit of an aside about the material used. For the zagane, rindou, and decorative sawari cap, there where many options to choose from, and I bounced around on everything from brass, bronze, stainless steel, and this pattern welded steel. I opted to go with this steel not only because I love the look of pattern welded steel and that it fits the Masamune theme, but for symbolic reasons as well. The stock is pattern welded from two carbon steels. This means that the hardware is susceptible to rusting, and will need extra considerations for maintenance. Going with something like brass or stainless, this would not be a problem at all, and would be relatively maintenance free. However, this is a very special instrument for myself personally, and is something I should really take care of and not just throw to the side. Having carbon steel hardware, beyond just aesthetics and theme, means that I have to really pay extra attention and take care of the instrument. If the damascus hardware is rusting, it means I am not playing or taking care of it enough!

The fully skinned dou has returned from Kyle! It is a massive relief to get this phase done and the dou safely returned after making a round trip literally across the US. Finally seeing Hibiki in real life, I am even more excited now to finish this up and start playing! I have never owned a shamisen with truly tight or professional grade skin before, so having a skinning job of this caliber is really awesome and a big motivator. (I’d post a picture, but I can’t get one as good as the one already posted above sent from Kyle!)

Also, the machinist finished the custom zagane and decorative screw cap a week earlier than expected, with plenty of the metal stock leftover. From the picture he sent, it looks like they came out fantastic. I will pick them up Monday, etch them, and start the fitting process this week.

In terms of design, the zagane are made to sit flush to the tenjin. The center itomaki holes are straight through, however the top and bottom ones are designed with an 8 degree angle on the flange. The flange portions also include some angled cuts, and are overall a bit thicker and larger to show off the etched metal pattern. All of the zagane have tapered bores machined into them as well, with matching tapers from the large to small zagane for the itomaki to be fit to.

For etching, the parts will be submerged in a ferric chloride bath, then go through a coffee etch (which is a very popular technique in the knife making community) to further bring out the color contrast in the steel.

For gluing, I know Kyle has mentioned that professional grade superglue is the stuff typically used. Epoxy is also another option. However, since these pieces were a bit on the costly side, if I ever wanted to do some refurbishment in the future, I may want to consider making them removable. Researching a bunch of options, apparently fish glue has been used historically as a reversible glue for bonding wood to metal, which works better than hide glue in this case due to fish glue’s ability to deal with the differences in expansion and contraction between the wood and metal. I am going to run a few tests to see how strong the joint is first before gluing. It can be made strong, however the surfaces must be super clean, and the metal should be cleaned, scored, and removed of oxides prior to gluing.

In parallel with fitting the zagane, I will also be working on the custom sawari design. I already got the first pieces ready to begin the build, and will post some pictures through the week of the progress. I will also share some shots of the tenjin as well, which hasn’t been revealed yet.

2 Likes

Finally having the dou back with hibiki got me really curious to see how it sounded. Over the weekend, my impatience got the best of me, and I just had to try and gauge the tone of the dou with Hibiki. The sao and tenjin are not ready for stringing yet, however I ended up taking the neck from a chuzao shamisen I bought years ago but never skinned and put it on the dou to try and test the sound. Despite the fact that the holes in my dou were way bigger than the chuzao nakago, and the nakago just barely made it through for me to attach an old neo I had, and the string tension held it in place well enough or me to at least get a glimpse of the sound. I already had second and third tsugaru shamisen strings with a tsugaru bridge, and substituted the first string with a solid nylon guitar string I had used in the past.

One major thing I have been increasingly worried about going back and forth with Kyle on was how the varnishing on the inside of the dou would affect the tone. Originally, I was going to varnish and gold leaf the inside with 24k leaf, but fortunately Kyle talked me out of that one. From his experience with the Kokoa build with the urushi inside, the tone ended up being too bright and harsh, especially with the sawari effect. I ended up applying two layers of Tru Oil varnish on the inside, but it has been bothering me since.

Varnishing the inside was a gamble, however this first sound test definitely put my mind to ease! While I couldn’t test the full dynamic range, as well as not having the actual neck locked in with a silk first string I don’t know the complete tone for now, but so far I am very happy with it! At least with this initial test it doesn’t sound excessively harsh like I was worried about. The tone is bright and clear tone without too much resonance or sustain despite the varnished inside, which I was worried would lead to overtone ringing in particular. I still have to see how the sawari sounds with a silk first string, but I don’t think I need to be worried anymore about the tone at this point! Getting a first appetizer of the tone now has made me even more determined to finish as fast as possible and begin playing, I want to hear more!

4 Likes

Finally got around to taking some pictures of the full sao to show off the topwood! I have actually documented this build extensively over the years, and probably have a couple hundred pictures of the whole process (the full laminations for everything was extremely involved), and I will have to see about posting the entire build someday. For now though, here is the end result:

The topwood is camatillo, an extremely hard and dense member of the rosewood family. This particular wood has a quite striking purple heartwood with black streaking through the grain. Here you can see the main feature of the topwood - the purple heartwood with a thin waving cream-colored sapwood running along the edge:

Of course like every part of this shamisen there is a backstory. This is actually the second fingerboard I cut for the sao. Initially, I spent a long time browsing different woods I wanted for this feature. Ebonies and typical rosewoods are extremely common for stringed instruments, and I wanted something a bit different that wasn’t commonly used, with unique coloring or features, as well as being very hard and dense. I stumbled across camatillo by chance, and was drawn in by the deep purple tones and streaking. The wood was already offered as fingerboard stock for a bass guitar build, so it was already the perfect thickness as well as being wide enough and long enough for the shamisen sao. The wood that came in had mostly heartwood, with the sapwood streak along one edge.

Originally, I cut the blank to use just the heartwood. I had the sao all prepped and ready for gluing, but decided to pause at the last minute.

Looking at it more, I thought the second unused half, which consisted of the heartwood and sapwood, could make for a more unique and interesting topwood. I had also remembered seeing some amazing bass guitar and ukulele builds that had a stunning mix of padauk sapwood and heartwood in the build, which I always thought was just so cool. After a lot of thought, I decided to switch over to this piece you see here. I ended up really lucking out that the remaining piece I cut was just wide enough for the sao after trimming.

The name for the shamisen, Masamune, was actually born from this feature soon after. Gluing the fingerboard and trimming the edges down to the proper width, the thin and wavy sapwood against the darker purple heartwood immediately reminded me of hamon patterns seen on forged Japanese blades. Goro Masamune, the most famous of all Japanese swordsmiths, crafted exquisite blades that were the stuff of legend, as well as having pioneered numerous new techniques and refining sword-craft to new levels. Starting this project years ago I was a bit overly ambitious, and also wanted this shamisen to be of “legendary” status. Further inspired by the natural feature and the work of the famous craftsman, Masamune shamisen was officially born, setting the course for the custom hardware theme that would eventually follow!

4 Likes

Aaaaah, yes, lovely!!! And now it makes sense, I was wondering what does a swordsmith have in common with this shamisen :slight_smile: Very nice!

1 Like

Some new pictures showing more detail of the tenjin!

Like the dou, the tenjin follows a similar lamination pattern with the figured bubinga on the sides, followed by thin strips of curly maple, and Australian red mallee burl in the center. For the tenjin, I wanted to show off more of the mallee burl, so I inverted the proportions between the bubinga and burl for a larger central piece.

The tenjin itself is made up of 8 pieces - 5 for the main tenjin block in the laminated pattern of the dou, and 3 pieces of camatillo to continue the sao fingerboard pattern.

As a major feature of the sao design, I wanted to have the sapwood continue up from the sao through the tenjin. This was a bit tricky positioning the cuts of camatillo at the joint between the sao and tenjin to achieve this effect. The chibukuro is also neither standard cut nor obi cut, and like the saruo, ended up slightly different from my initial design, evolving on its own as I carved it into the tenjin.

Originally on the sides at the outside of the kuro aze I was just going to cut the wood back to the mallee burl, but working more at it I decided to stop at the curly maple as it has very nice chatoyancy to it when polished, provides a bit of a bright contrast to the darker woods around it, and and adds some contrast for the darker-etched steel zagane to stand out against. The extra lamination also adds a bit of extra support for the burl wood to help prevent it from cracking, as burl can be fragile under mechanical stress. Particularly at the chibukuro, the lamination of woods creates a patterned striping effect as the layers are filed back, which matches up with the maple strip running along the kuro aze.

Finally, a look at the back of the tenjin. Overall the tenjin is a bit thicker than standard, for both the custom zagane as well as a slightly heavier feel (personal preference in design).

4 Likes

Hi Michael! I have been following your amazing build from day 1 that you posted. Actually, I commented on Facebook when Kyle shared your Dou. This is incredible man. I really applaud your originality as well. It is very inspiring. I can’t wait to see your finished Shamisen! I am building a couple of them myself. I am not a very experienced wood worker so the journey has been very challenging but mostly rewarding. I wouldn’t call mine original though, especially after seeing yours! Bravo Michael!

1 Like